This blog is a part of a series on the Data Science Pilot Action Set. In this blog we review all nine actions in Python.
Have you noticed the button bar in the upper right-hand corner of the SAS Visual Data Mining and Machine Learning Programming Guide?

This button bar allows you to view the programming guide in one of four languages! Clicking a new language causes the syntax and examples throughout the guide to reflect your choice. This button bar makes it easier to code in languages beyond SAS and CASL. For this blog, I suggest viewing the documentation in Python.
This blog will go over the Data Science Pilot Action Set from Python. For examples in SAS, please view the others blogs in the Data Science Pilot Explained Series. The Data Science Pilot Action Set is included with SAS Visual Data Mining and Machine Learning (VDMML) and consists of actions that implement a policy-based, configurable, and scalable approach to automating data science workflows. The example featured in this blog can be found on the SAS Software GitHub page.
The Scripting Wrapper for Analytics Transfer (SWAT)
Before you can begin coding in Python, you need the Scripting Wrapper for Analytics Transfer, also known as SWAT. SWAT is a package that allows you to create a connection to SAS. SWAT can be installed using pip and then imported into your project like any other Python library. Next, you create your connection to SAS Viya using your credentials.

The final step before you can begin using SAS analytics from Python is to load your action sets.

Connecting to Data and Creating Variables
I am using home equity data for predicting loan defaults. I will use the read_csv() function to read my data.

To make modeling easier, I am going to define variables to hold my target information and my policies.

Data Exploration Actions
The Data Science Pilot Action Set include four actions for data exploration and data understanding. These actions create a scalable approach to understanding data and data quality issues.
The exploreData action
The exploreData action automatically calculates various statistics for each column in your data. In addition, the exploreData action will group variables according to their data type and their values on various statistical metrics. These groupings allow for a pipelined approach to data cleaning. Furthermore, there is an optional explorationPolicy. This policy specifies how the data is grouped together.

The exploreCorrelation action
The exploreCorrelation action performs a correlation analysis with your data. This action will take care of managing data types and the appropriate correlation measures with no additional user input required.

The analyzeMissingPatterns action
The analyzeMissingPatterns action helps a data scientist better understanding missingness in their data set. Before you throw out a column because of missing data, check to see if that missingness has any meaning.

The detectInteractions action
The detectInteractions action will assess the interactions between each pair of predictor variables and the target.

The screenVariables action
The screenVariables action recommends to keep, transform, or remove variables. This recommendation is based off of several factors including missingness, consistency, redundancy, variance, leakage, and more. By editing the screenPolicy, you can control how much data messiness is acceptable.

Feature Engineering and Selection Action
The feature engineering and selection actions creates numerous features from your input data, but it will only keep the best performing features. As a result, your newly generated feature set is exponentially more powerful than your input data alone.
The featureMachine action
The featureMachine action not only generates new features, but it also explores the data and screens variables. That means that this action can also take on data exploration. When it comes to new features, this action creates everything but the kitchen sink. The list of transformations includes missing indicators, several types of imputation, several types of binning, and much more. Unfortunately, the featureMachine action doesn't include any subject matter expertise. This action won't replace domain knowledge in feature generation, but it has everything else covered. The featureMachine action includes the explorationPolicy and screenPolicy, and the transformationPolicy. The explorationPolicy specifies how the data is grouped together, the screenPolicy controls how much data messiness is acceptable, and the transformationPolicy defines which types of features to create.

The generateShadowFeatures action
The generateShadowFeatures action performs a scalable random permutation of input features to create shadow features. These shadow features can be used for all-relevant feature selection or post-fit analysis using Permutation Feature Importance (PFI).

The selectFeatures action
The selectFeatures Action will filter features based on a specified measure. Using the selectionPolicy, you can specify the measure you want to filter on and how many features you want.

Automated Machine Learning Pipeline
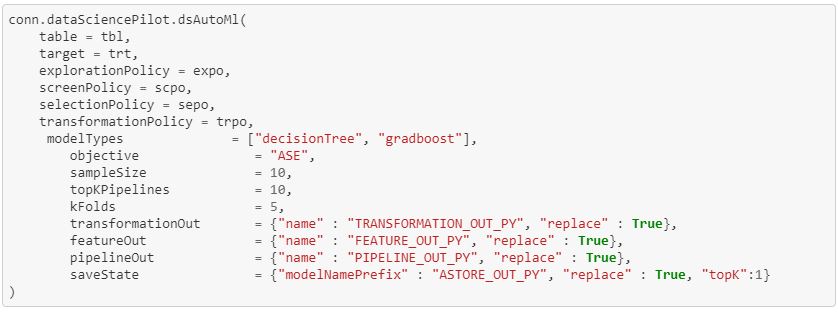
The dsAutoMl action does it all. It will explore your data, generate features, select features, create models, and autotune the hyper-parameters of those models. This action includes all the policies we have seen before: explorationPolicy, screenPolicy, transformationPolicy, and selectionPolicy. The dsAutoMl action builds on our prior discussions through model generation and autotuning. A data scientist can choose to build several models such as decision trees, random forests, gradient boosting models, and neural networks. In addition, the data scientist can control which objective function to optimize for and the number of K-folds to use. The output of the dsAutoMl action includes information about the features generated, information on the model pipelines generated, an analytic store file for generating the features with new data, and analytical stores for the top performing models.

Conclusion
The Data Science Pilot Action Set makes data science much easier through its scalable and comprehensive approach to machine learning. In this blog series, I have discussed each action in depth and used each action in both SAS and Python. Feel free to check out the other blogs in this series and my Jupyter Notebook on the SAS Software GitHub page!


