Welcome to the continuation of my series Getting Started with Python Integration to SAS Viya. In this post I'll show how to create user defined functions (UDFs) for the distributed CAS server using the SWAT package. Once the UDF is created you can use it on the CAS server with programming languages like Python, SAS, R and more!
Load and prepare data in the CAS server
First, I'll create some fake data to use. This script will create a simple pandas DataFrame, upload it to the distributed CAS server, and then views the data. The data in this example is small for training purposes. Processing data in the CAS server's massively parallel processing environment is typically reserved for larger data. In the script below make sure to add your specific CAS connection information.
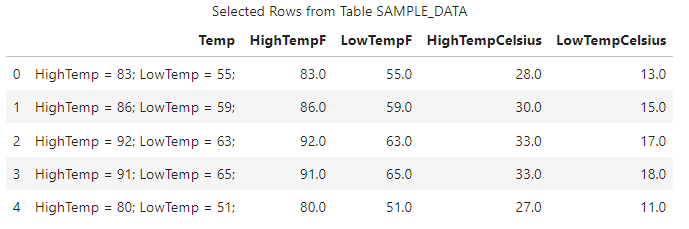
## Packages import swat import pandas as pd import numpy as np ## CAS connection information conn = swat.CAS(Enter your connection information) ## Create a pandas DataFrame df = pd.DataFrame([ "HighTemp = 83; LowTemp = 55;", "HighTemp = 86; LowTemp = 59;", "HighTemp = 92; LowTemp = 63;", "HighTemp = 91; LowTemp = 65;", "HighTemp = 80; LowTemp = 51;", ], columns=["Temp"]) ## Load the pandas DataFrame to the CAS server as a distributed CAS table castbl = conn.upload_frame(df, casout = {'name':'TEMPDATA', 'caslib':'casuser', 'replace':True}) ## Preview the CAS table display(conn.tableInfo(caslib = 'casuser'), ## Display available in-memory CAS tables castbl.head()) ## Display 5 rows of the castbl |
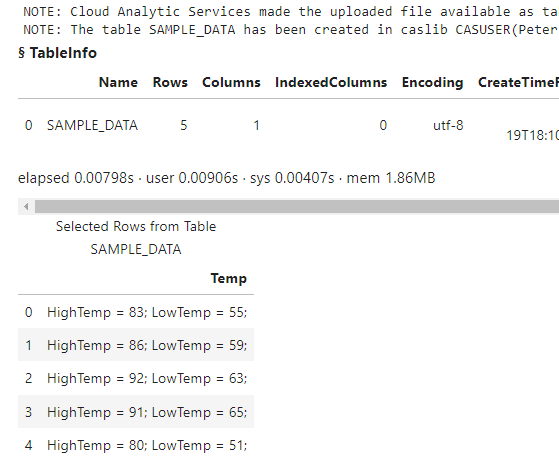
The results show the DataFrame was uploaded to the distributed CAS server in the table SAMPLE_DATA and contains a single character column.
Objective
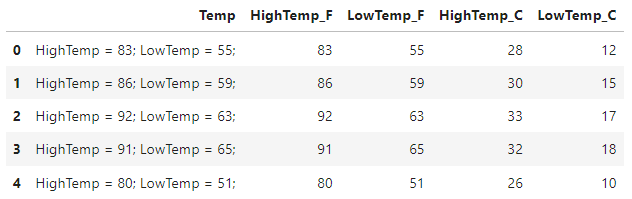
My objective is to obtain the numeric Fahrenheit values from the string and place them in their own columns. Then, use the numeric Fahrenheit values to create two new columns with the Celsius values. My final data should look something like this:
There are a variety of ways this problem can be solved. However, in my solution I want to create two UDFs to accomplish this task. Then, the UDFs can be used by other users.
Pandas Solution
I'll start by solving this using Pandas and then compare it to my SWAT solution. For my solution, I'll create two Python functions and apply them to the DataFrame. I won't go into detail on the Pandas code.
## ## Create function to get desired number (this is nice with Pandas) ## ## Separate statements in a column and obtain the number def get_numeric_value(data, column, position): return (data[column] .str.split(';') ## Split all statements by ; .str[position -1] ## Get the statement by position (Use 1,2,3 instead of 0,1,2) .str.split(' ') ## Split the single statement by a space .str[-1] ## Pull the last element (the number) .astype('int')) ## Convert the characer column to a numeric column ## Convert Fahrenheit to Celsius def convert_f_to_c(data, col): temp_column = data[col] celsius_temp = ((temp_column - 32) * (5/9)).astype('int') return celsius_temp ## Create the final DataFrame final_df = (df .assign( HighTemp_F = get_numeric_value(df,'Temp',1), LowTemp_F = get_numeric_value(df,'Temp',2), HighTemp_C = lambda _df: convert_f_to_c(_df, 'HighTemp_F'), LowTemp_C = lambda _df: convert_f_to_c(_df, 'LowTemp_F') ) ) final_df.head() |
The results show that the temperature values were obtained from the Temp column using the get_numeric_value user defined function and created the HighTemp_F and LowTemp_F columns. Then I used the convert_f_to_c function to convert the Fahrenheit values to Celsius, and created the HighTemp_C and LowTemp_C columns.
SWAT Solution
Next, I'll solve the same problem using the SWAT package with two UDFs. The key here is that these functions will run on the distributed CAS server, and can be used with other languages like SAS and R on the SAS Viya platform.
First, I'll load the fcmpact CAS action set. You can do that using the loadActionSet action. Loading an action set is like importing a package in Python.
conn.loadActionSet('fcmpact') ## and the results NOTE: Added action set 'fcmpact'. |
Next I'll create the UDFs. The fcmpact action set contains a variety of CAS actions (or methods). We will need to use the addroutines action. The addroutines action requires a few parameters. The main parameter is the routineCode parameter. The routineCode parameter specifies the FCMP routine's code (or function) as a string. This part does take a bit of SAS knowledge, but the general idea is the same.
I'll create the same functions as above, but this time use the SWAT package with FCMP routine code. I'll store each function in a string variable corresponding to the function. I could of done this in a single string, but I like to separate them. A few notes about the routine code:
- You start a function with the the FUNCTION statement and end it with the ENDSUB statement. After the FUNCTION statement you specify the function name and arguments. If the argument is character it requires a $ sign after the argument.
- In the get_temp_value function I use the SAS SCAN function similarly to how I used the Pandas split method to select part of a string. Then I use the SAS INPUT function similarly to the Pandas astype method to convert the character value to numeric.
- In the f_to_c function I use the formula to convert Fahrenheit to Celsius. I use the SAS ROUND function to round the value to a whole number.
## Separate statements in a column and obtain the number get_temp_value_func = ''' function get_temp_value(colname $, position); /* Get the statement by position */ get_statement_from_position = scan(colname, position,';'); /* Get the number from the string */ get_number_as_string = scan(get_statement_from_position, -1, ' '); /* Get the number from the statement and convert to a numeric column */ convert_string_to_numeric = input(get_number_as_string, 8.); /* Return numeric value */ return(convert_string_to_numeric); endsub; ''' ## Convert Fahrenheit to Celsius f_to_c_func = ''' function f_to_c(f_temp); /* Convert the Fahrenheit temp to Celsius */ c_temp = round((f_temp - 32) * (5/9)); /* Return celsius value */ return(c_temp); endsub; ''' |
After the routine code is created, use the addroutines action to create the functions in CAS. The addroutines action creates an in-memory CAS table with the function definitions. In the action I'll use the following parameters:
- The routineCode parameter specifies the FCMP routine's code that is saved to the table. In this parameter I'll concatenate the two strings with the routine code from above.
- The appendTable parameter specifies to append the new functions to an existing CAS table. In this example it's not required since I'm not appending the functions to an existing table . If you need to add new functions to an existing CAS table, this is required.
- The funcTable parameter specifies the table name and location where the FCMP function is written. Since UDFs are stored in CAS tables, make sure you specify the CAS table name and caslib. If you want to share the functions with other users, use a caslib that others have access to.
- The saveTable parameter specifies if the FCMP table should be saved to disk. If the value is set to True, the action saves the file to disk in the specified caslib using the name of the CAS table from above (in all uppercase) with the sashdat extension. Once the CAS table is saved to disk, you (or others) can load this file into memory anytime you need the functions. Think of it as importing a package in Python.
## Add UDF to functions CAS table conn.addroutines(routineCode = get_temp_value_func + f_to_c_func, saveTable = True, funcTable = {'name':"my_udfs", 'caslib':'casuser'}, appendTable = True) ## and the results NOTE: Cloud Analytic Services saved the file MY_UDFS.sashdat in caslib CASUSER(Peter). |
The results show the CAS table was saved as a sashdat file as expected.
By default, the addroutines action creates the in-memory table. I can confirm the CAS table is in-memory by using the tableInfo action.
conn.tableInfo(caslib = 'casuser') |
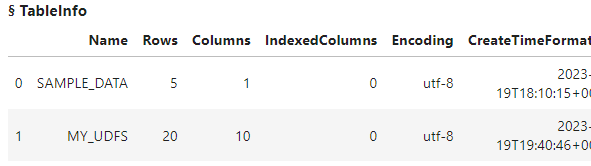
The results show that the addroutines action automatically creates and loads the MY_UDFS CAS table into memory. That table contains the function definitions. If the functions were already created and the table was not loaded into memory, you can use the loadfcmptable action to load the sashdat file you created above into memory.
conn.loadfcmptable(table = 'MY_UDFS.sashdat', caslib = 'casuser') ## and the results ERROR: The table MY_UDFS already exists in caslib CASUSER(Peter). ERROR: The action stopped due to errors. |
The results here return an error since the CAS table is already in-memory. If the CAS table wasn't loaded into memory, you would need to load the file.
There is one more step before we can use the functions. We have to modify the cmplib option using the setSessOpt action. The cmplib option specifies one or more CAS tables that contain the functions. By default, the CAS server won't know that these functions exist and you will receive an error.
conn.setSessOpt(cmplib = 'casuser.my_udfs') |
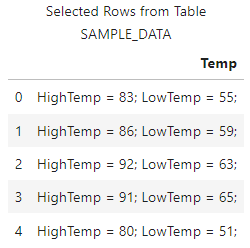
Once the functions are created and the cmplib system option is set, you can use the functions. I'll start by executing the SWAT head method on the CASTable object to view the data.
castbl.head() |
Next, use the new functions. I'll use the SWAT eval method to create new columns with the UDFs. I'll add the head method at the end to return a preview of the results. This helps validate that the functions did what I expect before I use it on the entire CAS table if the table was larger. For more information on creating columns check out my previous post.
## The inplace = False parameter temporarily adds the parameter to the object and returns another CAS table. This enables chaining methods. (castbl .eval("HighTempF = get_temp_value(Temp,1)", inplace = False) .eval("LowTempF = get_temp_value(Temp,2)", inplace = False) .eval("HighTempCelsius = f_to_c(HighTempF)", inplace = False) .eval("LowTempCelsius = f_to_c(LowTempF)", inplace = False) .head() ) |
The results show that the functions worked!
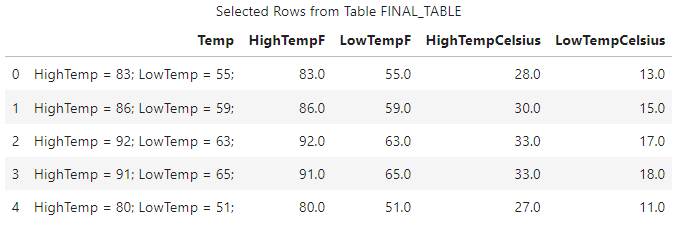
Now that everything looks good I'll create my final CAS table with the prepared data. I'll use the copyTable action to create a new distributed CAS table named FINAL_TABLE in the Casuser caslib.
(castbl .eval("HighTempF = get_temp_value(Temp,1)", inplace = False) .eval("LowTempF = get_temp_value(Temp,2)", inplace = False) .eval("HighTempCelsius = f_to_c(HighTempF)", inplace = False) .eval("LowTempCelsius = f_to_c(LowTempF)", inplace = False) .copyTable(casout = {'name':'final_table', 'caslib':'casuser'}) ) |
The results show that the CAS table FINAL_TABLE was created successfully.
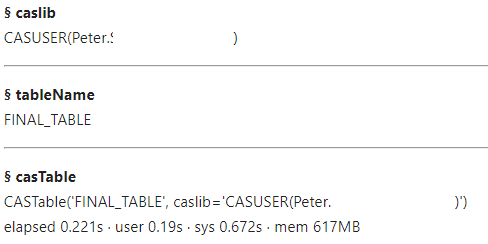
Lastly, I can reference the FINAL_TABLE CAS table and execute the SWAT head method to preview the final data.
finalTbl = conn.CASTable('FINAL_TABLE', caslib = 'casuser') finalTbl.head() |
The results show that the final CAS table is ready to go!
Using the UDFs in SAS
So maybe you are a SAS coder and you have a coworker that uses Python. Your coworker created a great UDF for CAS using Python, and you want to use it. How can you do that? Well, it's pretty easy! Since the function definitions were saved in the MY_UDFS.sashdat file, you can load that into memory in your SAS environment, set the cmplib option, and then use the functions stored in that table!
In this example, the function file was stored in the Casuser caslib which is a personal caslib. To share the functions with others users you must store it in a shared caslib. Anyway, here is the SAS code to use the function that was created with Python. I won't go into detail on the SAS code since this is a Python blog.
/* Create CAS session */ cas conn; /* Create a libref to the Casuser caslib */ libname casuser cas caslib='casuser'; /* Create the test CAS table */ data casuser.tempdata; Temp = 'HighTemp = 83; LowTemp = 55;'; output; Temp = 'HighTemp = 86; LowTemp = 59;'; output; Temp = 'HighTemp = 92; LowTemp = 63;'; output; Temp = 'HighTemp = 91; LowTemp = 65;'; output; Temp = 'HighTemp = 80; LowTemp = 51;'; output; run; /* Load the MY_UDFS.sashdat file into memory to make the function definitions available */ proc cas; fcmpact.loadFcmpTable / table='MY_UDFS.sashdat', caslib = 'casuser'; quit; /* Modify the cmplib option to use the CAS table that has the function definitions */ options sessopts=(cmplib='casuser.my_udfs') cmplib=(casuser.my_udfs); /* Use the function on the distributed CAS server */ data casuser.final_sas / sessref=conn; set casuser.tempdata; HighTempF = get_temp_value(Temp,1); LowTempF = get_temp_value(Temp,2); HighTempCelsius = f_to_c(HighTempF); LowTempCelsius = f_to_c(LowTempF); run; /* Preview the final CAS table */ proc print data=casuser.final_sas(obs=5); run; /* Terminate the CAS session */ cas conn terminate; |
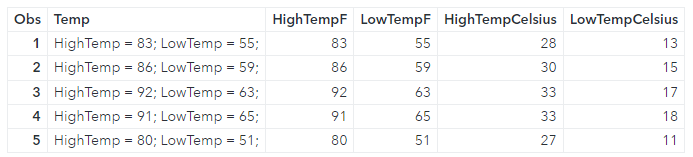
The results show that the CAS table was created using the UDFs. If I look at the log of the DATA step I can see that it ran on the distributed CAS sever.
NOTE: Running DATA step in Cloud Analytic Services. NOTE: There were 5 observations read from the table TEMPDATA in caslib CASUSER(Peter). NOTE: The table final_sas in caslib CASUSER(Peter) has 5 observations and 5 variables. NOTE: DATA statement used (Total process time): real time 0.71 seconds cpu time 0.08 seconds |
Summary
The SWAT package blends the world of pandas and CAS to process your data in a massively parallel processing (MPP) environment. In this example, I focused on creating user defined functions (UDFs) on the CAS server using Python to prepare your data. Then, with the ability to use multiple languages on the SAS Viya platform, you can use these functions in other languages like SAS and R. This enables teams of varying skills to work together!
Additional and related resources
- Getting Started with Python Integration to SAS® Viya® - Index
- SWAT API Reference
- fcmpact.addRoutines CAS action
- fcmpact.loadFcmpTable CAS action
- How does PROC FCMP store functions?
- SAS® Cloud Analytic Services: Fundamentals
- CAS Action Documentation
- CAS Action! - a series on fundamentals
- SAS Course - SAS® Viya® and Python Integration Fundamentals