If you've ever built a machine learning model in Python, you know how quickly things can get messy. Between cleaning your data, transforming features, and training your model, it’s easy to lose track of what happens when—and where bugs might creep in. That’s where Scikit-learn pipelines come in.
Pipelines act like a to-do list for your machine learning workflow, helping you organize each step—from preprocessing to prediction—into a clear, repeatable process. They not only make your code easier to read and maintain but also help prevent common mistakes like data leakage.
In this post, I’ll explain what pipelines are, how to build one from scratch, and how they can help streamline your workflow. Whether you're just starting out or looking to clean up your existing code, this guide will help you build smarter, faster machine learning projects with confidence.
I will be working in SAS Viya Workbench which allows me to seamlessly spin up an environment with all the Python packages, libraries, and computational resources I need.
What are Scikit-learn pipelines?
Imagine you are following a recipe to make a chocolate cake—you wouldn’t randomly take the steps and try to do them all at once; instead, you follow each step in order to create the perfect cake. Similarly, a machine learning workflow requires following each step sequentially: cleaning the data, transforming it, training the model, and then making predictions.
Scikit-learn pipelines organize this workflow into a single, streamlined process that keeps your code clean and manageable. They also simplify hyperparameter tuning, cross-validation, and model comparison.
Setting up your environment
Now that you understand the basics of why we use Scikit-learn pipelines, let’s get your environment set up! SAS Viya Workbench already has all the packages I need, but if you haven’t already, go ahead and install NumPy, Scikit-learn, and Pandas using pip install.

Building your first pipeline
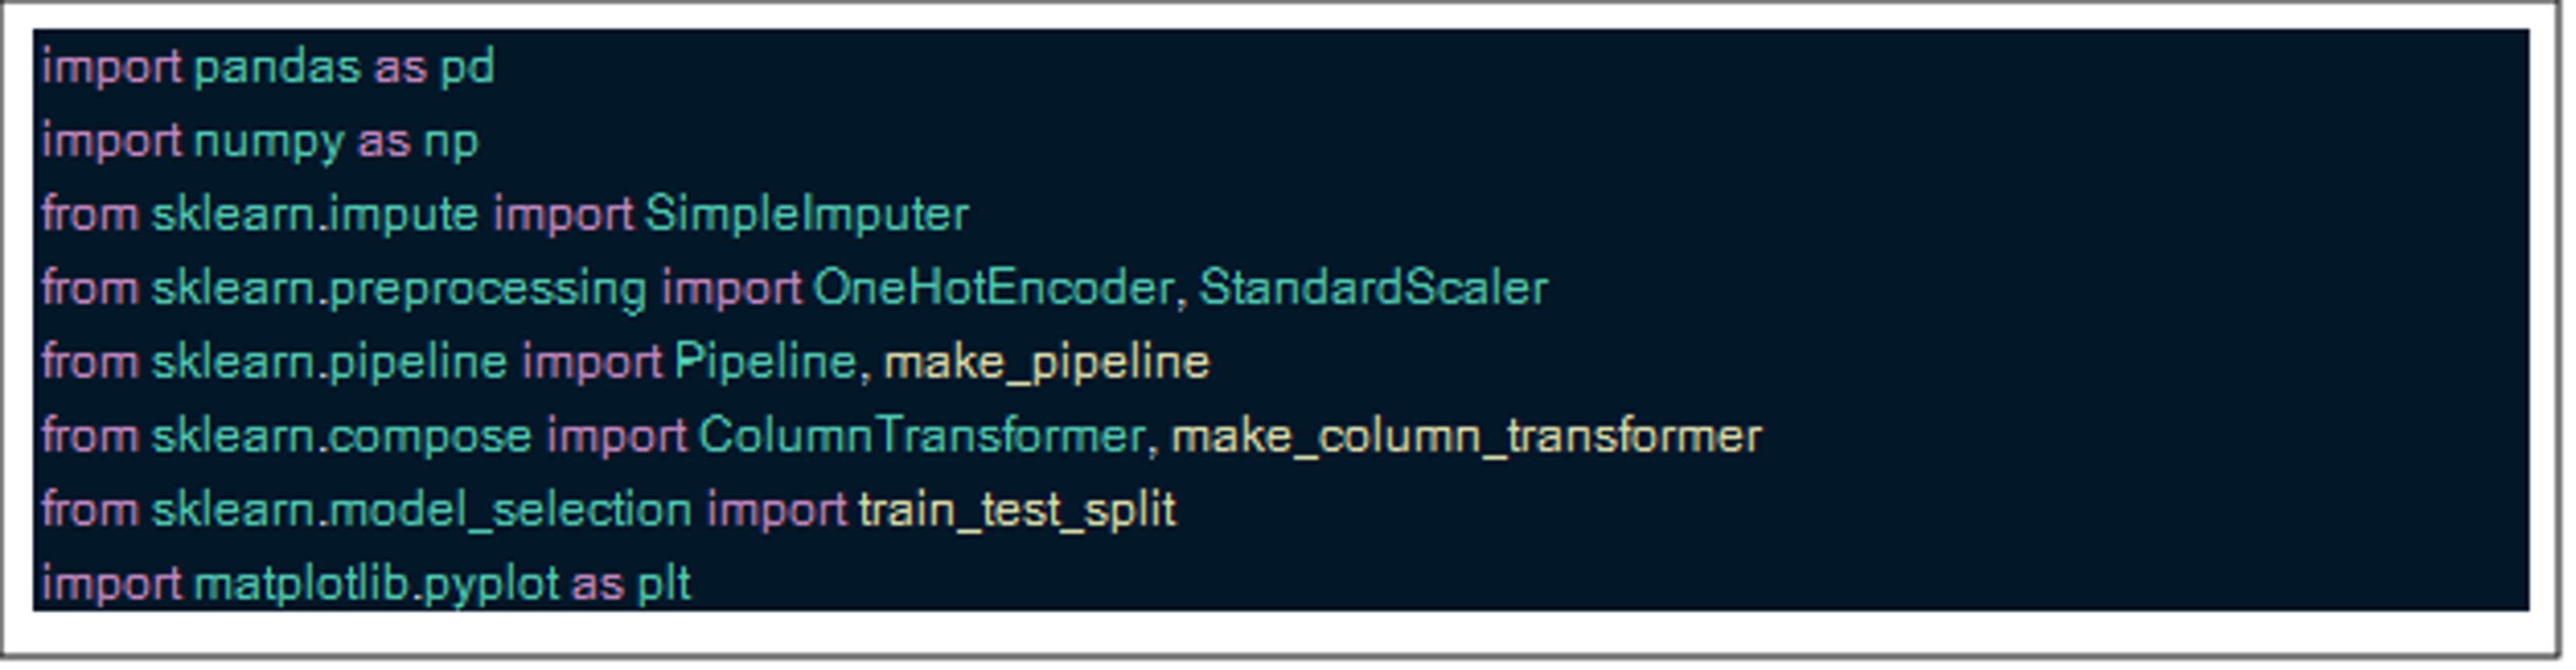
Step 1: Import all packages for the pipeline
The first thing I always do when starting a new project is import all the parts of a pipeline that I need so that everything is in one spot.
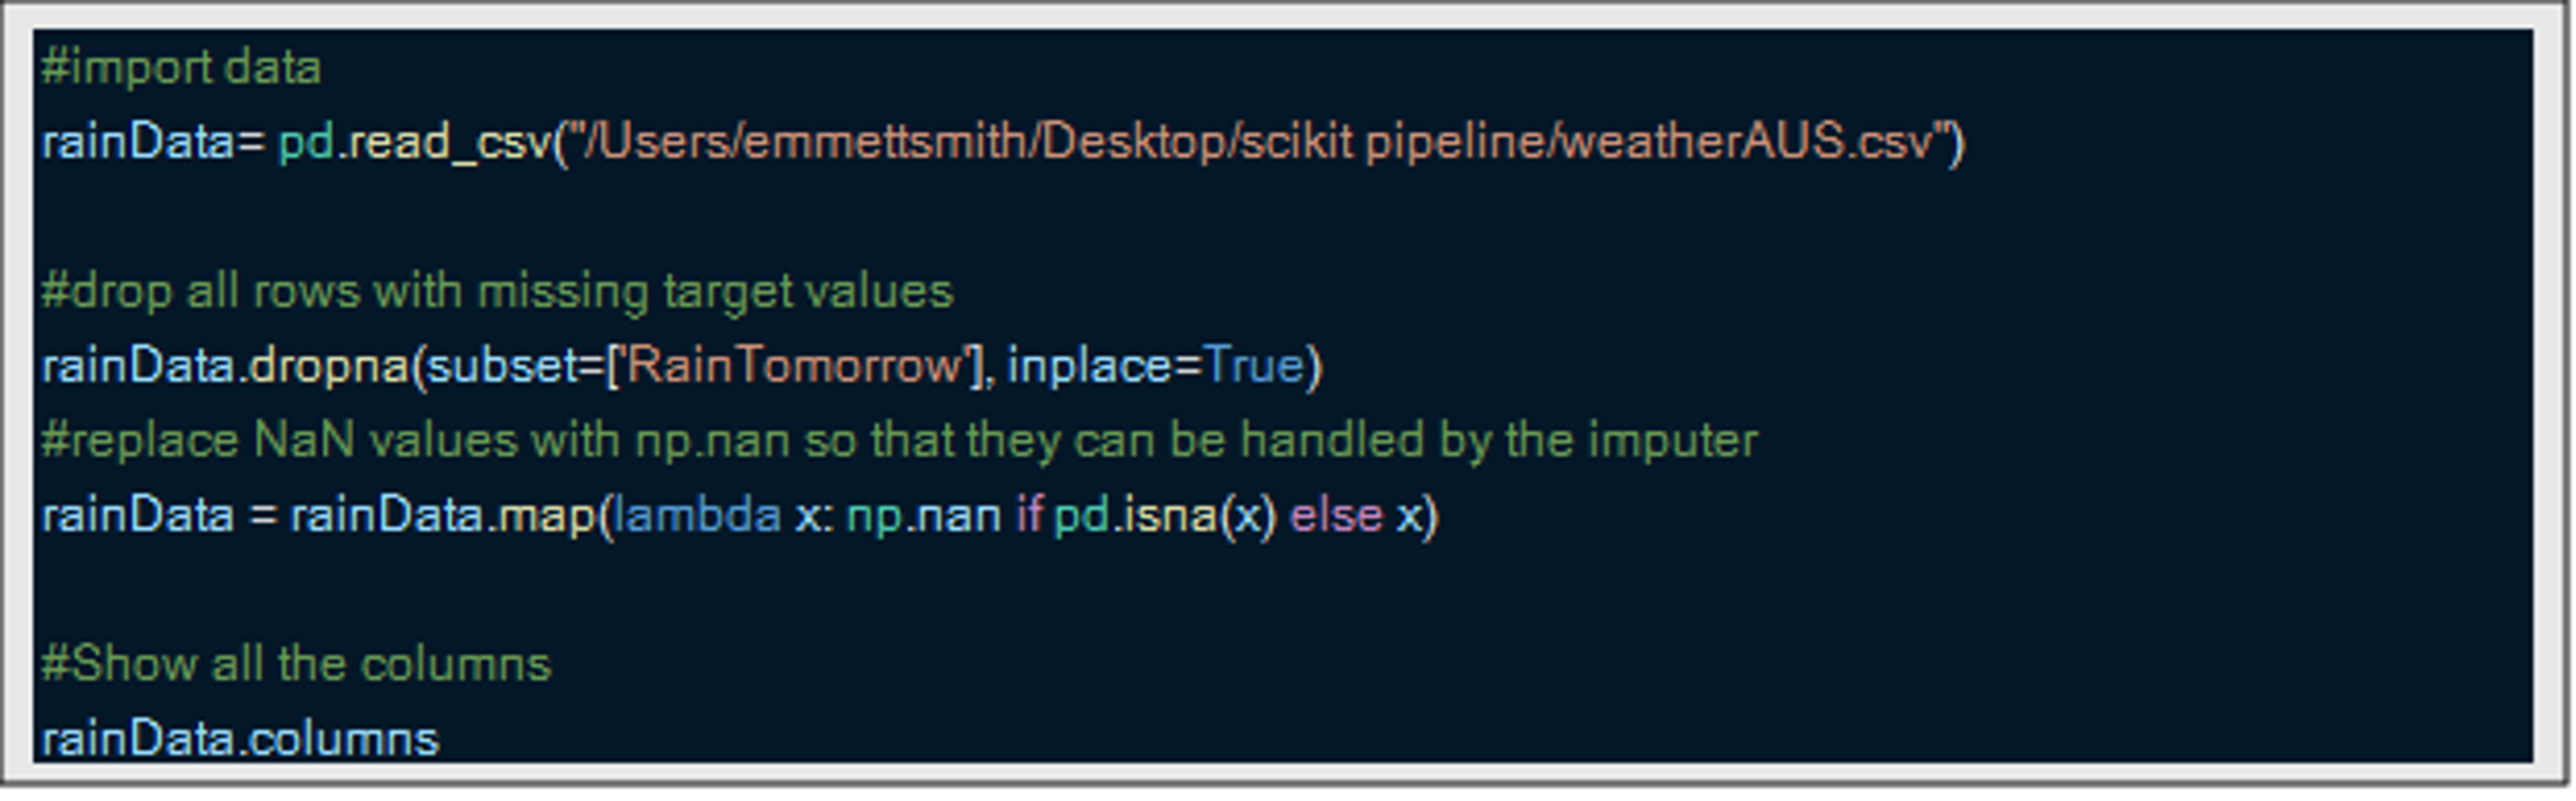
Step 2: Load your data
The first step is to load your data. For this example, I’m using a dataset from Kaggle that predicts rain in Australia based on the previous day’s weather conditions. The dataset contains 20 variables that can help predict whether it will rain the next day. While I won’t dive deeply into the dataset here, it’s important in any data science project to explore the data to fully understand it, select the best preprocessing methods, and choose the best modeling methodologies to test.
I also performed some preprocessing by removing any rows without a target value to predict and converting all missing values to NumPy’s NaN to simplify the preprocessing steps.
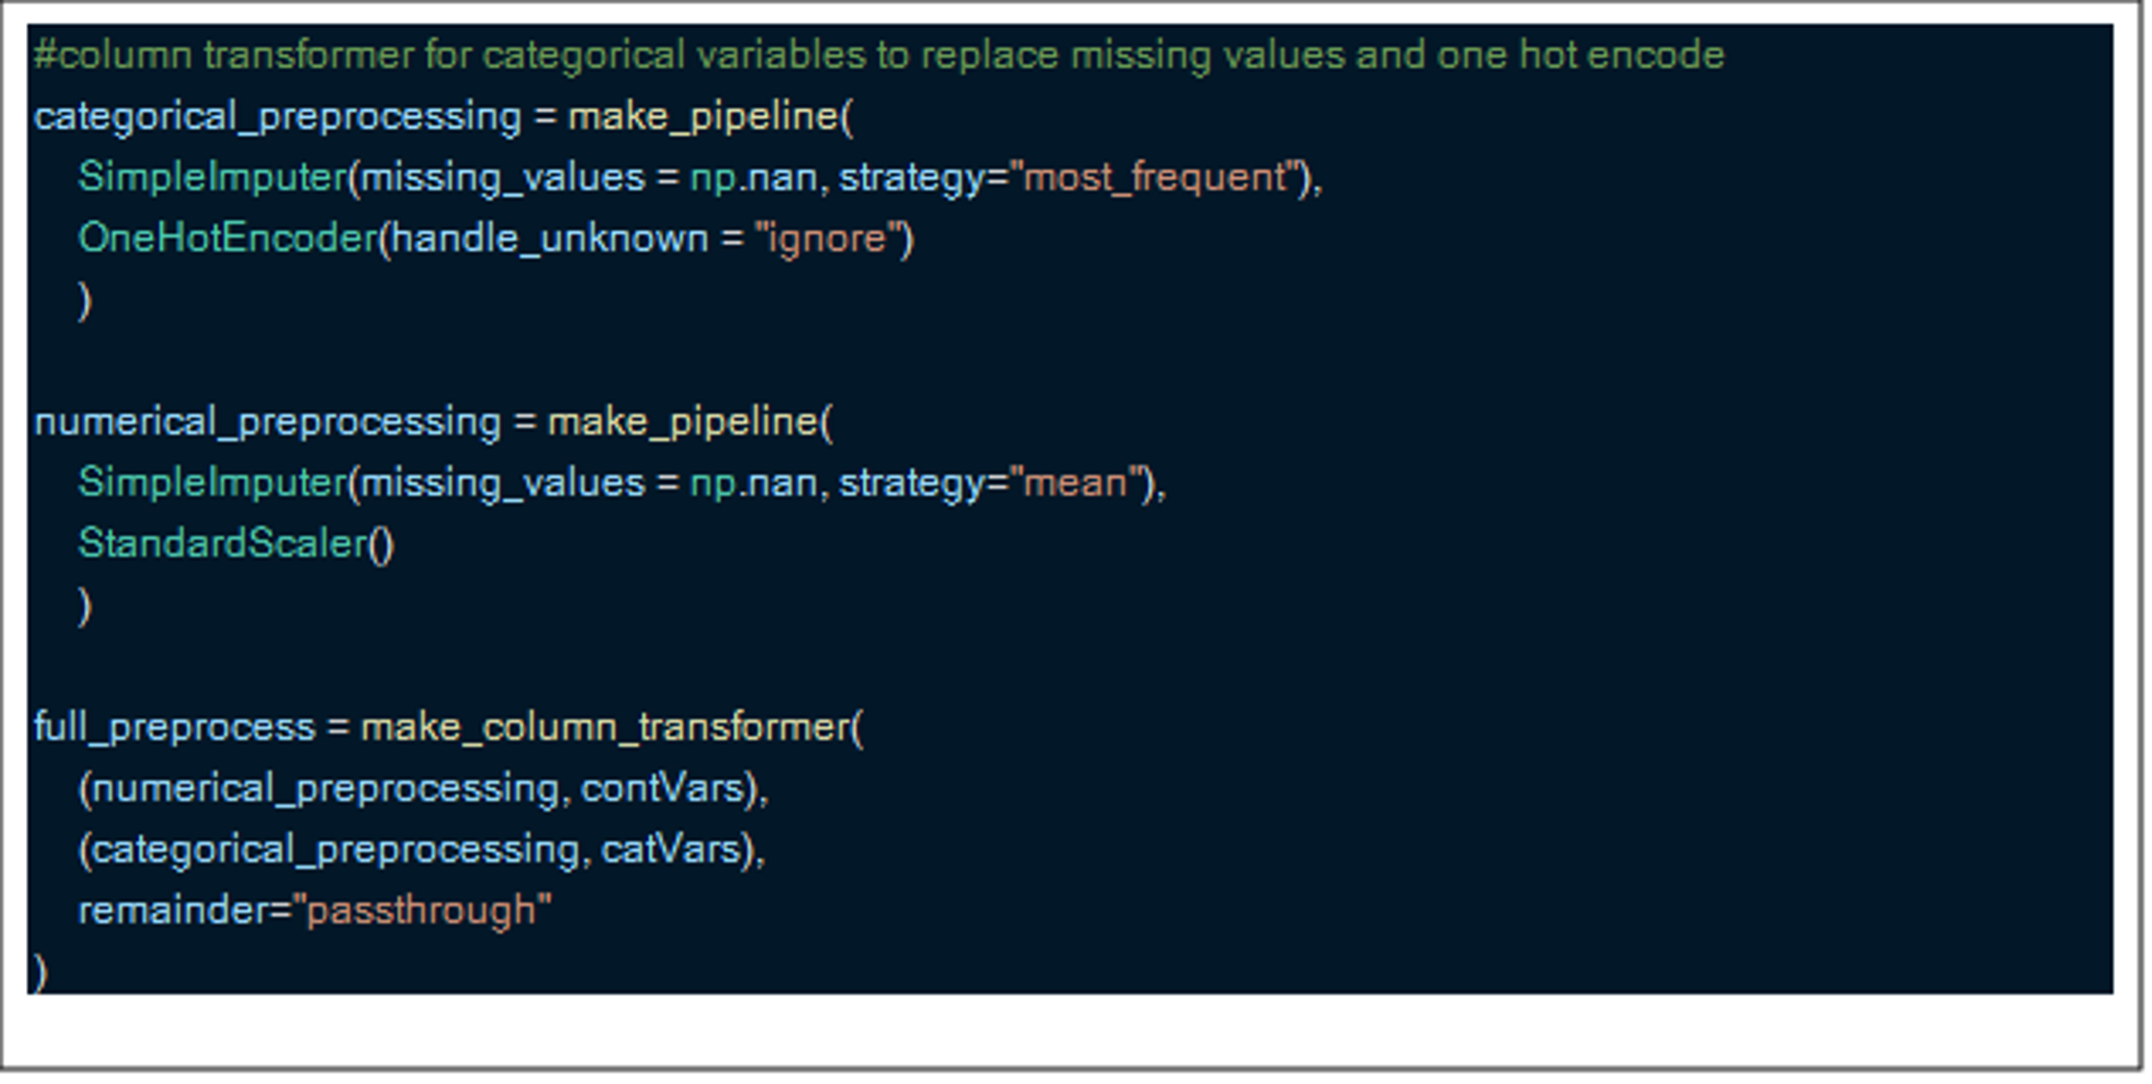
Step 3: Creating a column transformer
You might be wondering what a column transformer is and why it’s necessary. Simply put, most datasets contain both categorical and numerical columns, which require different preprocessing steps. A column transformer allows you to apply different preprocessing steps for each data type.
In this case, I imputed missing numerical data with the mean and applied a standard scaler. For categorical data, I imputed using the most frequent answer and finally conducted one hot encoding. As you can see, each preprocessing feature has its own pipeline which is useful, as the column transformer can run these in parallel to speed up preprocessing.
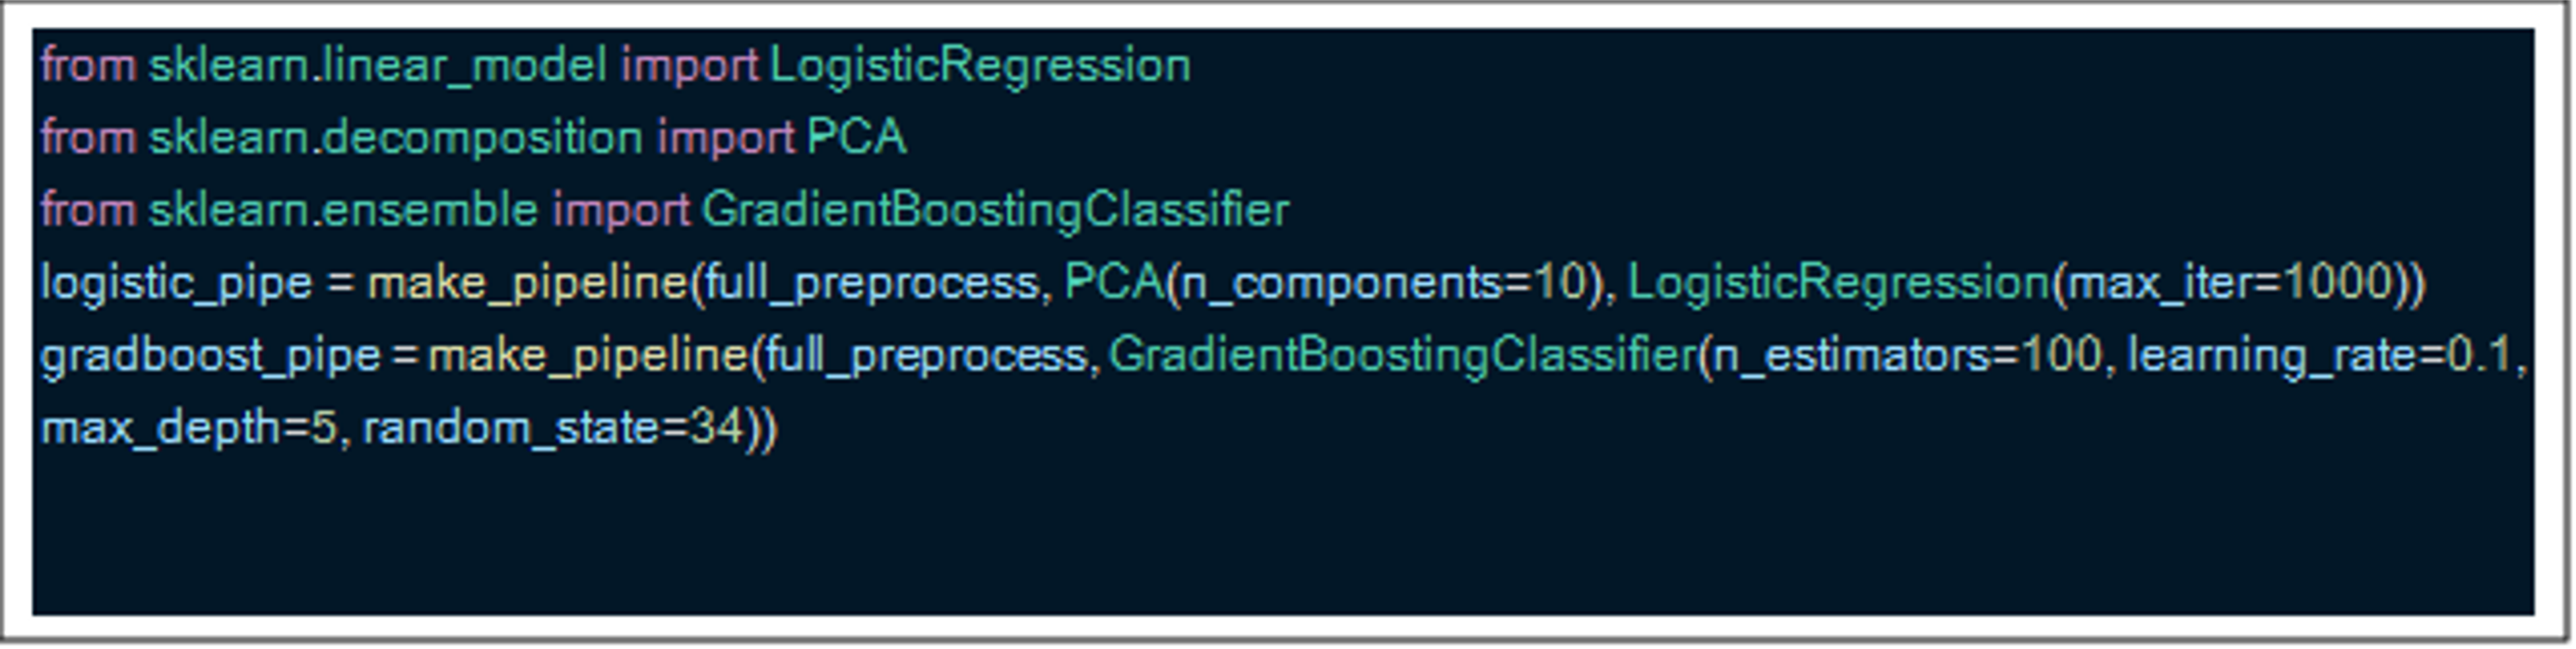
Step 4: Add models to create the full pipeline
I have chosen to show one pipeline of a principal components analysis (PCA) model combined with a logistic regression model, and a second pipeline with gradient boosting. The only difference I had to change was the last step's name, and both pipelines work the same.
Here is a final diagram of the logistic regression pipeline where we can see the two preprocessing pipelines in our column transform before going into our PCA and logistic regression models.

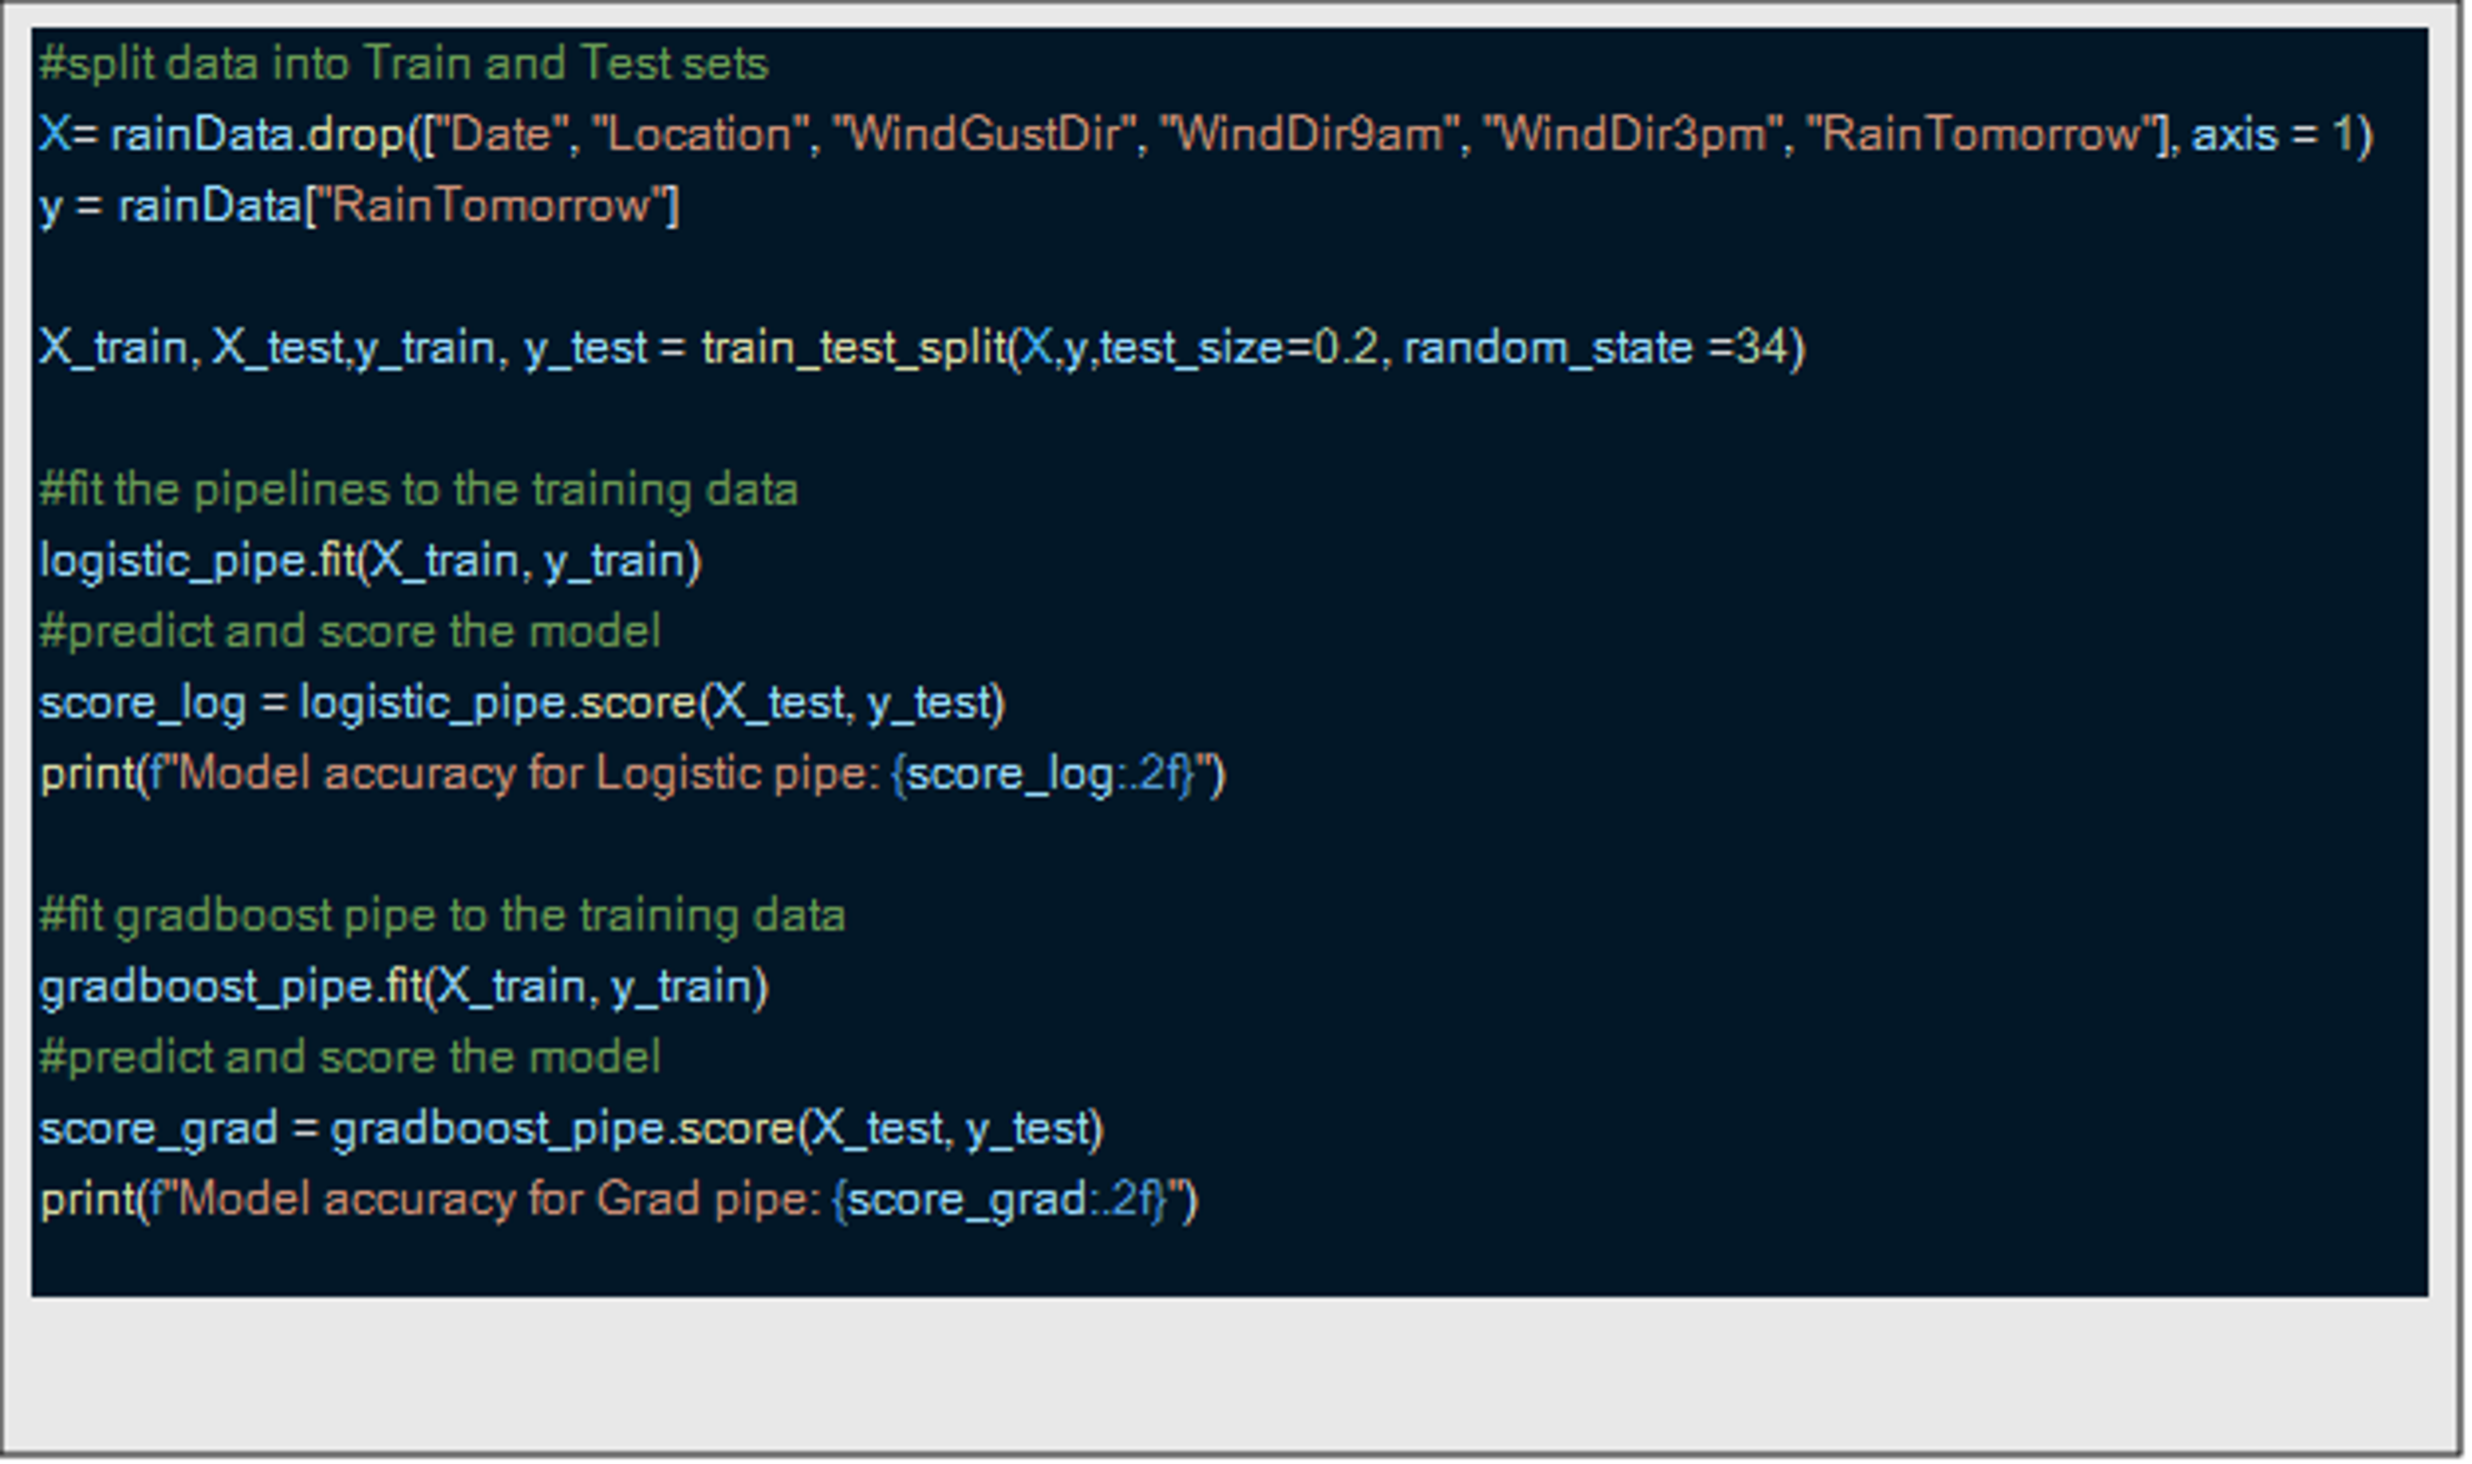
Step 5: Fit and score the models
Finally, I split the data into training and test sets before fitting and evaluating both models. The gradient boosting model outperformed logistic regression by 2 percentage points (85% vs. 83%), but it took 41 seconds to fit and score compared to just 1.6 seconds for logistic regression—an important consideration for production use with large datasets.
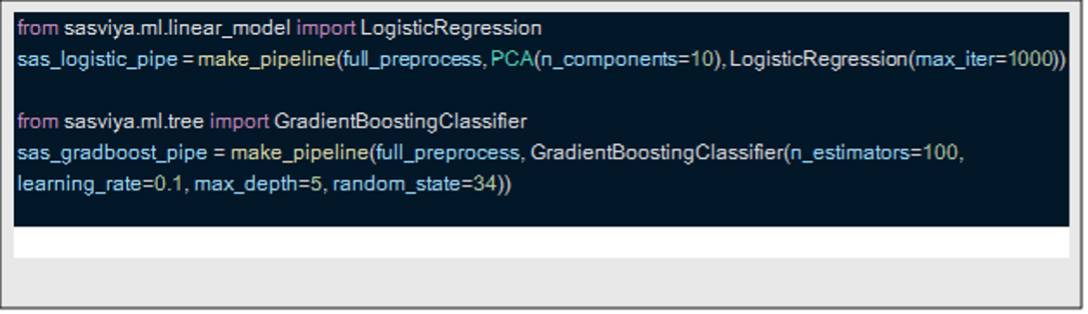
To speed up the pipelines slightly, specifically the gradient boosting model, I also tried the same pipelines but just changed the import statement and created separate pipeline objects. I am only displaying the lines of code that I changed as everything else is the same. This simple change reduced the gradient boosting runtime to 2.5 seconds and logistic regression to just 1 second, demonstrating the significant performance improvements offered by SAS Viya Workbench.
Congratulations! You’ve now created your first pipeline!
Why pipelines matter
Now that you’ve created a pipeline, you might wonder why use one instead of writing code step-by-step. Here are four reasons that may help answer that:
1. Avoiding data leakage
Data leakage occurs when information from outside the training dataset is used to create the model, leading to overly optimistic performance estimates. Pipelines help prevent this by ensuring that all preprocessing steps are applied only to the training data during fitting, and then consistently applied to the test data during prediction.
2. Keeping preprocessing and modeling steps together
By encapsulating preprocessing and modeling steps into a single object, pipelines make your code more modular and easier to manage. This structure reduces the risk of applying inconsistent transformations and simplifies debugging and collaboration.
3. Easier cross-validation and grid search
Pipelines integrate seamlessly with Scikit-learn’s model selection tools. You can tune hyperparameters across the entire pipeline, including preprocessing steps, using tools like GridSearchCV and cross_val_score. This ensures that your evaluation metrics reflect the true performance of the entire workflow.
4. Using joblib for model persistence
Once your pipeline is trained, you can save the entire object—including preprocessing and model steps—for later use. This makes it easy to deploy your model, archive it, or share it with others without needing to re-run the entire training process.
Common pitfalls and how to avoid them
Even with pipelines, there are a few common mistakes to watch out for:
Forgetting to include preprocessing in the pipeline
Preprocessing steps performed outside the pipeline can lead to inconsistencies between training and prediction. Always include all transformations within the pipeline to ensure consistency and reproducibility.
Data leakage from test set
Be careful not to fit any transformation on the entire dataset before splitting into training and test sets. Pipelines help mitigate this risk by ensuring that transformations are fit only on the training data.
Misusing fit_transform vs transform
During training, use fit_transform to learn and apply transformations. During testing or inference, use transform to apply the same transformations without re-fitting. Pipelines handle this distinction automatically, but it's important to understand when working outside of them.
Final thoughts and next steps
Scikit-learn pipelines offer a structured, efficient, and error-resistant way to build machine learning models. They help you:
- Avoid data leakage
- Maintain clean and modular code
- Simplify cross-validation and hyperparameter tuning
- Enable model persistence with joblib
As you continue exploring pipelines, consider learning about:
- FeatureUnion for combining multiple feature extraction processes
- GridSearchCV for tuning hyperparameters across the entire pipeline
- Custom transformers for building reusable preprocessing components tailored to your data
Pipelines are a foundational tool in any machine learning workflow. Start using them early, and you'll build models that are not only more accurate but also easier to maintain and deploy. and find them to be
Pipelines are a foundational tool in any machine learning workflow. Start using them early to build models that are not only more accurate but also easier to maintain and deploy. I encourage you to try them out—you might find them just as useful as I have.
Learn more
- SAS® Viya® Workbench Demo: Solving Your Productivity Challenges
- Download this e-book: Five reasons developers hit a productivity wall – and what to do about it
- Training code, scoring code, and what makes a model
- Predicting Survivor winners with Python: Real-world modeling from 47 seasons of data
- 300 data pipelines + 30,000 models = $100+ million in potential value