In the previous article, we demonstrated how to run CMS-HCC Risk Adjustment Models using SAS Analytics Pro on Viya. Recall that we used the SAS Studio interface to access the demographic and diagnoses input data, set up the model score code and score the input data.
In this third article, we will introduce an alternative approach that surfaces the CMS-HCC Risk Adjustment Model execution through SASPy integration to a Flask application. We will demonstrate how this integration allows a user to score an individual patient/member on-demand, using inputs to an interactive web form to execute the model score code, surfacing the resulting score to the user.
You may be thinking, "Why would I want to do this? Isn’t it sufficient to run the CMS-HCC Risk Adjustment Models manually as necessary?" Of course, there is nothing wrong with running the models via SAS Studio as needed and relying on a person to do so.
However, there are scenarios where an automated approach, less dependent on the active participation of a person and integrated with a third-party application is preferred. For example, you may need your CMS-HCC Risk Adjustment Model to run on-demand based on a 3rd party application that was developed by your clients or you may need to run the models as part of a process that is detached from your SAS deployment.
In these cases, you can take advantage of SAS, SASPy integration and cloud infrastructure to achieve the level of automation and integration required. Rather than the MacBook deployment leveraged in the prior article, we will use a deployment of SAS Analytics Pro Viya on a Linux server instance in Azure.
The following lists the step-by-step process to run the CMS-HCC Risk Adjustment Model through SASPy API integration to a Flask application.
- The Flask application receives the input form data from the web browser as JSON
- Python uses SASPy to connect to SAS Analytics Pro Viya via SSH
- SASPy parses the JSON input into SAS tables
- SASPy submits SAS code with the SAS tables as input to SAS Analytics Pro on Viya
- SAS Analytics Pro Viya runs the code and generates an output SAS table in the output folder
- SASPy accesses the output SAS table and converts it to a Pandas data frame
- Flask exposes the data frame as JSON back to the web browser
To achieve this integrated process, we are going to walk through all the necessary deployment and configuration steps in a video. To follow along, the following items are required:
- Azure subscription
- Azure Linux instance deployed
- License for SAS Analytics Pro Viya – save it under the sasinside folder
- Knowledge of Linux to execute scripts
- Familiarity with Docker containers
- Clone the provided GitHub repository
Watch the video below to see a detailed demonstration of the deployment and configuration steps.
The video follows the whole process with the high-level steps outlined here.
- Deploy an Azure instance with Ubuntu
- Install Docker on this instance
- Clone the GitHub repository
- Install SAS Analytics Pro on Viya container
- Configure password-less SSH
- Build the Flask application container
- Run the Flask application container
- Test password-less SSH from the Flask application container to the SAS Analytics Pro on Viya container
- Configure ports on the Azure instance to confirm it is accessible from my machine
- Run the application on the browser to score a patient/member with the CMS-HCC model
This is the overall architecture of the application found on this GitHub repository.
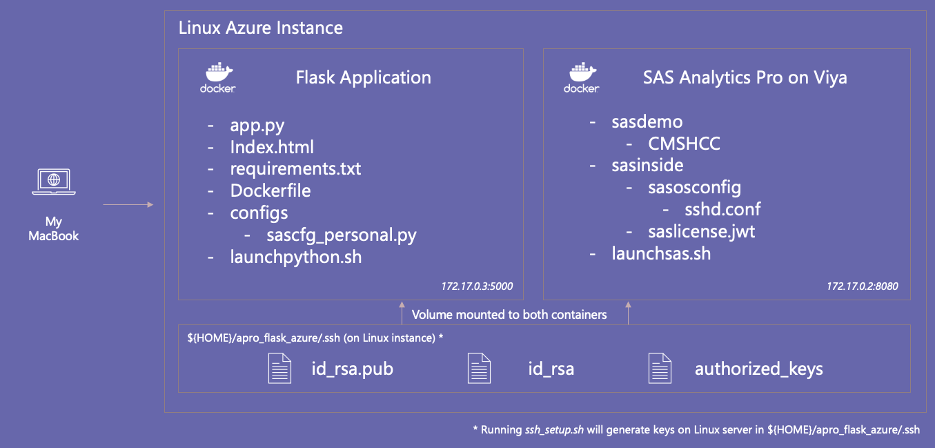
If you followed along with the deployment and configuration, you may have additional questions. If you are wondering about the purpose of the sascfg_personal.py file, it tells SASPy how to connect via SSH to the SAS Analytics Pro on Viya container. You have to specify the host, localhost and luser options to make sure SASPy can successfully connect.
If you run the SAS Analytics Pro on Viya container first, Docker will probably assign 172.17.0.2 as the IP for that container and 172.17.0.3 for the Flask container. If you suspect the IP is different, inspect the container to make sure the IP is correct.
SAS_config_names = ['ssh'] ssh = {'saspath' : '/opt/sas/viya/home/SASFoundation/sas', 'ssh' : '/usr/bin/ssh', 'host' : '172.17.0.2', # sas apro container host 'luser' : 'sasdemo', 'localhost': '172.17.0.3', # local Python container ip address 'options' : ["-fullstimer"] } |
For more information, check out the official documentation page.
Thanks to everyone that contributed to this blog series and to those that followed it from the beginning. I hope this was helpful and that you learned something along the way.
*If you are interested in a license for SAS Analytics Pro on Viya, contact your SAS representative or get in contact with SAS through the chatbot on sas.com.

3 Comments
Does SAS support the CDPS+Rx Risk Adjustment model for Medicaid?
Hi James! It looks like this model was developed by UC San Diego and it is licensed through them.
However, accordingly to this link, it says those programs are written in SAS, which would be executable in a SAS environment.
Great article - The three part series is good one to bookmark.
Deva