We’ve become a lower carb household in the past few years due to family health history and genetics that strongly encourage it. As a result, our decades-old breakfast of eating cereal with milk went out with the trash leaving the challenge of finding low carb, nutrient-dense options.
Ditch the decades-old breakfast of cereal and milk for this delicious low carb option #saslife Share on XLet’s face it, many traditional American breakfasts are low fiber, carb bombs that wreak havoc on our morning energy and blood glucose levels – muffins, donuts, toaster pastries, pancakes with OJ, some fruit smoothies. We love them, but they don’t love us! Even processed cereals that claim to be high in protein don’t contain enough protein to prevent a carb:protein imbalance and glucose spikes.
So, during his quest for breakfast replacements, my husband heard about a relatively new kitchen gadget for cooking eggs. I had heard of these machines but my first thought was “Why would you need a gadget to cook eggs? All you need is a pot!” Regardless, he persevered and added the Cuisinart Egg Cooker to his Christmas list and left his fate in Santa’s hands.
On Christmas morning, to his delight, he unwrapped his egg cooker. My first impression....Gotta admit, it’s kinda cute!

Next morning, we’re off to the kitchen for our first (his second) test batch. I watched as my husband set up the Cuisinart Egg Central. He moved through the set up with ease.
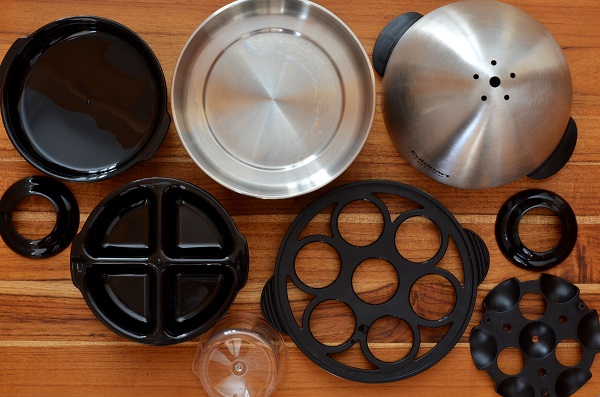
These are the various parts to make 3 different varieties of eggs. (Don’t worry, you only use a couple of them for each cooking option.)
Boiled (actually steamed) Eggs
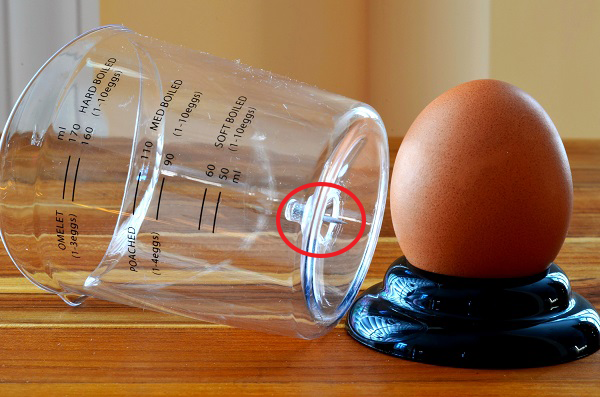
Step 1: Use the sharp tack at the bottom of the graduated plastic beaker to poke a small hole in the top of the raw egg. This prevents the egg from exploding when it is steamed.
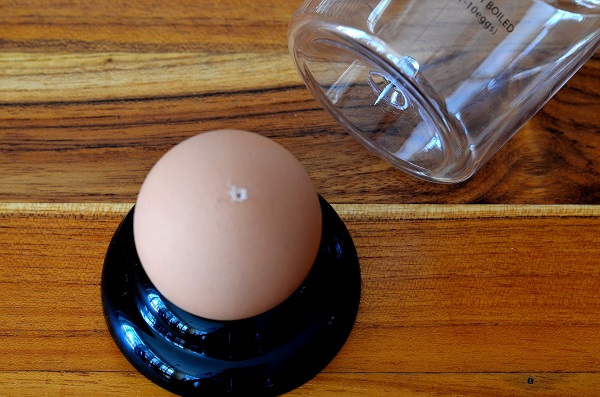
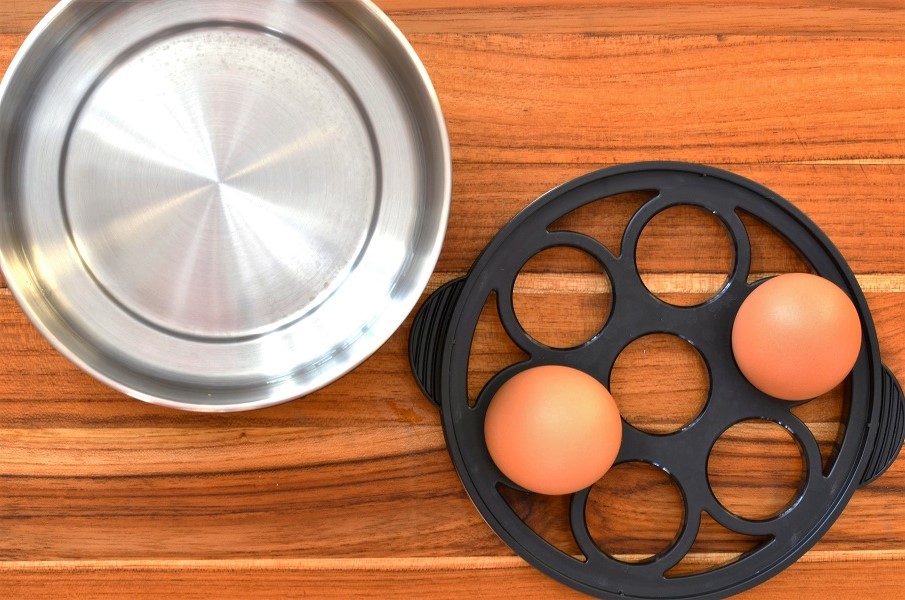
Step 2. Place the pricked eggs (pinhole facing down) in the egg tray.
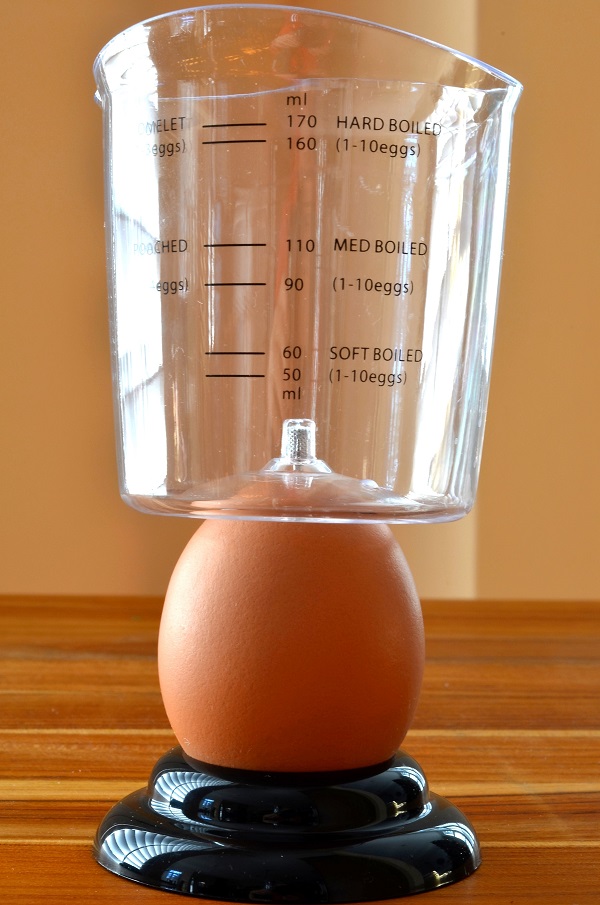
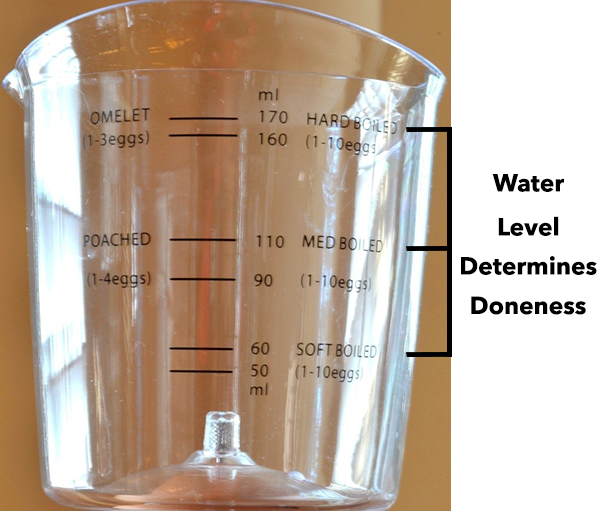
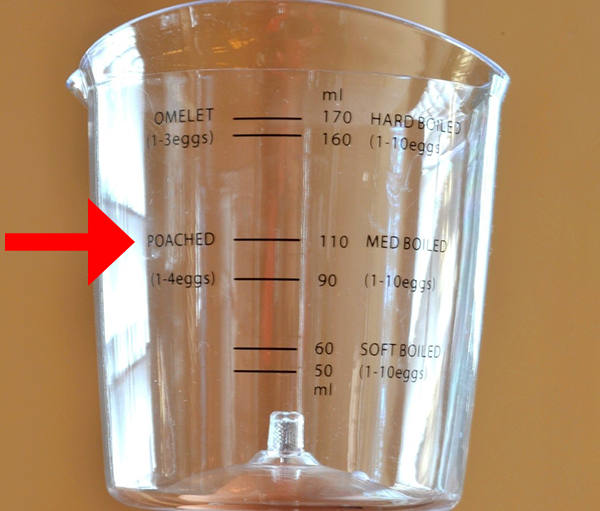
Step 3: Use the graduated plastic beaker to measure the amount of water needed for soft, medium or hard boiled eggs.
Step 4: Pour the water in the well of the heating unit and place the tray containing the eggs on top.
Step 5: Cover with the aluminum egg-shaped dome and turn the machine on.
What happens next is the heating unit heats up and boils the water. The amount of water you poured in determines how long the eggs will steam. Once the water has boiled out, the machine will beep to let you know your eggs are ready. This takes about 6 – 10 minutes depending on whether you want soft, medium or hard cooked eggs.
Results: The “boiled eggs” were perfectly done and remarkably easy to peel (one of my biggest pet peeves is trying to peel eggs whose shells don’t come off so you destroy the egg in the process!). The next morning I made my own batch with the same ease and success.
Poached Eggs
I was impressed that the machine could cook boiled eggs, but, the most intriguing feature for me is this machine’s ability to poach eggs. Watching Bobby Flay make perfect poached eggs on Food Network has not conquered my fear of ending up with egg drop soup.
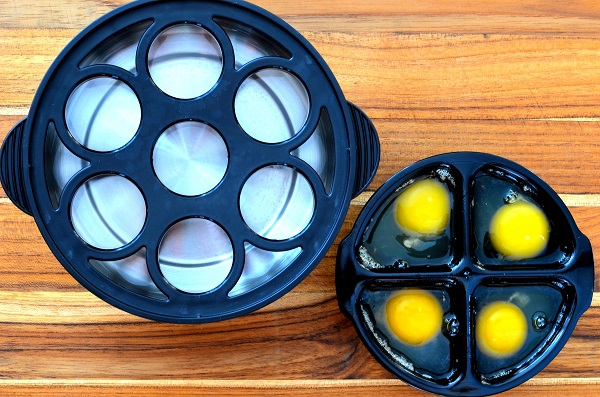
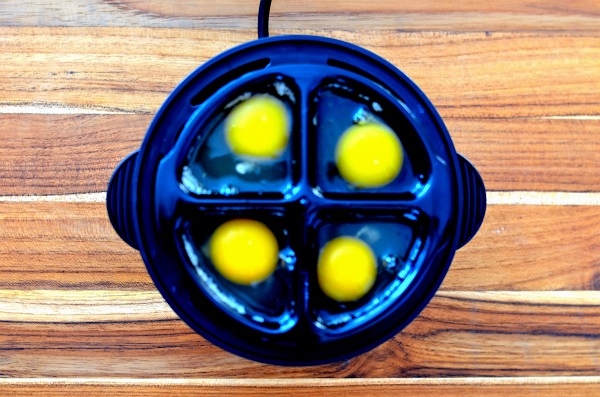
Step 1: Spray the individual sections of the poached egg tray with vegetable cooking spray or rub with butter. Crack 1 egg into 1 or more of the 4 compartments.
Step 2: Fill the plastic graduated beaker with filtered water up to the poached egg line. Add the water to the well of the heating unit.
Step 3: Place the boiled egg tray on first as a shelf, then stack the poached egg tray on top.
Step 4: Cover with the egg shaped lid and turn the machine on. Once the machine beeps, the poached eggs are ready.
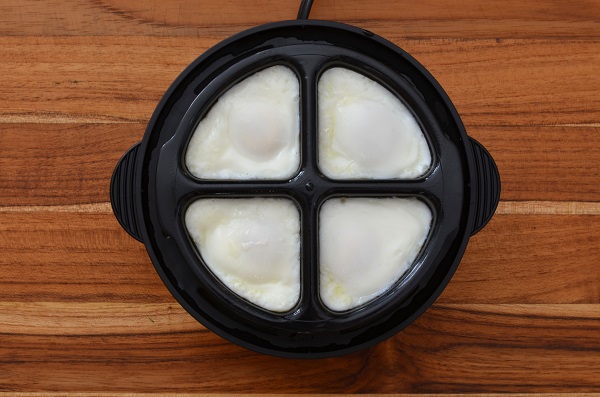
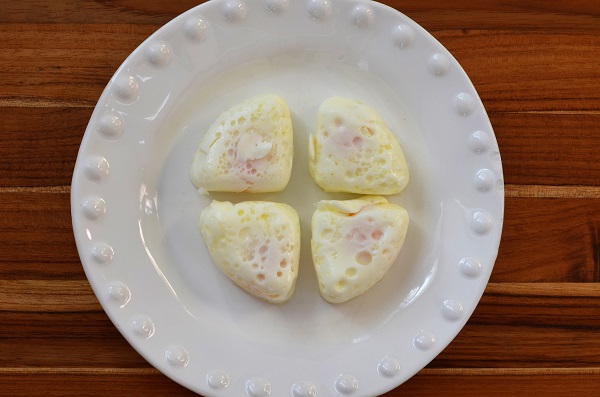
Results: The poached egg feature was super easy and produced perfect poached eggs with perfectly tender whites and soft yolks. So, big win for Santa!
Here is my final analysis of the Cuisinart Egg Cooker:
Pros:
- Minimal parts, easy to clean, dishwasher safe (except for the electric base, just wipe clean).
- Quick cooking time.
- Eggs, both boiled and poached, were cooked perfectly without guess work – soft, medium or hard boiled. (I haven’t tried the omelet feature yet).
- Offers boiled egg, poached egg and omelet attachments.
- Attractive stainless steel design to match other kitchen appliances.
- Reasonably priced - $39.99 (it’s sold at Bed Bath and Beyond so use the 20% off coupon!)
- Easy enough for tweens, teens and college students to use once they’ve been trained. (Due to the steam, the unit gets very hot so training your youth is advised).
Cons:
- Requires counter or storage space.
- Same task can be done with normal pots and pans, but with much more guess work and risk of failure.
Target Populations for this Product:
- College students
- Teenagers (promotes healthy, self-sufficient cooking)
- Busy families
- Single professionals
A Variety of Egg Cookers to Choose From
There are several different models of egg cookers. I have featured the Cuisinart Egg Central in this post. Here are some others you can investigate if you’re interested:
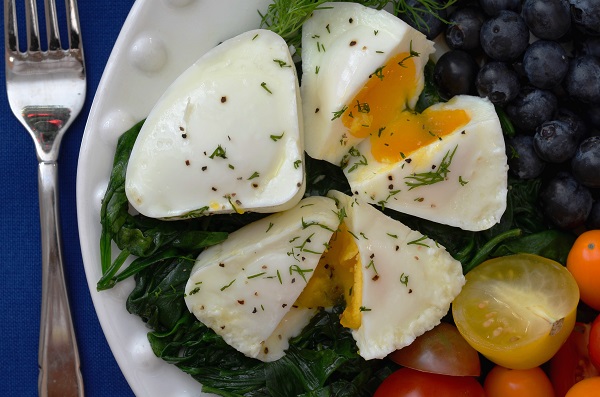
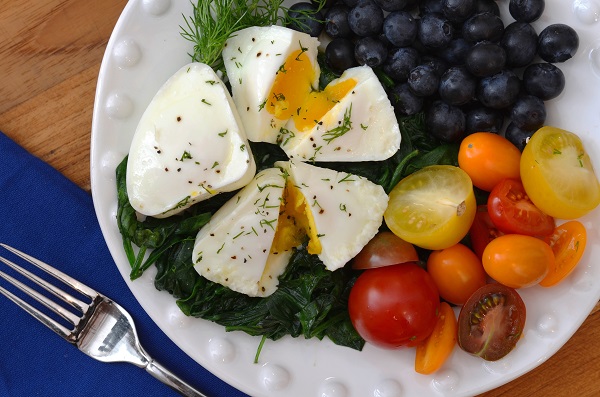
Poached Eggs with Sautéed Spinach
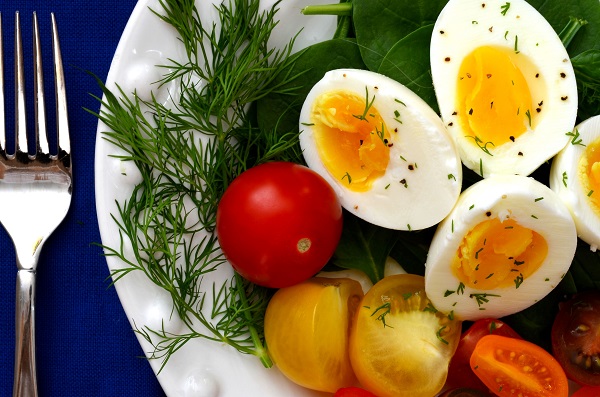
This recipe can be used for a low carb breakfast or a really quick dinner on busy nights. The colorful grape tomatoes and blueberries complete the rainbow color spectrum (ROY G BIV) which means this meal is loaded with great nutrition.
You can either poach the eggs (if you have the Egg Central or you’ve mastered this culinary technique) or boil a few eggs to make this dish.
Ingredients
2-4 fresh eggs (preferably free range, pastured)
4 packed cups of fresh baby spinach
2 Tbsp extra virgin olive oil
Salt and pepper to taste
Directions
- Put eggs on to boil or poach for 6-10 minutes.
- While eggs are cooking, heat the extra virgin olive oil in a large skillet.
- Once the olive oil begins to shimmer, slowly pile the spinach in the skillet and begin to carefully turn the spinach with tongs.

- After about 15 – 30 seconds, turn off the heat and continue stirring the spinach until all the leaves are wilted. Remove the pan from the heat.
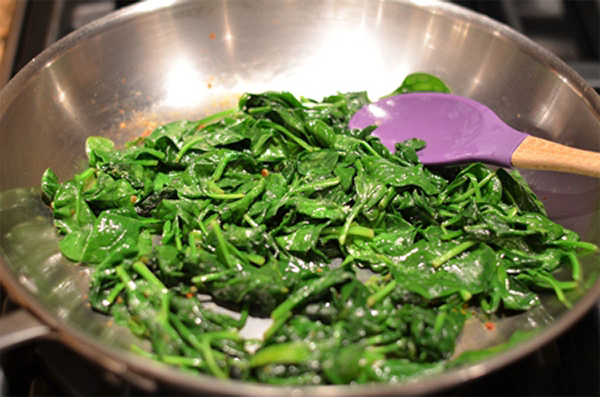
- Add salt and pepper to taste.
- Plate the spinach and layer the eggs on top. Season as desired. Serve with ¾ cup fresh berries and multi-colored grape tomatoes.
Click here for a printer-friendly version of this recipe.
Click here for a printer-friendly version of this blog post.
