It’s hard to pick up a medical journal or news article these days without reading something about the gut microbiome. Thanks to the NIH Human Microbiome Project established in 2008, health professionals and the general public have learned much about the link between the condition of our gut microbiome and the state of our health.
It’s an exciting time because it lets us know that there is a lot we can do to take charge of our health. Unfortunately, what we’ve also learned is that Western cultures and lifestyle habits cause a lot of imbalance to the gut microbiome thereby threatening our health and wellbeing.
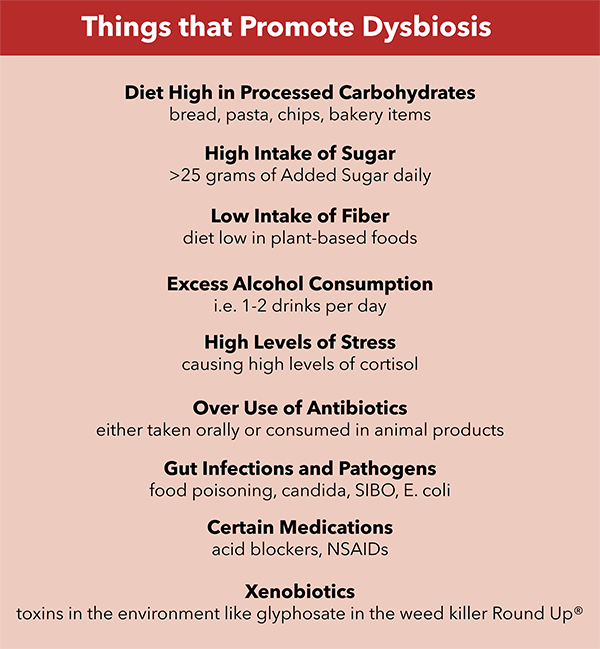
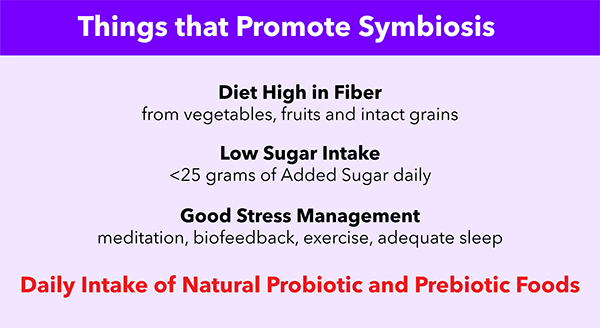
Symbiosis versus Dysbiosis
The gut contains good and bad bacteria that live commensally. Both good and bad bacteria play key roles in our health and are intended to live in balance and harmony. A good balance of the gut bacteria is called “Symbiosis”. An imbalance of gut bacteria is dys-symbiosis or “Dysbiosis”.
According to Neurologist David Perlmutter, MD, untreated dysbiosis can lead to gut permeability (damage to the lining of the intestines) and inflammation which puts us at risk for many health conditions like heart disease, autoimmune conditions, brain disorders and even cancers.
Natural Probiotics
Probiotics are a new frontier and the climate for best practices with probiotics keeps changing. The increase in knowledge about the gut and microbiome health has led to a boom in the sales of probiotic supplements. On the one hand, this is good news because it indicates that health care providers and the public are heeding the advice to increase and support good bacteria in the gut.
On the other hand, taking probiotic supplements is only helpful to a point because according to some experts we are creating a “micro-monocropping” situation. With oral probiotic supplements, we consistently take 1 – 10 probiotic strains daily but we are not replacing tens of thousands of other strains of bacteria that reside in the gut. According to integrative medicine practitioner, Zach Bush, MD, this is “doing on a microscopic level what crop monoculture is doing in agriculture: favoring a relatively small number of species at the expense of ecosystem diversity.“
Taking #probiotic supplements is only helpful to a point. #saslife Share on XIn addition, Johns Hopkins gastroenterologist, Gerard Mullin, MD, states recent research has shown that within 3 weeks of stopping an oral probiotic, the benefit gained from it disappears. Probiotic supplements do not take root in the gut. They simply populate the gut in real time.
#Probiotic supplements don't take root in the gut. They simply populate the gut in real time. Share on XStart Eating Diversity Every Day
So, as the probiotic frontier continues to evolve, gut health experts are recommending, in addition to taking oral probiotic supplements, we add natural probiotics, or “fermented foods,” to our diets every day. According to Dr. Perlmutter and others, fermented foods are “naturally full of gut healing, inflammation reducing, immune balancing bacteria.” The best way to keep your gut populated with an abundance of healthy bacteria is to eat fermented foods daily.
Gut health experts recommend adding natural probiotics, or fermented foods, to our diets daily. Share on XFermented foods can be bought at your local health food store or made in your own kitchen.
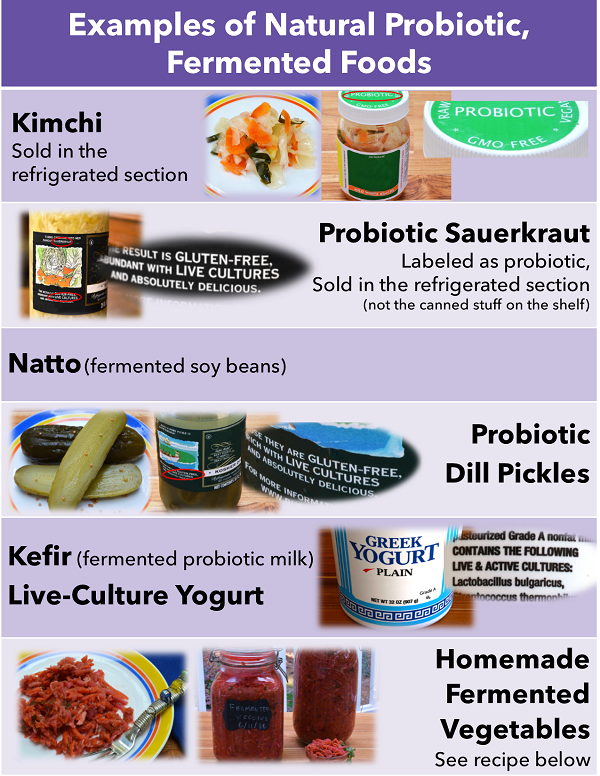
It is common to see Kombucha (a fermented tea) on the lists of recommended fermented foods, however, since it can be high in sugar and caffeine, it’s addictive nature causes many gut health experts to omit it from their recommended lists.
It is important to note that probiotic bacteria is destroyed by heat so to get the probiotic benefits from fermented foods you should eat them cold.
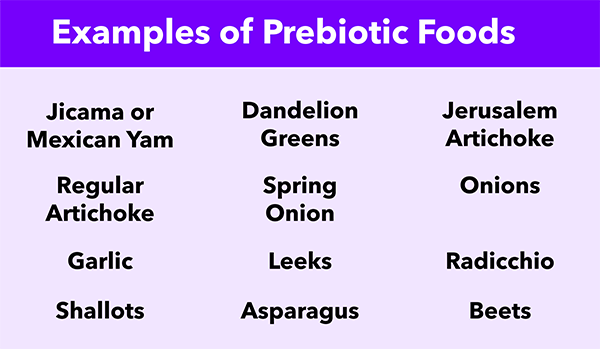 A Word about Prebiotics
The term Probiotic is a household word these days but another important term is not quite as mainstream – “Prebiotic.” Prebiotics are food for the good bacteria or probiotics in our gut. To help insure that the good gut bacteria are nurtured and fed, we need to eat prebiotics foods daily as well.
Important Note for IBS sufferers:
Some probiotic and prebiotic foods can cause gas and bloating if your gut is imbalanced. It is important to work with a Registered Dietitian Nutritionist (RDN) who specializes in gut health to slowly rebuild your microbiome which may eventually help decrease your IBS symptoms.
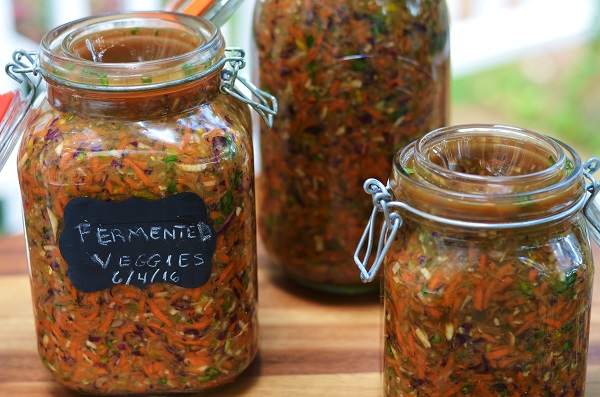
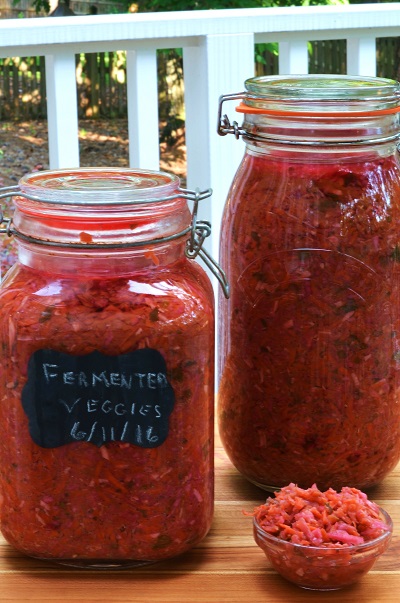
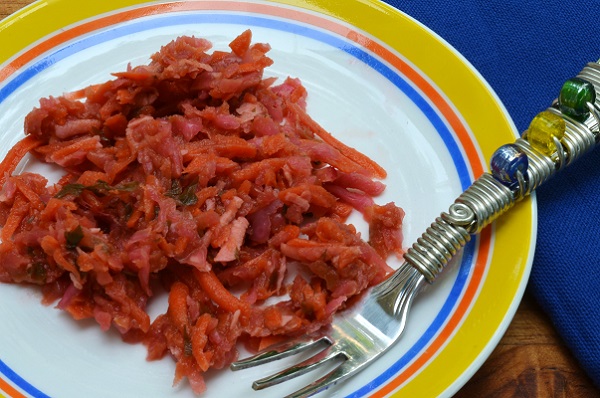
Fermented Vegetables
Adapted from: Kinetic Culture
After doing my research on fermented vegetables, I tried various store-bought versions and couldn’t find a flavor that was appealing to me. So, I searched for recipes and found this one from Joseph Mercola, DO, that contains many of the vegetables I enjoy eating every day. That sounded like a good start! As my journey with fermented vegetables has progressed, I’m learning to appreciate the tart flavor and enjoy a small dish of them before dinner, kind of like a small appetizer. The process of making this recipe takes about 2 hours but it yields 2-3 months of fermented vegetables so it’s a cost- and time-effective investment.
Ingredients
(Note: It is recommended that you use organic produce in this recipe.)
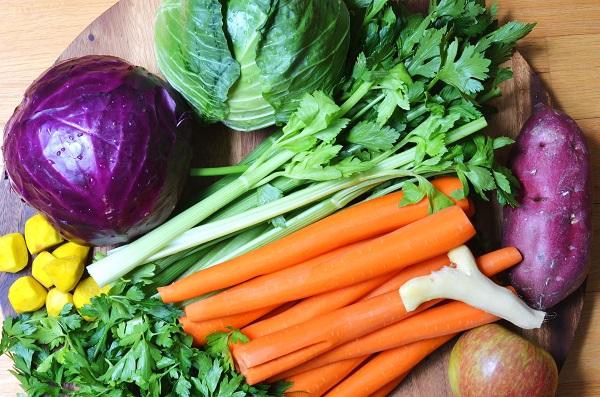
1 medium purple cabbage
1 medium green cabbage
3 ¼ lbs carrots, peeled
2 medium or several small golden beets, peeled
1 bunch celery
½ granny smith or Fuji apple, unpeeled
½ large orange or white sweet potato, unpeeled
4 inch stalk of fresh ginger, peeled
1 bunch flat leaf parsley
1-2 Tablespoons sea salt (optional)
Filtered water (do not use tap water), optional
4-6 sleeves Kinetic Culture® Probiotic Culture Starter (optional)
Note: The original recipe called for following vegetables but I chose not to include them:
- ⅓ of a red bell pepper
- ½ bunch of cilantro
- 1 head of garlic
Directions
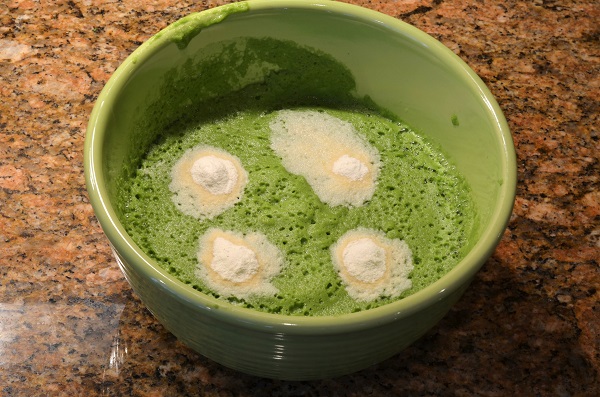
- Juice the entire bunch of celery in a blender or juicer. If using a blender, add 1½ cups of filtered water while blending.
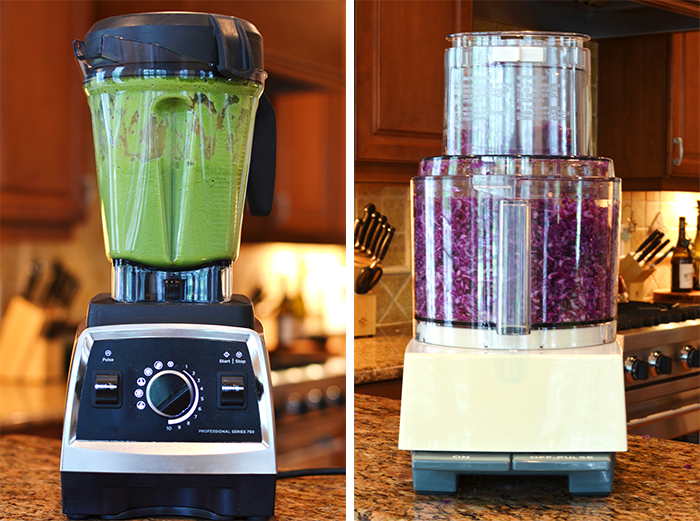
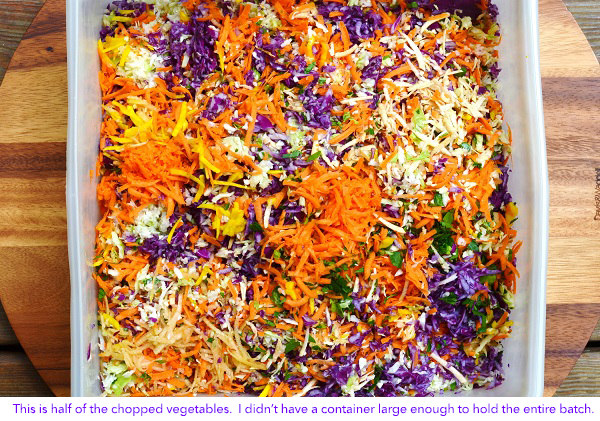
- Chop remaining vegetables except parsley in a food processor. Chop parsley by hand. This will make a large amount of chopped vegetables which will shrink once they begin to brine.
- Add 4-6 Culture Starter packets to the celery juice. Stir thoroughly. (This step is optional. Vegetables will ferment without a starter culture which is called Wild Fermentation, it will just take longer to ferment – like 30 days compared to 7 days).
- Add the celery juice mixture to the vegetables. Mix the liquid thoroughly into the chopped vegetables and with clean hands massage the vegetables until a brine begins to release. If necessary, you may add 1-2 Tbsp. sea salt to help the vegetables create a brine. (You may also add ½ cup or more of filtered water, if needed.)
- Continue massaging vegetables until you can press the vegetables down and the brine will cover them. This may take 15-30 minutes. Once the vegetables are massaged to create a brine, they decrease in bulk and the 2 large containers fit into 1 large mixing bowl.

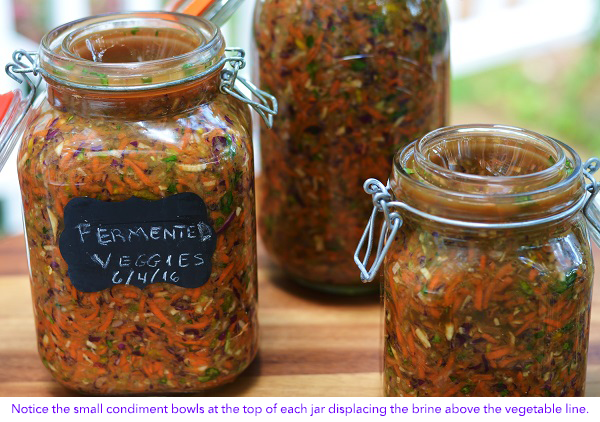
- Once an adequate amount of brine has been created, pack the vegetables tightly into quart-sized jars that have tight fitting lids. Be sure to pack the vegetables down tightly in the jar so the brine comes up above the vegetables. It is important for the brine to stay above the vegetables so the vegetables stay in an anaerobic environment required for fermentation.
- To assist with keeping the vegetables below the brine line, you can place a large cabbage leaf over the top of the vegetables and tuck it in around all sides pressing down to release air bubbles. Make sure the cabbage leaf is completely submerged below the brine line. Or, you can place a small condiment bowl on the top of the vegetables to displace the brine above the vegetables.
- Place the jars in a temperature consistent spot, like a closed cooler, and allow them to sit and ferment for 7 days (or up to 30 days if you don’t use a culture starter). Do not clamp the lids closed because as the vegetables ferment they produce gas which could cause the glass containers to burst. Leave the lids ajar or place cheesecloth or a paper coffee filter over the top.

- Check on the vegetables daily to insure that the brine line is staying above the vegetables. If you see some greenish brown residue form on the top, simply scrape it off, discard it and press the vegetables below the brine line once again. If vegetables have poked above the brine line, scrape off and discard the exposed vegetables and re-press the remaining vegetables down below the brine.
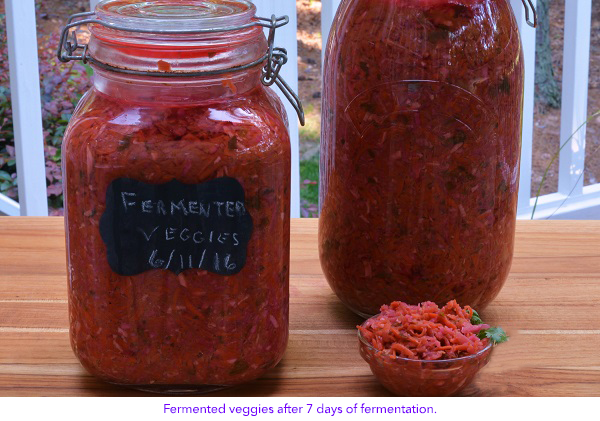
- After 7 days, taste your vegetables and if they are to your liking, clamp the jars shut and store them in the refrigerator for 2-3 months, enjoying your fermented vegetables daily.
Important Notes about Consuming Fermented Vegetables
- If you are new to eating fermented vegetables, start slowly by adding 1 forkful of fermented vegetables at one meal daily. Increase slowly by forkfuls until you are able to consume ¼ - ½ cup daily. Adding too much too fast can cause GI distress like gas, bloating or diarrhea. Allow yourself several weeks to build up your quantity. If you have a bad reaction to fermented vegetables, it doesn’t mean they are bad for you, it just means you need to add them more slowly.
- Do not heat fermented vegetables as this will kill the probiotics. Eat them cold.
- Once fermented, always store fermented vegetables in the refrigerator.
Popular Books About Food Fermentation
- The Art of Fermentation, Sandor Ellix Katz, 2012, Chelsea Green Publishing
- Wild Fermentation, Sandor Ellix Katz, 2003, Chelsea Green Publishing
- Real Food Fermentation, Alex Lewin, 2012, Quarry Books
Click here for a printer-friendly version of this recipe.
Click here for a printer-friendly version of this blog post.

8 Comments
I'm confused. I'very read that the fermentation takes place at around 70-75 degrees F. And that a refrigerator is too cold which makes the process slow down. What is true?
It's easy to get confused with fermenting because there are a lot of variables. Fermenting temperatures are different for different foods (vegetables, yogurt, kefir, cheese, etc.) and length of time for fermenting varies depending on the temperature of the environment you're fermenting in (warm weather fermenting versus cold weather).
In the references I used (mentioned above) the ideal temperature for fermenting vegetables can range from 50 degrees to 80 degrees. The cooler the environment, the longer the fermentation process will take. Wild Fermentation can take 30 days up to 4 months, while adding a "culture starter" to the vegetables can shorten the fermentation period.
For the Mercola recipe I used above, I added a culture to the vegetables. Dr. Mercola recommends fermenting the vegetables containing a culture in a 65 - 75 degree environment (85 degrees max.) for 3 - 7 days.
Most experts recommend tasting the vegetables throughout the fermentation process and once they are to your liking (you develop your liking with experience) you can stop the fermentation by storing them in the refrigerator while you enjoy them for several months. Refrigeration helps keep them crisp but the crispness will decrease the longer they remain in the refrigerator.
For your specific recipe for fermented vegetables, how many quart size jars would I need? (I need to purchase them and don't want to be caught by surprise without enough as I'm making this recipe.)
The recipe states it makes 6 to 8 quarts. This will vary depending on the size of your cabbages and other vegetables. I've made this recipe twice and it made about 6 quarts each time.
Unfortunately fermented foods cause reactions for people with histamine intolerance, and that usually includes anyone with a chronic illness/autoimmunity etc. We started fermented foods and all had terrible reactions then I read about histamine intolerance.
Yes, fermented foods can be problematic for people with histamine issues. However, not everyone with an autoimmune illness or chronic illness has histamine intolerance. Improving one's gut health can often help improve histamine tolerance. For someone with histamine intolerance who is working to improve gut health, taking an oral probiotic and rotating the strains regularly can help increase the diversity and quantity of beneficial bacteria in the gut. Working with a medical provider and dietitian who are trained in gut health can be very helpful in the journey of improving histamine intolerance.
Thank you for this recipe! My husband is sensitive to cabbage, can I make this without the cabbages? Would I need less celery?
Linda, yes you can certainly make this without the cabbage. It will decrease the volume considerably so you may not need as much celery juice. You can tweak the recipe however you like. Example: The original recipe calls for bell peppers and cilantro. Though I like them, I didn't want those flavors in this vegetable mix so I left them out.