You might be surprised to learn that the fancy automation you see based on computer vision requires an enormous amount of manual effort in the form of labeling images. In fact, most modern computer vision models use a supervised learning approach. This requires human annotators to label images one at a time by opening them up in an editing canvas and manually assigning attributes. It’s a highly tedious and laborious process, but also unavoidable. Human beings must first “teach” the machine, through labels, before the machine can go out on its own to automate a process.
As a result, many data labeling platforms have been created to make this process easier. In this post, I will introduce a newly developed tool called JupICL. It enables you to rapidly label images and runs entirely with a Jupyter Notebook. Jupyter Notebooks are one of the most popular IDEs in data science. They are often used for data prep and model building. But now with this image labeling tool, data scientists can stay within Jupyter Notebook to label images as well.
You’ve probably heard some variation of the quote that a good programmer is “lazy.” Well, last year, I wouldn’t say I was lazy, but I was desperately craving more efficiency. My task was to manually label over 20,000 images for a computer vision project. Like many data scientists today, I was working in a Python environment with Jupyter Notebook. But in my case, I had no labeling software. To use a third-party labeling software would have required a lengthy process to acquire and get approval. Instead, I realized that Jupyter Notebooks with Python had all the functionality I needed to set up a robust image labeling tool. Now you can also use this tool now that SAS has open-sourced it on GitHub.
JupICL Features
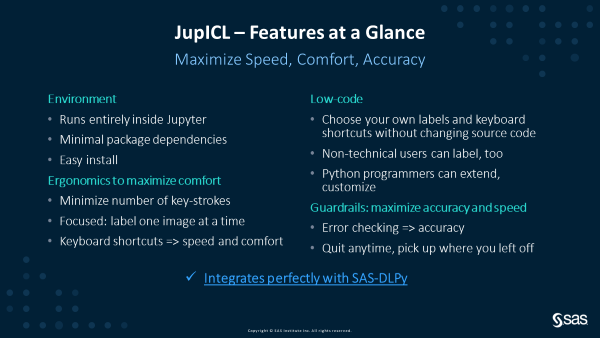
I'm excited to introduce JupICL, pronounced 'joop-pickle', a portmanteau of the name Jupyter-Image-Class-Labeler. JupICL is a SAS field-tested, easy-to-use, customizable image labeling tool that runs entirely inside a Jupyter Notebook. Its primary use is for labeling whole images which are used as inputs for training image classification models. Note that JupICL is not a tool for labeling bounding boxes or labeling pixels as is commonly done for object detection and image segmentation tasks. JupICL isn’t meant for every type of image labeling task. Rather it is designed to do one task extremely efficiently within a Jupyter Notebook. Figure 1 below describes the key design features of JupICL.
All the code for the image labeling is contained in a single notebook. With less than 400 lines of code, you can read and figure out what’s going on quickly, but I will summarize how JupICL works right here.
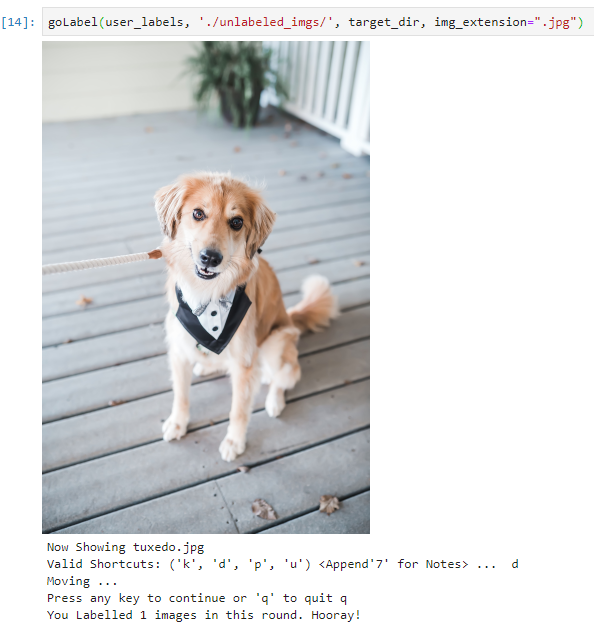
You start by running the first seven cells in the notebook that define all the helper functions. This is followed by setting up your own labels and keyboard shortcuts, as well as choosing where the images will end up. Then you get to the final cell (see Figure 2) which is the main driver for the image labeling. An image is displayed within the notebook. A user-input prompt appears so that you can choose the label, and after you confirm, the next image is displayed continuing the loop. At the end, you will see how the labeled images have landed in their corresponding subdirectories.
User-defined keyboard shortcuts
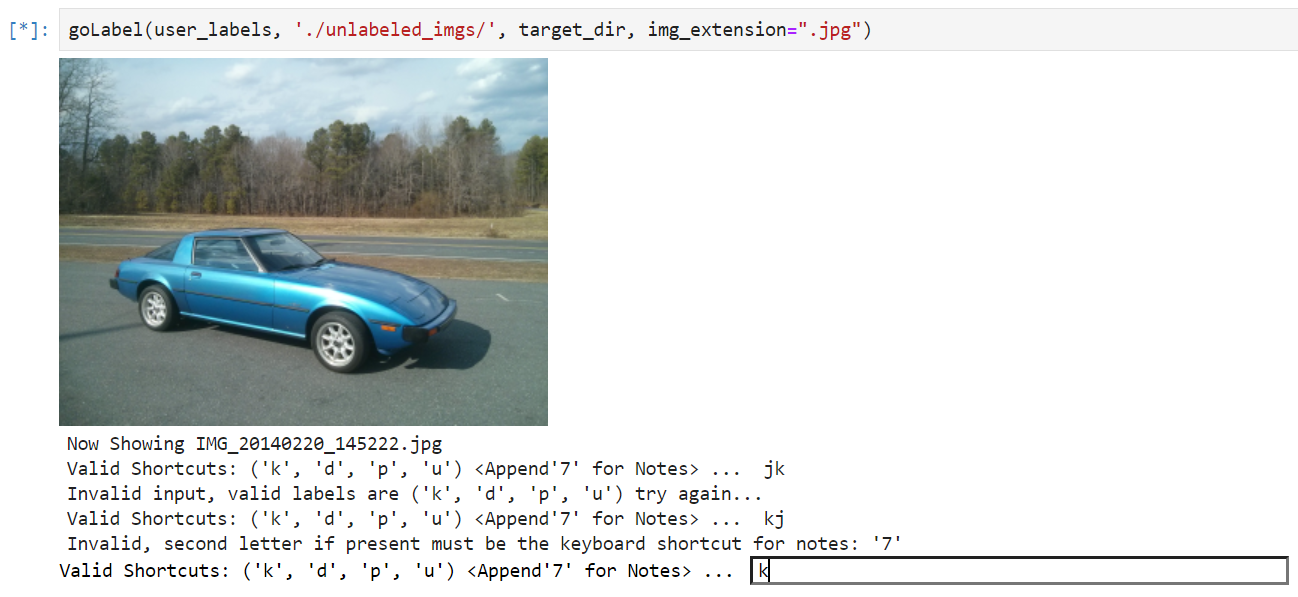
My favorite thing about JupICL is the speed and comfort with which you can label images. This is thanks to the user-defined keyboard shortcuts. The tool is optimized to minimize the number of keystrokes to label an image while still providing guardrails to limit avoidable mistakes. You can see an example of the guardrails in action in Figure 3 below. If you type an invalid keyboard shortcut, you are notified and get to try again. Each time an image is displayed for labeling, you only press one key to label the image. You then press enter to confirm before automatically moving on to the next one.
Getting Started
But don’t take my word for it, you can try it out for yourself by cloning the code from GitHub.
To get started, you will need a Python environment with Jupyter Notebooks, Python >= 3.6.10, as well as the famous image processing libraries: cv2 (opencv) and PIL (pillow). Then you can open “ImageAnnotator.ipynb” and run the cells. Some sample images are provided for you in the repo so that you can start experiencing the labeling process right away.
At a high level, JupICL works by moving image files around from a source directory into some subdirectories of a target directory corresponding to the assigned label of the image. In more detail the cells are performing the following operations:
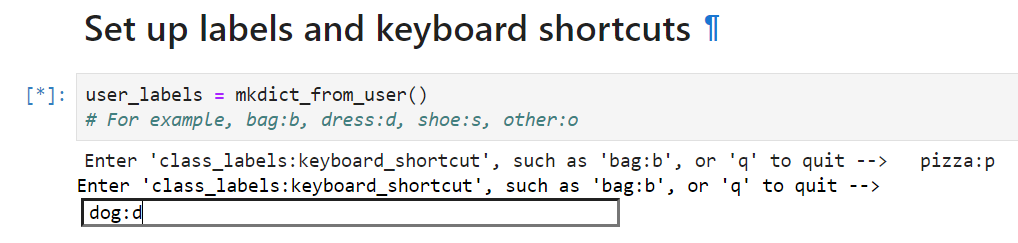
1. Set up labels and keyboard shortcuts:
-
- You get to choose the labels and the corresponding keyboard shortcuts
- Optional tips
- Choose a single letter for keyboard shortcuts
- Don’t choose two keys that are next to each other on the keyboard (helps with “fat finger problem” aka finger slip, which can happen when labeling hundreds to thousands of images)
- Choose keys that maximize your comfort in terms of ergonomics so your hand position can be relaxed.
See the screenshot in Figure 4.
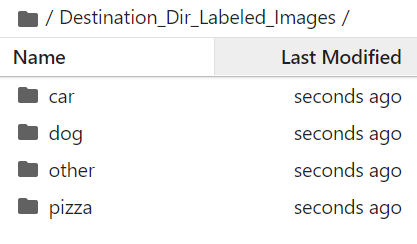
2. Select a destination folder for labeled images
-
- You get to choose the name of a destination folder which will be created for you automatically,
- Note that the labels you choose will correspond to subdirectories that will also be created automatically
See screenshot in Figure 5.

3. Label your images
-
- goLabel() is the main driver for labeling images
- Each time you run this cell; you will be automatically looping through the source directory to be presented with an image that you will label to move on to the next one.
- You can quit at any time and rerun this cell to resume your labeling and pick up where you left off.
- Since files are being moved on the file system, once an image is labeled it is moved to the appropriate folder. So it will no longer be in the source directory. In this way, you will never be presented with the same image file twice.
See screenshot in Figure 6.
This format of organizing your labeled images into subdirectories is ideal for users of the SAS Deep Learning Framework with SAS DLPy. For example, in SAS DLPy, you call the ImageTable.load_files() function pointing to the destination folder, and it will automatically examine the image files in each of the subdirectories and prepare a CAS ImageTable with the expected format for training models subsequently.
That being said, JupICL is agnostic of any particular deep learning framework. If you are using a different framework, you can easily convert JupICL’s output into an alternative format such as a json with some basic scripting. So we welcome you to contribute. Feel free to use, modify, and extend it for your use case (in accordance with the terms of the Apache 2.0 license under which it has been open-sourced).
JupICL Conclusion
JupICL is a useful tool that arose from a real-world use case during the delivery of a SAS customer project. Since then, multiple small teams have used it to rapidly label tens of thousands of images for computer vision projects. These have ranged from image classification to anomaly detection. These teams found JupICL very helpful. I was glad to hear that the tool was easy to use even for novice Python users. I hope JupICL will also make your life easier working on your next computer vision project that requires image labeling.
LEARN MORE | SASPy