
Normalizing your data
Some of the numerical features in the examples from parts 1 and 2 have different ranges. The variable Age spans from 0-100 and Hours_per_week from 0-80. These ranges affect the calculation of each feature when you apply them to a supervised learner. To ensure the equal treatement of each feature, you need to scale the numerical features.
The following example uses the SAS STDIZE procedure to scale the numerical features. PROC STDIZE is not a standard procedure available in the SASPy library. However, the good news is you can add any SAS procedure to SASPy! This feature enables Python users to become a part of the SAS community by contributing to the SASPy library and giving them the chance to use the vast number of powerful SAS procedures. To add PROC STDIZE to SASPy, see the instructions in the blog post Adding SAS procedures to the SASPy interface to Python.
After you add the STDIZE to SASPy, run the following code to scale the numerical features. The resulting values will be between 0 and 1.
# Creating a SASPy stat objcect stat = sas.sasstat() |
# Use the stdize function that was added to SASPy to scale our features stat_result = stat.stdize(data=cen_data_logTransform, procopts = 'method=range out=Sasuser.afternorm', var = 'age education_num capital_gain capital_loss hours_per_week') |
To use the STDIZE procedure in SASPy we need to specify the method and the output data set in the statement options. For this we use the "procopts" option and we specify range as our method and our "out" option to a new SAS data set, afternorm.
After running the STDIZE procedure we assign the new data set into a SAS data object.
norm_data = sas.sasdata('afternorm', libref='SASuser') |
Now let's verify if we were successful in transforming our numerical features
norm_data.head(obs=5) |

The output looks great! You have normalized the numerical features. So, it's time to tackle the last data-preparation step.
One-Hot Encoding
Now that you have adjusted the numerical features, what do you do with the categorical features? The categories Relationship, Race, Sex, and so on are in string format. Statistical models cannot interpret these values, so you need to transform the values from strings into a numerical representation. The one-hot encoding process provides the transformation you need for your data.
To use one-hot encoding, use the LOGISTIC procedure from the SASPy Stat class. SASPy natively includes the LOGISTIC procedure, so you can go straight to coding. To generate the syntax for the code below, I followed the instructions from Usage Note 23217: Saving the coded design matrix of a model to a data set.
stat_proc_log = stat.logistic(data=norm_data, procopts='outdesign=SASuser.test1 outdesignonly', cls = "workclass education_level marital_status occupation relationship race sex native_country / param=glm", model = "age = workclass education_level marital_status occupation relationship race sex native_country / noint") |
To view the results from this code, create a SAS data object from the newly created data set, as shown in this example:
one_hot_data = sas.sasdata('test1', libref='SASuser') display(one_hot_data.head(obs=5)) |
The output:
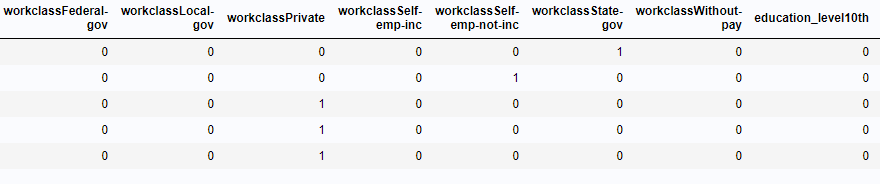
Our data was successfully one-hot encoded! For future reference, due to SAS’ analytical power, this step is not required. When including a categorical feature in a class statement the procedure automatically generates a design matrix with the one-hot encoded feature. For more information, I recommend reading this post about different ways to create a design matrix in SAS.
Finally
You made it to the end of the journey! I hope everyone who reads these blogs can see the value that SASPy brings to the machine-learning community. Give SASPy a try, and you'll see the power it can bring to your SAS solutions.
Stay curious, keep learning, and (most of all) continue innovating.