At the end of my SAS Users blog post explaining how to install SAS Viya on the Azure Cloud for a SAS Hackathon in the Nordics, I promised to provide some technical background. I ended up with only one manual step by launching a shell script from a Linux machine and from there the whole process kicked off. In this post, I explain how we managed to automate this process as much as possible. Read on to discover the details of the script.
Pre-requisite
The script uses the Azure command-line interface (CLI) heavily. The CLI is Microsoft's cross-platform command-line experience for managing Azure resources. Make sure the CLI is installed, otherwise you cannot use the script.
The deployment process
The process contains three different steps:
- Test the availability of the SAS Viya installation repository.
- Launch a new Azure Virtual Machine. This action uses a previously created custom Azure image.
- Perform the actual installation.
Let’s examine the details of each step.
Test the availability of the SAS Viya installation repository
When deploying software in the cloud, Red Hat Enterprise Linux recommends using a mirror repository. Since the SAS Viya package allows for this installation method, we decided to use the mirror for the hackathon images. This is optional, but optimal, say if your deployment does not have access to the Internet or if you must always deploy the same version of software (such as for regulatory reasons or for testing/production purposes).
In our Azure Subscription we created an Azure Resource group with the name ‘Nordics Hackathon.’ Within that resource group, there is an Azure VM running a web server hosting the downloaded SAS Viya repository.

Of course, we cannot start the SAS Viya installation before being sure this VM – hosting all rpms to install SAS Viya – is running.
To validate that the VM is running, we issue the start command from the CLI:
az vm start -g [Azure Resource Group] -n [AZ VM name] |
Something like:
az vm start -g my_resourcegroup -n my_viyarepo34 |
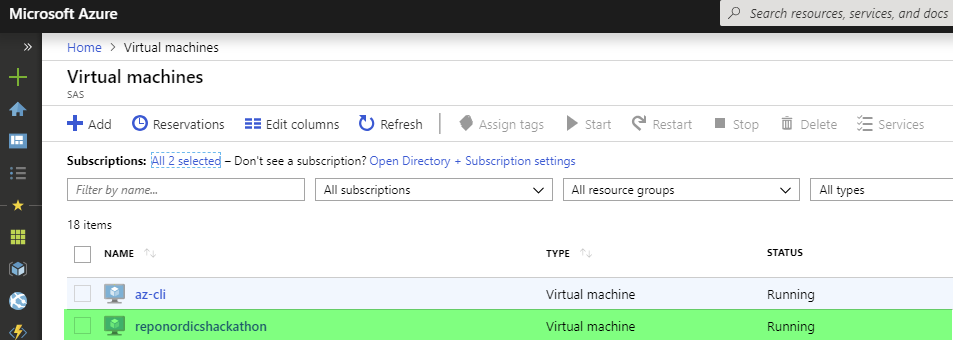
If the server is already running, nothing happens. If not, the command starts the VM. We can also check the Azure console:

Launching the VM
The second part of the script launches a new Azure VM. We use the custom Azure image we created earlier. The SAS Viya image creation is explained in the first blog post.
The Azure image used for the Nordics hackathon was the template for all other SAS Viya installations. On this Azure image we completed several valuable tasks:
- We performed a SAS Viya pre-deployment assessment using the SAS Viya Administration Resource Kit (Viya ARK) utility tool. The Viya ARK - Pre-installation Playbook is a great tool that checks all prerequisites and performs many pre-deployment tasks before deploying SAS Viya software.
- Installed R-Server and R-Studio
- Installed Ansible
- Created a SAS Viya Playbook using the SAS Orchestration CLI.
- Customized Ansible playbooks created by SAS colleagues used to kickoff OpenLdap & JupyterHub installation.
Every time we launch our script, an exact copy of a new Azure Virtual machine launches, fully customized according to our needs for the Hackathon.
Below is the Azure CLI command used in the script which creates a new Azure VM.
az vm create --resource-group [Azure Resource Group]--name $NAME --image viya_Base \ --admin-username azureuser --admin-password [your_pw] --subnet [subnet_id] \ --nsg [optional existing network security group] --public-ip-address-allocation static \ --size [any Azure size] --tags name=$NAME |
After the creation of the VM, we install SAS Viya in the third step of the process.
Installation
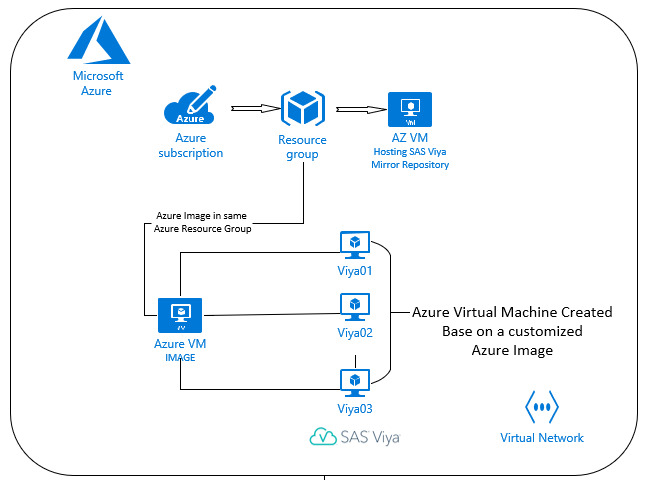
After running the script three times (using a different value for $NAME), we end up with the following high-level infrastructure:

After the launch of the Azure VM, the viya-install.sh script starts, a script that was part of the original image and located in the /opt/sas/install/ location.
In this step the script installs OpenLdap, SAS Viya and Jupyterhub. The following command runs the script:
az vm run-command invoke -g [Azure Resource Group] -n $NAME --command-id RunShellScript --scripts "sudo /opt/sas/install/viya-install.sh &" |
The steps in the script should be familiar to those with experience installing SAS Viya and/or Ansible playbooks. Below is the script in its entirety.
#!/bin/bash touch /start #################################################################### echo "Starting with the installation of OPENLDAP. Check the openldap.log in the playbook directory for more information" > /var/log/myScriptLog.txt #################################################################### # install openldap cd /opt/sas/install/OpenLDAP ansible-playbook openldapsetup.yml if [ $? -ne 0 ]; then { echo "Failed the openldap setup, aborting." ; exit 1; } fi cp ./sitedefault.yml /opt/sas/install/sas_viya_playbook/roles/consul/files/sitedefault.yml if [ $? -ne 0 ]; then { echo "Failed to copy file, aborting." ; exit 1; } fi #################################################################### echo "Starting Viya installation" >> /var/log/myScriptLog.txt #################################################################### # install viya cd /opt/sas/install/sas_viya_playbook ansible-playbook site.yml if [ $? -ne 0 ]; then { echo "Failed to install sas viya, aborting." ; exit 1; } fi #################################################################### echo "Starting jupyterhub installation" >> /var/log/myScriptLog.txt #################################################################### # install jupyterhub cd /opt/sas/install/jupy-azure ansible-playbook deploy_jupyter.yml if [ $? -ne 0 ]; then { echo "Failed to install jupyterhub, aborting." ; exit 1; } fi #################################################################### touch /finish #################################################################### |
Up next
In a future blog, I hope to show you how get up and running with SAS Viya Azure Quick Start. For now, the details I provided in this and the previous blog post is enough to get you started deploying your own SAS Viya environments in the cloud.
