It’s done. It’s finally done. After many caffeine-fueled late nights and countless hours of feature engineering, you’ve built the ultimate model. But the journey isn’t over. Not quite yet. There’s one thing left for you to do: get that model into production and let your ModelOps team take the reins. That’s where SAS Model Manager shines. While there are many ways to deploy a model built in SAS Viya Workbench (even if you have no other SAS products), using SAS Model Manager to deploy a model within a SAS Viya environment is an excellent option and has many benefits. In this article, we’ll do a deep dive into how to do that.
When you’re in SAS Viya Workbench, you have access to powerful computer environments for complex experimentation that your thin client laptop just can’t handle. But that doesn’t mean it lives on its own isolated island. Once your model is ready to go, you need a bridge to SAS Viya to get it into SAS Model Manager. For SAS models, that’s PROC REGISTERMODEL. For open-source models, that’s sasctl, SAS’s open-source package with flavors in both Python and R designed to handle everything you need to register your model with SAS Viya.
With all the tools we have in our arsenal, let’s walk through a quick example of building, registering, and testing an XGBoost model that predicts loan defaults in the classic HMEQ dataset.
Hello, I’m SAS Viya Workbench. Can you hear me?
If you’ve ever registered a Python model from your own machine into SAS Model Manager, you’ll be happy to know that there’s no difference with SAS Viya Workbench. The same code that you would use on your local machine works the same way in SAS Viya Workbench. All you need to do is make sure that SAS Viya Workbench can talk with your SAS Viya Server.
The first thing you need to do is run a quick test. Run the code snippet below:
import requests host = 'https://my-viya-server.com' resp = requests.get(f'{host}/SASLogon', verify=False) if resp.status_code == 200: print('Status: 200. You can successfully communicate with the server.') else: print("WARNING: Received a non-200 status code:", resp.status_code) |
If you receive no connection errors and a 200-status code, you’re all set: SAS Viya Workbench can talk with your SAS Viya server. If not, ask your administrator to allow a connection from SAS Viya Workbench to your SAS Viya server. And if all else fails, you still have the option to download your model as a zip file and upload it to SAS Model Manager – we’ll talk about that later.
If you’re already up to speed on exactly how to register a Python model to SAS Model Manager, then you can stop here. Seriously: that’s how seamless SAS Viya Workbench is. But if you’d like a refresher, a bit more explanation, and a notebook you can run yourself, then keep on reading.
Let’s register
We are going to use the pzmm (Python Zip Model Management) package from sasctl to do the heavy lifting. SAS Model Manager expects certain files and score code. You can technically write all of them yourself, but it’s much easier to let pzmm do it for you. Let’s set the stage with the model we’ll be registering.
The model
I’m going to intentionally skip past the model building details and get straight to what you’re here for: what is it that I need to do to register my Python model to SAS Viya? Just so you have a bit more context, here’s everything you need to know:
- Our data is HMEQ
- We’re predicting bad loans using the column "BAD"
- We’ve built an XGBoost model with early stopping based on validation data
- The model is:
xgb_model = xgb.XGBClassifier( objective="binary:logistic", random_state=42, n_estimators=xgb_eval.get_booster().best_iteration + 1 ) |
Now that you’ve got the background, let’s talk turkey.
It’s all about the prep work
SAS Model Manager requires specific information about your model that pzmm formats and organizes for you. You’ll need:
- The name of the model
- A description of the model
- The project name for SAS Model Manager
- The modeler’s name or user ID
- The model instance to be pickled
- The data used to train the model
- The expected input column names
- The target variable name
- The expected target output values
- The name of the target output variables
- Where the model files should be saved
To keep it tidy and manageable, I like to put all of this into a single place:
prefix = 'XGBoost' # Model name model_desc = "XGBoost model for hmeq" # Model description project = "HMEQ Models" # Name of project modeler = input('Enter modeler username') model = xgb_model # Model instance data = df_hmeq # Data for model inputs = X.columns # Input columns target = 'BAD' # Target variable target_values = ["0", "1"] # Target values: 0/1 for HMEQ target_cols = ["EM_CLASSIFICATION", "EM_EVENTPROBABILITY"] # Model output variables model_path = '/workspaces/myfolder/models' # Path to model files |
Once you have all of this, you can invoke the features of pzmm to automatically convert it into files that SAS Model Manager can use. Let’s take a look at each step.
Step 1: Pickle it
pzmm has a built-in method, pickle_trained_model, which will pickle your model and put it in same folder you’ll be writing all the other files to.
pzmm.PickleModel.pickle_trained_model( model_prefix=prefix, trained_model=model, pickle_path=model_path ) |
That’s all there is to it!
Step 2: Define inputs and outputs
SAS Model Manager needs to know what the model inputs and outputs are to correctly score data. A single method does this: write_var_json. As you might expect from the name, it saves all this information to JSON files.
Model Inputs
pzmm.JSONFiles.write_var_json( input_data=data[inputs], is_input=True, json_path=model_path ) |
Model Outputs
output_var = pd.DataFrame(columns=target_cols, data=[["A", 0.5]]) pzmm.JSONFiles.write_var_json( output_var, is_input=False, json_path=model_path ) |
Note that the output data might seem a little strange at first. What we’re doing is creating a DataFrame with (1) the expected output variable names and (2) examples of the expected output types. We’re using “A” and “0.5” as examples to indicate that the first column (EM_CLASSIFICATION) will be labels while the second column (EM_EVENTPROBABILITY) will be probabilities. If you open up outputVar.json, you’ll see it automatically interpreted the example output values of “A” and “0.5” to be strings and intervals:
[ { "name": "EM_CLASSIFICATION", "level": "nominal", "type": "string", "length": 1 }, { "name": "EM_EVENTPROBABILITY", "level": "interval", "type": "decimal", "length": 8 } ] |
Are you wondering why we’re using EM_CLASSIFICATION and EM_EVENTPROBABILITY as the variable names? Seasoned SAS veterans already know, but I’ll leave that as a history lesson for you. Leave a comment if you know!
Step 3: What file does what?
You can upload a lot of different types of files into SAS Model Manager, and of the things in there, it needs to know exactly which ones will allow it to score your data. That’s where write_file_metadata_json comes in:
pzmm.JSONFiles.write_file_metadata_json(model_prefix=prefix, json_path=model_path) |
If you look at the output file, file_metadata.json, it gives a role to each file:
[ { "role": "inputVariables", "name": "inputVar.json" }, { "role": "outputVariables", "name": "outputVar.json" }, { "role": "score", "name": "score_XGBoost.py" }, { "role": "scoreResource", "name": "XGBoost.pickle" } ] |
This step is critical: skipping it means that the Model Manager won’t know what each file is supposed to be used for, and it will be unable to score your data.
Step 4: Build model properties
Finally, as the last step before registering, you need to write out the model properties. This gives SAS Model Manager information about the model’s name, the Python version, algorithm, and more. write_model_properties_json does this for you.
pzmm.JSONFiles.write_model_properties_json( model_name=prefix, target_variable=target, # Target variable to make predictions about (BAD in this case) target_values=target_values, # Possible values for the target variable (0 or 1 for binary classification of BAD) json_path=model_path, # Where are all the JSON files? model_desc=model_desc, # Describe the model model_algorithm="Ensemble", # What kind of algorithm is it? modeler=modeler # Who made the model? ) |
If you take a look at ModelProperties.json, you can view what SAS Model Manager will add to the model properties once you register it.
{ "name": "XGBoost", "description": "XGBoost model for hmeq", "scoreCodeType": "python", "trainTable": "", "trainCodeType": "Python", "algorithm": "Ensemble", "function": "classification", "targetVariable": "BAD", "targetEvent": "1", "targetLevel": "Binary", "eventProbVar": "P_1", "modeler": "Stu Sztukowski ", "tool": "Python 3", "toolVersion": "3.11.13", "properties": [] } |
Step 5: Connect to SAS Viya
Use the Session function of sasctl to start a session on your SAS Viya server. You have a few different authentication methods available:
- Username/password
- Client ID and secret
- OAuth token
Your administrator can help you figure out the appropriate authentication method. Here is one example of how you might connect using a username and password:
sess = Session( 'https://my-viya-server.com', username=input('Enter username'), password=getpass.getpass('Enter password'), protocol='https', verify_ssl=False ) |
Step 6: Register your model
You’re now ready to register your model to SAS Viya. Use import_model from pzmm to zip up all the files and register your model automatically. When you do this, lots is happening behind the scenes: a project is built, model files are loaded, and a plethora of checks are done to ensure that it all is going as planned.
pzmm.ImportModel.import_model( model_files = model_path, # Where are the model files? model_prefix = prefix, # What is the model name? project = project, # What is the project name? input_data = X, # What does example input data look like? predict_method = [xgb_model.predict_proba, [int, int]], # What is the predict method and what does it return? overwrite_model= True, # Overwrite the model if it already exists? score_metrics = target_cols, # What are the output variables? target_values = target_values, # What are the expected values of the target variable? target_index = 1, # What is the index of the target value in target_values? model_file_name= prefix + ".pickle", # How was the model file serialized? missing_values = True # Does the data include missing values? ) |
If successful, you will see the following message:
The model was successfully imported into SAS Model Manager as XGBoost with the following UUID: {UUID}.
Log in to SAS Model Manager and open the Projects page. Sort it in descending order by modified time and you’ll see your project at the top:
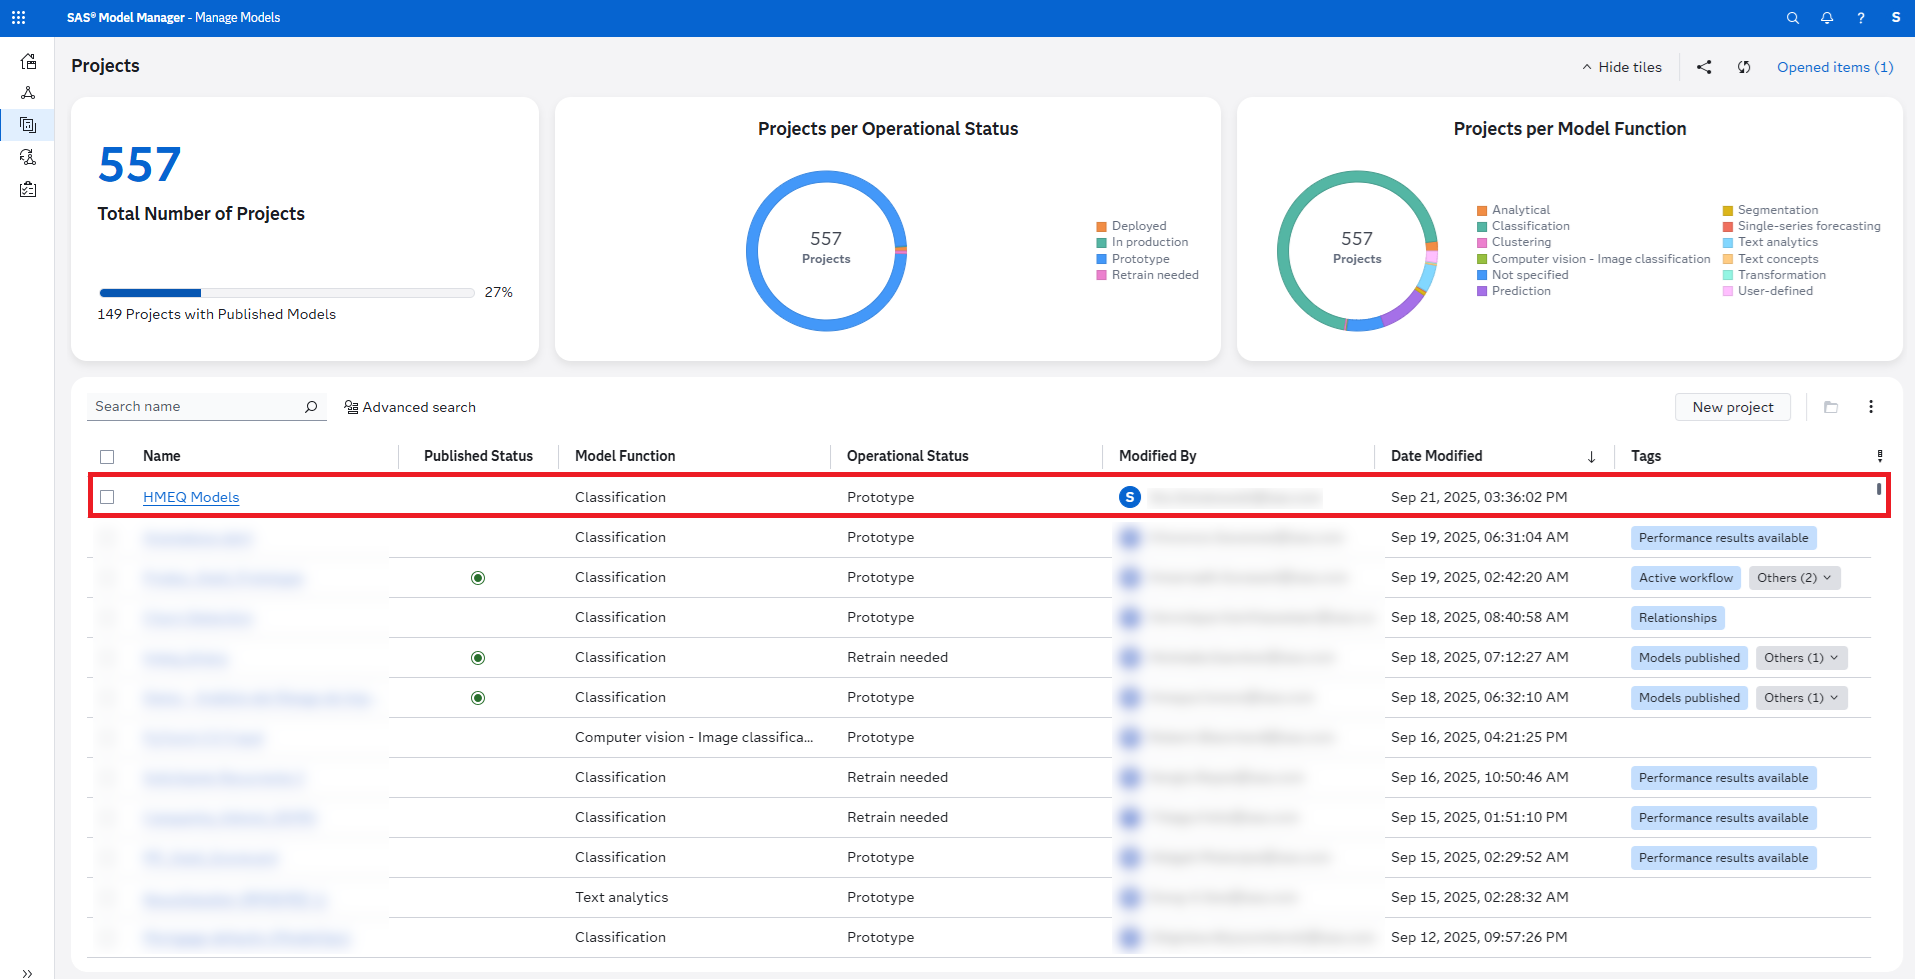
Open the project and you’ll see your model:

But what if I can’t connect to SAS Viya?
You still have an option available. import_model is also a wrapper for two methods that you can run yourself:
Running both will generate your score code and zip up everything into a nice package that you can then download to your machine and manually import into Model Manager through the UI.
pzmm.ScoreCode.write_score_code( model_files = model_path, # Where are the model files? score_code_path= model_path, model_prefix = prefix, # What is the model name? project = project, # What is the project name? input_data = X, # What does example input data look like? predict_method = [xgb_model.predict_proba, [int, int]], # What is the predict method and what does it return? overwrite_model= True, # Overwrite the model if it already exists? score_metrics = target_cols, # What are the output variables? target_values = target_values, # What are the expected values of the target variable? target_index = 1, # What is the index of the target value in target_values? model_file_name= prefix + ".pickle", # How was the model file serialized? missing_values = True, # Does the data include missing values? is_viya4 = True ) pzmm.ZipModel.zip_files( model_files = model_path, # Where are the model files? model_prefix = prefix, # What is the model name? is_viya4 = True # Set to False if Viya 3.5 or earlier ) |

Simply download the zip file to your machine, then log into SAS Model Manager and create a new modeling project. Open it up and select Add Models. From there, you can import your zip file.

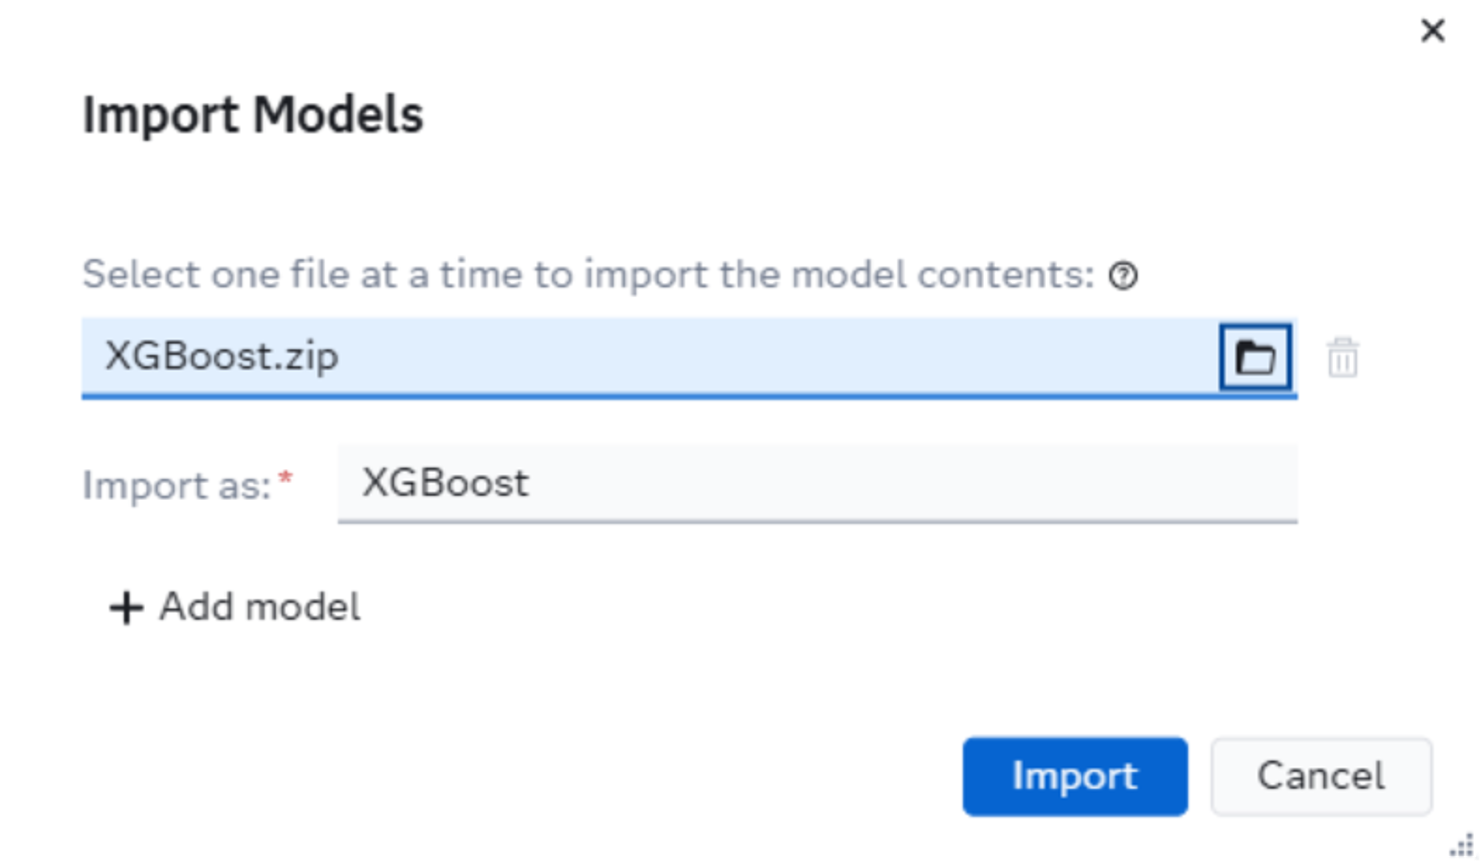
Now you know where the zip part comes from in Python Zip Model Management!
Run a scoring test
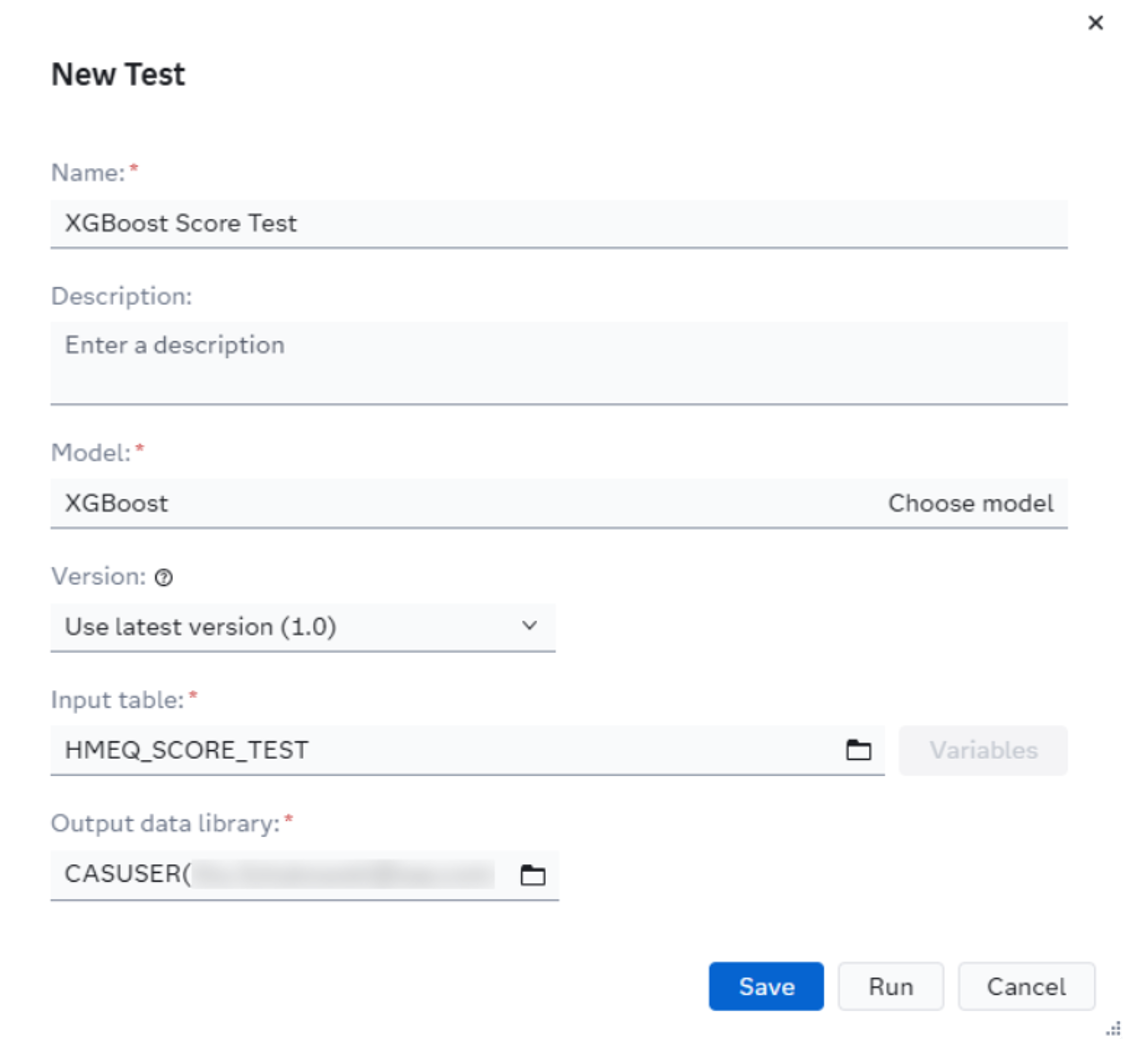
It’s a good idea to confirm that your model will run successfully and that SAS Viya isn’t missing any packages that the model needs. Running a scoring test on the model is a quick way to find out. You can run a new test from your project’s Scoring tab. Click the New Test button and fill out the form. Make sure that the data you upload is in the exact format that your model expects.
The test page will show you if it was successful. You can dive further into the results to confirm that it is working by looking at the log and output.
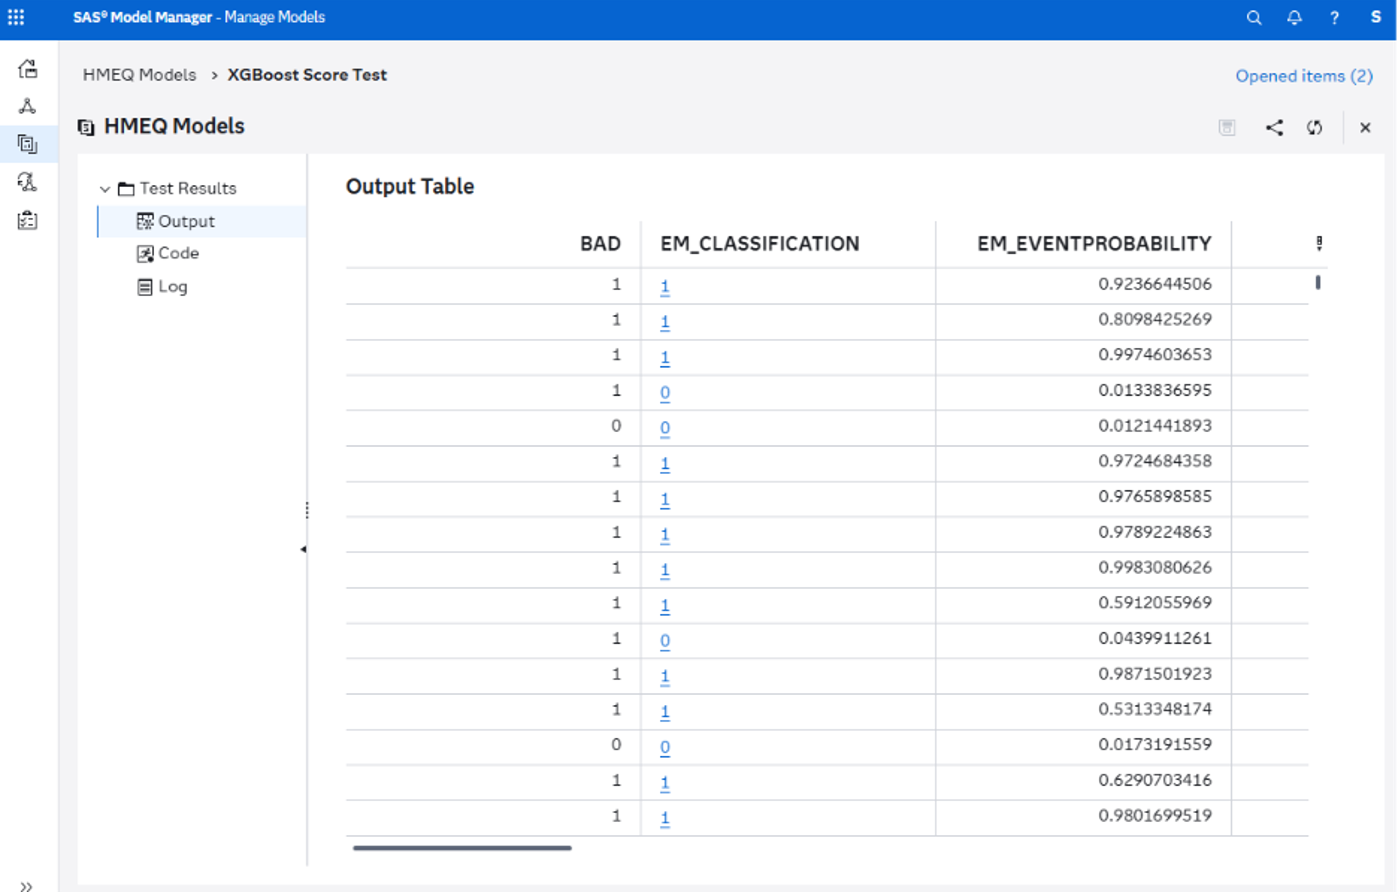
If it all looks good, then you’re done! Your model is now ready to be published to a multitude of destinations and put to work.
There’s no place like home
One of the most amazing things about SAS Viya Workbench is how you can spin up powerful environments in seconds yet still have that feeling of running code directly from your laptop. If you’ve been building Python models and registering them into SAS Model Manager already, then you already know how to do it on SAS Viya Workbench. It really is that easy. But we’ve just covered the basics. There’s so much more you can do, like build Model Cards, enable model performance monitoring, and loads of other features you need for the last mile of AI.
What models do you find yourself working with most? How do you use Model Manager with your Python models? Let me know in the comments below!
Links
- Example Notebook: Registering Open Source Models to SAS Viya from SAS Viya Workbench
- Model Management Resources for Open-Source Models
- Open Source Models in the SAS Viya Platform
- Registering MLFlow Models to SAS Model Manager using sasctl: A Comprehensive Guide
- sasctl and pzmm Examples
- sasctl and pzmm API Reference