Related Post: Splitting a data table into multiple sheets of an Excel workbook
![]() No matter which powerful analytical tools data professionals use for their data processing, MS Excel remains the output of choice for many users and whole industries.
No matter which powerful analytical tools data professionals use for their data processing, MS Excel remains the output of choice for many users and whole industries.
In banking and finance, for example, I have seen many SAS users create quite sophisticated data queries and data analysis projects in SAS Enterprise Guide. Yet, at the end, when the final datasets have been produced and validated, comes the manual part when users export those tables into Excel, and then combine and rearrange them by copying-pasting into a desired workbook for storing and distributing.
However, this heavily manual process can be not just fully automated, but also enhanced compared with the point-and-click “export to Excel” and “copy-paste” interactive process. Here is how.
Creating a single simple Excel sheet
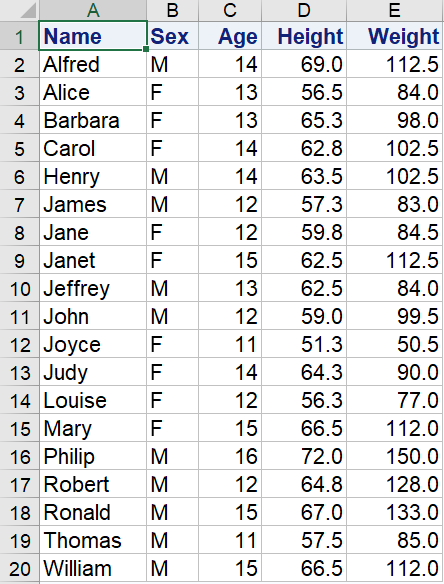
Suppose, we want to convert SASHELP.CLASS data table to Excel. Here is a bare-bone solution using SAS Output Delivery System:
ods excel file='C:\Projects\SAS_to_Excel\Single_sheet.xlsx'; proc print data=SASHELP.CLASS noobs; run; ods excel close; |
This code is pretty much self-explanatory. It will produce Single_sheet.xlsx Excel workbook file in the folder C:\Projects\SAS_to_Excel. When opened in Excel, it will look as follows:
If you browse through the ODS EXCEL documentation you will find a variety of options that allow you to customize Excel output. Let’s get a little fancy by utilizing some of them.
Creating several customized sheets in Excel workbook
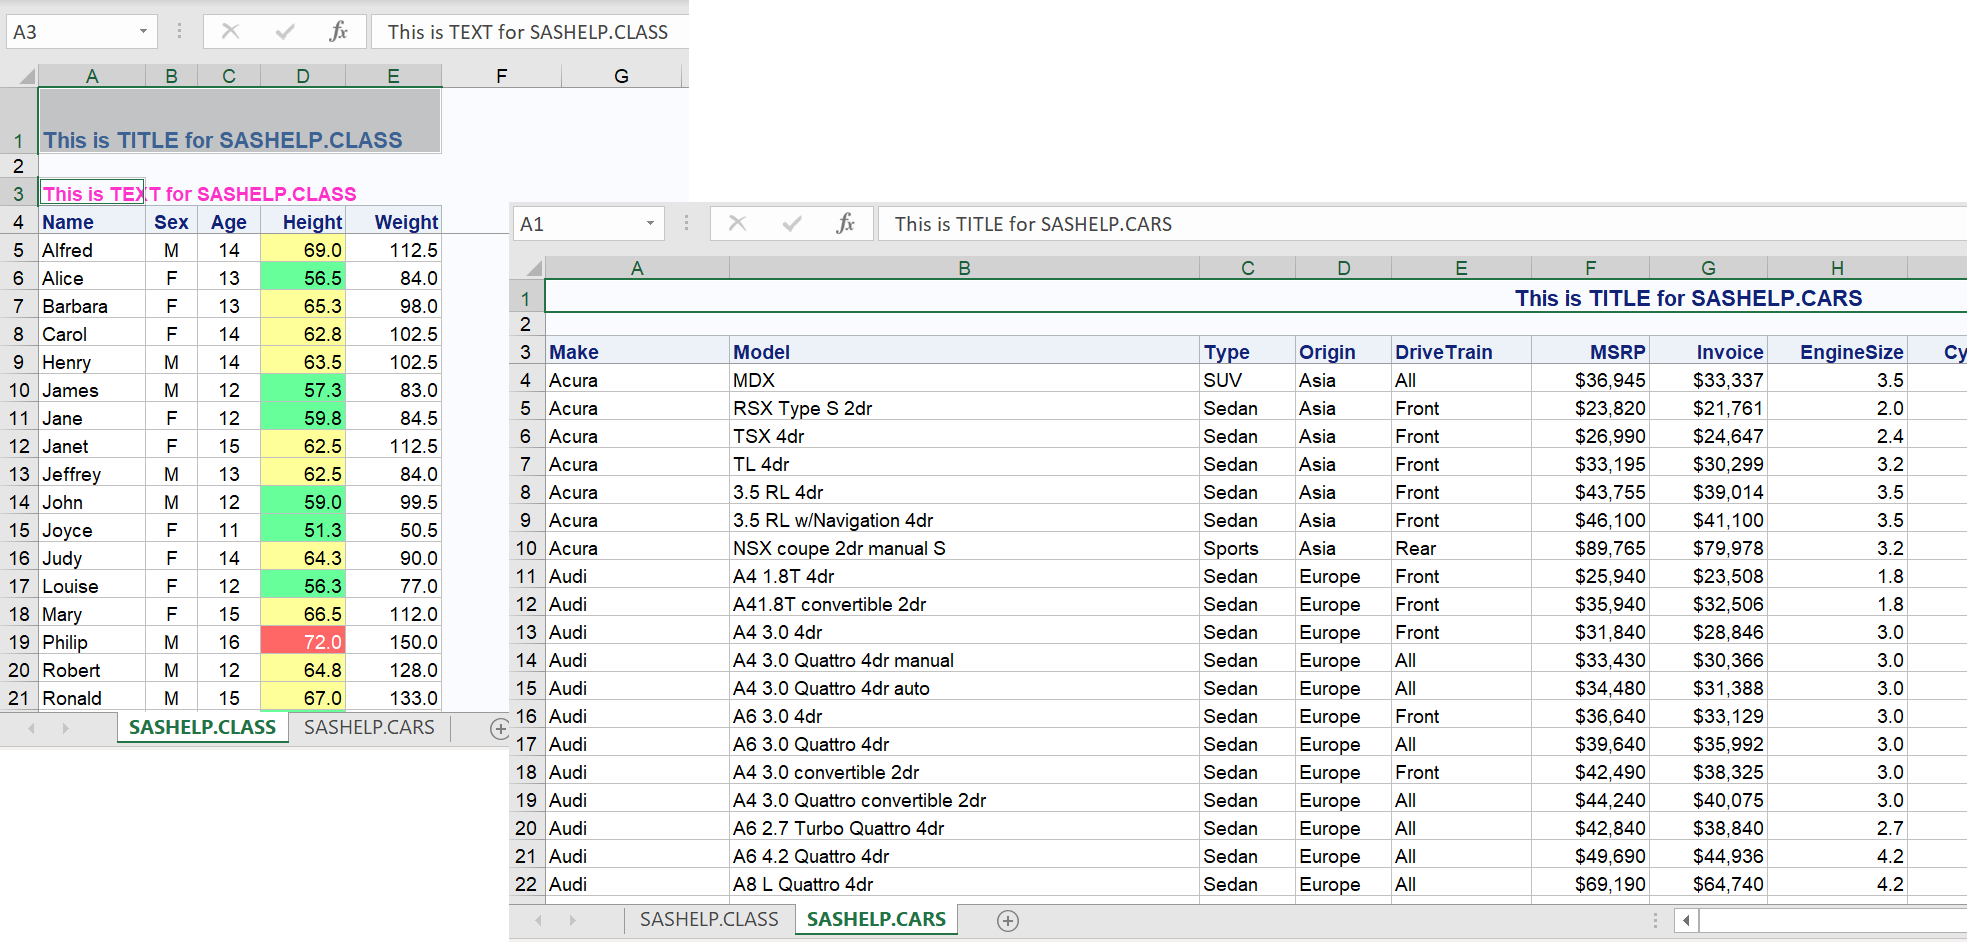
The following code example creates two sheets (tabs) in a single workbook. In addition, it demonstrates some other features to enhance data visualization.
/* -------------------------------------------- */ /* Two sheets workbook with enhanced appearance */ /* -------------------------------------------- */ /* Formats for background & foreground coloring */ proc format; value hbg 50 <- 60 = #66FF99 60 <- 70 = #FFFF99 70 <- high = #FF6666 ; value hfg low -< 50, 70 <- high = white; run; /* Define custom font style for ODS TEXT */ proc template; define style styles.MyStyle; parent=styles.htmlblue; style usertext from usertext / foreground = #FF33CC font_weight = bold ; end; run; /* ODS Excel output file destination */ ods excel file = 'C:\Projects\SAS_to_Excel\Two_sheets_fancy.xlsx'; /* Excel options for 1st sheet (tab) */ ods excel options ( sheet_name = 'SASHELP.CLASS' frozen_headers = 'on' embedded_titles = 'on' ) style = styles.MyStyle; title justify=left color='#4D7EBF' 'This is TITLE for SASHELP.CLASS'; ods text='This is TEXT for SASHELP.CLASS'; proc print data=SASHELP.CLASS noobs; var NAME; var SEX AGE / style = {just=C}; var HEIGHT / style = {background=hbg. foreground=hfg.}; var WEIGHT; run; /* Excel options for 2nd sheet (tab) */ ods excel options ( sheet_name = 'SASHELP.CARS' frozen_headers = 'on' embedded_titles = 'on' ); title 'This is TITLE for SASHELP.CARS'; proc print data=SASHELP.CARS noobs; run; ods excel close; |
Here are the code highlights:
- PROC FORMAT creates two formats, HBG and HFG, which are used in the first PROC PRINT to illustrate cell text and background coloring.
NOTE: In SAS, colors are specified as hexadecimal RGB values (cxRRGGBB). However, I found (although it seems undocumented) that in PROC FORMAT and PROC TEMPLATE these colors can be written as quoted (double or single) or unquoted values, as well as prefixed with either ‘#’ or ‘cx’ (for hexadecimal). For example, the following are all valid values: #FFAADD, '#FFAADD', cxFFAADD, 'cxFFAADD'. - PROC TEMPLATE defines usertext custom font style for ODS TEXT, which used in ODS EXCEL along with and as alternative to the TITLE statement.
- ODS EXCEL FILE=file-specification statement opens the EXCEL destination and specifies the output file for ODS EXCEL. The output file-specification can be either a physical file name (must be in quotes) or a fileref (without quotes) assigned with FILENAME statement. It can point to a location on the machine where SAS is run (SAS server), or a network drive accessible from the SAS server.
This statement follows by two separate ODS EXCEL OPTIONS statements – one per corresponding sheet (tab). - ODS EXCEL OPTIONS statement specifies destination-specific suboptions with space-delimited name='value' pairs. In particular, we use the following options:
- SHEET_NAME= specifies the name for the next worksheet (worksheet names can be up to 28 characters long).
- FROZEN_HEADERS='ON' specifies that headers are not scrolled when table is vertically scrolled (default is OFF). It is very convenient feature that keeps the title(s) and column names in view while user scrolls through the data rows.
- EMBEDDED_TITLES='ON' specifies whether titles should appear in the worksheet (default is OFF).
There is a variety of other useful ODS EXCEL options allowing further customization of your Excel workbook appearance and functionality.
- TITLE statement is highly customizable with Output Delivery System as shown in this custom TITLE with ODS example.
- ODS TEXT= statement inserts text into your ODS output. Unlike TITLE for which ODS EXCEL merges several cells, ODS TEXT places its text in a single cell (see screenshot below). The UserText style element that we modified using PROC TEMPLATE controls the font style, font color, and other attributes of the text that the ODS TEXT= statement produces.
- In PROC PRINT, we use multiple VAR statements to select variables, determine their order and apply styles (text and background colors) to the printed values. There are much more ODS styles with PROC PRINT available for further customizations.
- The next section of the code ( /* Excel options for 2nd sheet (tab) */ ) creates the second sheet in the same Excel workbook. Similarly, you can create as many sheets/tabs as you wish.
- The last statement ods excel close; closes the ODS Excel destination so nothing more is written to the output file.
The following are the two screenshots illustrating the two sheets in the produced Excel workbook:
Questions
Do you find this post useful? Do you have questions, comments, suggestions, other tips or tricks about creating MS Excel workbooks in SAS? Please share with us below.
Additional Resources
- Exchanging Data From SAS® to Excel: The ODS Excel Destination (book by William E. Benjamin Jr., 2017)
- Insights from a SAS Technical Support Guy: A Deep Dive into the SAS® ODS Excel Destination (SESUG paper by Chevell Parker, 2018)
- Power Up Your Reporting Using the SAS® Output Delivery System (SGF paper by Chevell Parker, 2019)
- Using SAS® ODS EXCEL Destination "Print Features" to Format Your Excel Worksheets for Printing as You Create Them (PharmaSUG paper by William E Benjamin Jr., 2019)

24 Comments
Thank you, Leonid-san.
I found inspiration in this blog.
I have a poster presentation tomorrow.
(Japanese only)
https://www.sas.com/ja_jp/events/22/users-group-2022/sessions.html#m=p-1
Yoshihito
I am happy to hear it. Good luck with your presentation, Yoshihito!
Thank you very much! It is very neat and clear as always! Also lots of comments are very good addition to the article! 🙂
You are welcome! And thank you, Elena, for such a nice addition to the article! 🙂
Hi Leonid,
Thanks for your excellent blog post, just wanted to check if is it possible to print multiple datasets into the same sheet with different titles and footnotes for each dataset?
I achieved printing multiple datasets on the same sheet using the ods excel option - sheet_interval="none" however the titles and footnotes are not coming as intended.
Thanks,
- Nikhil
Hi Nikhil, thanks for your comment and a great question. Yes, it is possible to print multiple tables on the same sheet with different titles and and footnotes. You just use sheet_interval='none' as you suggested, plus embedded_titles='on' and embedded_footnotes='on' options; see this example:
Also see my another blog post that does the opposite; it splits one tables in parts and places each part into different tabs (sheets) - Splitting a data table into multiple sheets of an Excel workbook.
Can we set the excel "table style" which is under the "Table Design" tab using ODS excel?
Hi Lianbo, could you please clarify your question? What software are you talking about? Where is the "Table Design" tab?
In Excel, Home ->Format as table , then in "Table Design" tab, select "Banded rows"
It's Excel's "table style", I want to achieve this by SAS ODS Excel.
You can open it throght "Home" --> "format as table", then in "Table Design" tab, you can customize "Banded Rows"
Hi Lianbo, I don't think you can apply those MS Excel styles directly in SAS ODS Excel. However, you can customize many SAS-supplied styles by using PROC TEMPLATE for modifying PARENT style as shown in this blog post. You can browse the appearances of the SAS-supplied styles, for example in SAS Enterprise Guide, by going to Tools -> Style Manager. There you can pick a style from the Style List in the left pane, and preview its look in the Preview pane in the right pane.
very helpful, thank you
Hello Leonid, very useful and easy-to-read post!
Is it also possible to write to Excel using (my) Excel defaults (font name, size, color) and with visible gridlines?
Thanks!
Eric
Hi Eric, thanks for your feedback and great questions. It is possible to customize Excel style to control your data cells' font name, size and color. You would need to add another STYLE statement to the PROC TEMPLATE, here is an example:
In order to have visible grid lines, you would need to remove the background color (grey) of the worksheet. This is done by the BACKGROUNDCOLOR= (alias BACKGROUND=) attribute set to _UNDEF_ for the BODY style element. Here are a couple examples:
See also discussion on using CLASS vs. STYLE.
Thank you Leonid. Such a simplified and elucidated explanation . When would you use ods text over title ? Can text be centered or right justified?
Thank you, Mona, for your feedback! I see two main differences between ODS TEXT and TITLE:
1) As described in this post: "Unlike TITLE for which ODS EXCEL merges several cells, ODS TEXT places its text in a single cell".
2) There is a limit of 10 TITLE lines (denoted as TITLE1, TITLE2, ..., TITLE10), but there is no limit on the number of ODS TEXT lines (so if you need to include a brief history of the world along with a detailed description of the table that follows, you are in a better shape with ODS TEXT. 🙂 )
Got it! 😊 Thanks so much for the clarification .
Oh, and by the way, according to Chevell Parker of SAS Technical Support, "we cannot justify the text using ODS TEXT within the ODS Excel destination."
Wow, good job! I have learnt something on ods excel. Is there a way of having a dynamic proc format, such that every time say a user has different data, the colours change?
Thank you, Daniel, great question! Yes, you can create dynamic format for colors using PROC FORMAT that is data-driven, see
Example 13: Creating a Format from a CNTLIN= Data Set. That way you can assign any colors to data value ranges dynamically.
Leonid, thank you for sharing those useful tips. I love the colors!
You are welcome, Tatiana! I love them too. Plus value-based color-coding makes it so much more intelligible...
Excellent stuff! Thanks Leonid, a great guidance for exporting and customizing tables into Excel.
Helps a lot to see how we use ODS excel options statement effectively.
Thank you again for posting.
Thank you, Murat, for your feedback!