Thousands of SAS users are migrating from SAS University Edition to SAS OnDemand for Academics (ODA). I thought I would share some of my thoughts, having just finished two books using ODA (Getting Started with SAS Programming: Using SAS Studio in the Cloud and A Gentle Introduction to Statistics Using SAS Studio in the Cloud). Users of SAS University Edition had to download software to create a virtual computer on their local computer, then download the SAS software, and finally, set up a way to read and write files from their “real” computer to their “virtual computer.” This caused many people massive headaches (including me). The great news about SAS OnDemand for Academics is that you don’t have to download anything! You access SAS on a cloud platform. Also, reading data from your real computer is quite simple.
ODA was developed so that people can use it to learn how to program and run tasks using SAS. It is not to be used for commercial purposes. There is also a 5-gigabyte limit for data files, but that is certainly not a problem for learning how to use SAS.
Registering for ODA
To gain access to ODA, you need to register with SAS. Part of the registration process is to create a SAS profile. If you already have a SAS profile, skip that portion of the instructions.
To start, point your browser to:
You will have to wait for an email from SAS with an approval, but once you have access, it is a delight to use. Let me show you step-by-step how easy it is to upload an Excel workbook from your local computer to SAS Studio using ODA.
This first figure shows a worksheet (Drug_Study.xlsx) with information on four individuals.
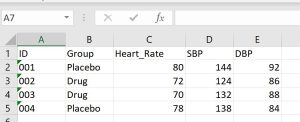
All the variable names should be self-explanatory except for SBP (systolic blood pressure) and DBP (diastolic blood pressure). It is a good idea to choose variable names that are compatible with SAS V7. The next step is to select a folder in the Server Files and Folder tab in SAS Studio and upload the file. This tab is shown in Figure 2 (with the UPLOAD icon circled).
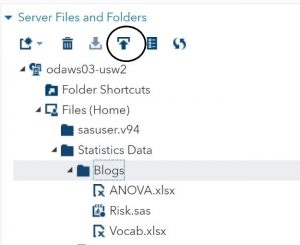
Once you click the UPLOAD icon, you are given the option to select a file.
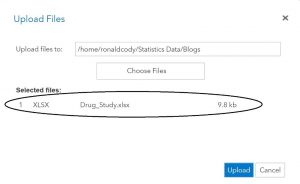
Select your file, click UPLOAD, and the file on your local hard drive (Drug_Study.xlsx) will appear in the SAS Studio folder (Figure 4). (Note: you can upload multiple files at one time if you choose.)
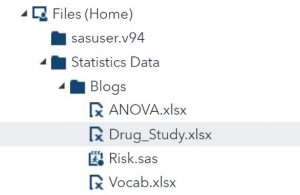
You can now use the IMPORT utility (under Tasks and Utilities) to convert this Excel file to a SAS data set. In this example, the default name of the WORK file (IMPORT) was changed to Drug_Study. A list of variables is shown in Figure 5.
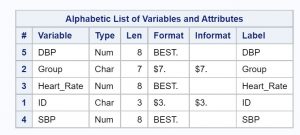
You can now write programs or use SAS Studio tasks to analyze this data set.
To learn more about how to use SAS Studio as part of SAS OnDemand for Academics, write SAS programs, or use SAS Studio tasks, please take a look at my new book, Getting Started with SAS Programing: Using SAS Studio in the Cloud.
I welcome comments and questions on this blog.
