About SAS® dates
Let’s begin with dates. We regularly hear customers say something similar to this: "I have a date, but I’m not sure how to use it or whether it’s even a SAS date yet." No worries--we can figure it out! A SAS date is a numeric variable whose value represents the number of days between January 1, 1960 and a specific date. For example, assume that you have a variable named X that has a value of 12398, but you’re not sure what that value represents. Is it a SAS date? Or does it represent January 23, 1998?
To determine what the value represents, you first need to run the CONTENTS procedure on the data set and determine whether the variable in question is character or numeric.
For this example, here is the partial output from the PROC CONTENTS step:
Alphabetic List of Variables and Attributes
#    Variable    Type    Len    Format

1    x           Num       8
2    y           Char      3
3    z           Num       8    Z5.
If X is a numeric variable, is a format shown in the FORMAT column for that variable? In this case, the answer is no. However, if the variable is numeric and there is no assigned format, this might be a SAS date that needs to be formatted to make sense of the value. If you run a simple DATA step to add any date format to that SAS date value, you will see that 12398 represents the date December 11, 1993.
data a;
mydate=12398;
format mydate worddate.;
run;
If you print the results of this program with the PRINT procedure, the output for data set A is as shown below:
Obs         mydate

 1     December 11, 1993
Is this a valid date in the context of this data sample? If you’re unsure, look at the other date values to see whether most of them are similarly structured. Most of the time, if a variable is stored as a SAS date, the variable is already assigned a date format, which is shown in the PROC CONTENTS output. If the value 12398 is a numeric variable such that the digits represent the month, day, and year of a given date (for example, January 23, 1998), you can convert it to a SAS date by running the following DATA step:
data a;
x=12398;
y=input(put(x,5.),mmddyy6.);
format y date9.;
run;
The PROC PRINT output from this step shows that the variable Y has a formatted value of 23JAN1998.
Obs      x              y

 1     12398    23JAN1998
The format that you assign to the variable can be any SAS format or custom-date format.
If the original variable is a character variable, you can convert it to a SAS date by using the INPUT function and the MMDDYY6. informat.
data a;
x='12398';
y=input(x,mmddyy6.);
format y date9.;
run;
Using arrays in SAS
Many customers aren’t quite sure that they understand how to use arrays. Arrays are a common construct in many programming languages. Arrays can seem less complex when you remember that they are a temporary grouping of variables. When you perform the same operation on multiple variables, you have less to program if you can refer to a group of variables by a single name. You simply execute a DO loop that processes each variable in turn, and the task is complete!
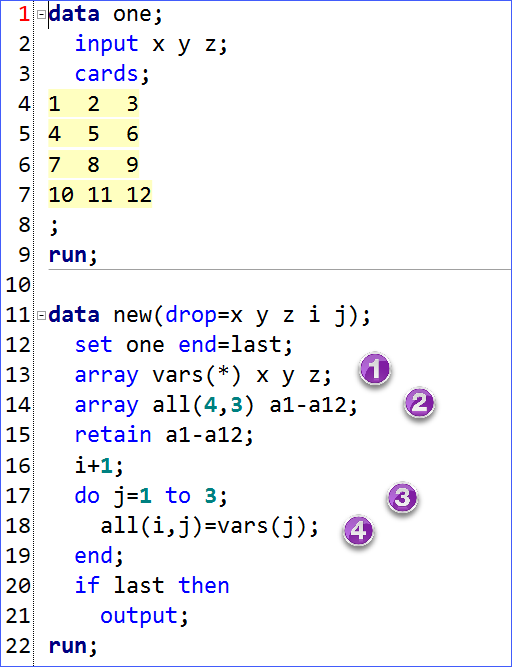
We often see arrays used for "reshaping data" or transposing a data set from wide-to-long (or long-to-wide). For example, assume that you want to reshape a data set, comprised of three variables and four observations, into a data set that contains twelve variables. Using an array approach makes the programming much easier, as shown below:

In this example:
-
1. The variables X, Y, and Z are loaded into an array named VARS, which means that they can be referred to as VARS(1) – VARS(3) or by the variable names X, Y, and Z.
2. A multidimensional array named ALL is created with twelve variables. The first number in parentheses represents rows, and the second represents columns.
3. A DO loop processes each variable in the VARS array.
4. The ALL array is populated one observation at a time by the value of I and the value of J as the DO loop increments.
Because the ALL array is populated by each observation as it is read from data set One, the END= option in the SET statement creates the variable LAST as a flag. This variable indicates when the last observation is read, and the IF statement tests variable LAST. If the variable has a value of 1 (which evaluates to "true"), the statement prints the contents of the program data vector to the output data set. Here's the starting data set and the reshaped result:

Managing PC files in client/server environments
When I began working in Technical Support many years ago, the only interface to Base SAS® software was the Display Manager System, which has separate Program Editor, Log, and Output windows. Now, you can run SAS in various ways, and many of our customers use SAS Enterprise Guide and SAS Studio as their interfaces. One of the most frequently asked questions from customers is about how to access local PC files from these applications that access SAS through a UNIX server.
SAS Enterprise Guide offers built-in tasks to upload and download data sets and other files. You can find these tasks on the Tasks->Data menu.

Two of the tasks, Upload Data Files to Server and Download Data Files to PC, allow you to copy SAS data sets directly between your local PC and your SAS libraries. The third task, Copy Files, allow you to copy any file (or group of files) between your local PC and the file system of the SAS session. See this article to learn how to apply a common pattern with this task: export and download any file from SAS Enterprise Guide. (Note: The Copy Files task was added in SAS Enterprise Guide 7.13. For earlier releases, you can follow the steps in this article.)
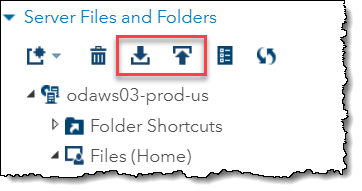
If you’re using the SAS Studio interface, you can upload and download files between the server and your PC.

To download a file from the SAS server to your computer:
-
1. Select the file that you want to download from the folder tree.
2. Click the download button and save the file according to the information in your browser dialog box.
To upload one or more files from your local computer:
-
1. Select the folder to which you want to upload the files and click the upload button.
2. In the Upload Files window, click Choose Files to browse for the files that you want to upload.
3. Select one or more files from your computer and click Open. The selected files are displayed as well as their size. An error message is displayed when you try to upload files where the total size exceeds 10 MB.
4. Click Upload to complete the upload process.
Always go back to the basics
The three topics that are discussed here don't represent new features or challenges. However, these topics generate many calls to Technical Support. It's a reminder that even as SAS continues to add new features and technology, we still need to know how to tackle the basic building blocks of our SAS programs.

1 Comment
I see these questions all the time as an instructor too. Thanks for the simple step-by-step breakdown describing both the problem and the solution! Great resource for any SAS programmers.