 The SAS® Output Delivery System provides the ability to generate output in various destination formats (for example, HTML, PDF, and Excel). One of the more recent destinations, ODS Excel, became production in the third maintenance release for SAS 9.4 (TS1M3). This destination enables you to generate native Microsoft Excel formatted files, and it provides the capability to generate worksheets that include graphics, tables, and text. If you generate spreadsheets, then the ODS Excel destination (also known as just the Excel destination) might be just the tool you're looking for to help enhance your worksheets.
This post begins by discussing the following Excel destination options that are useful for enhancing the appearance of worksheets:
- START_AT=
- FROZEN_HEADERS= and FROZEN_ROWHEADERS=
- AUTOFILTER=
- SHEET_NAME=
- ROW_REPEAT=
- EMBEDDED_TITLES=
The discussion also covers techniques for adding images to a worksheet as well as a tip for successfully navigating worksheets. Finally, the discussion offers tips for moving to the use of the Excel destination if you currently use one of the older ODS destinations (for example, the ExcelXP destination) and information about suggested hot fixes.
Using Excel Destination Options to Enhance the Appearance of Your Microsoft Excel Worksheet
There are certain ODS Excel destination options that you could conceivably add to any program that would make it easier for your users to navigate your worksheets.
These options include the following:
- START_AT= option
- FROZEN_HEADERS= and FROZEN_ROWHEADERS= options
- AUTOFILTER= option
- EMBEDDED_TITLE= option
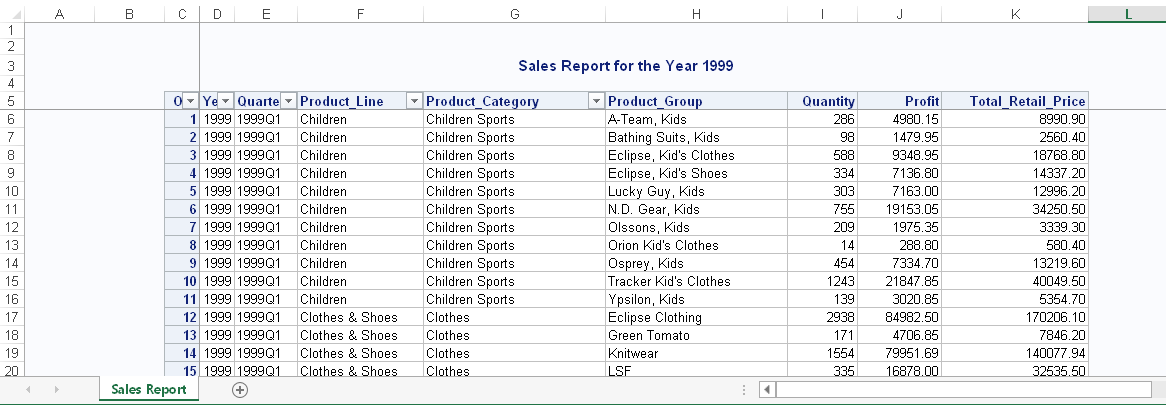
The following example uses all of the options described above. In this example, filters are added only to the character fields.
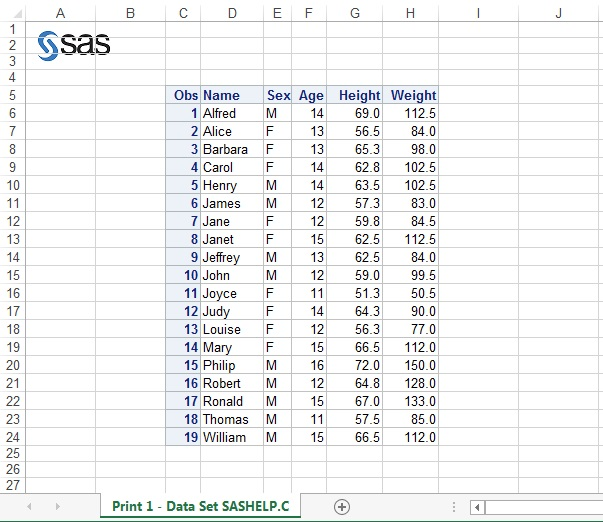
ods excel file="c:\temp.xlsx" options(start_at="3,3" frozen_headers="5" frozen_rowheaders="3" autofilter="1-5" sheet_name="Sales Report" row_repeat="2" embedded_titles="yes"); proc print data=sashelp.orsales; title "Sales Report for the Year 1999"; run; ods excel close; |
In This Example
- The START_AT= option enables you to select the placement of the initial table or graph on the worksheet. In Microsoft Excel, by default, a table or graph begins in position A1. However, pinning the table or graph in that position does not always provide the best visual presentation.
- The FROZEN_ HEADERS= option locks the table header in your table while the FROZEN_ROWHEADERS= option locks row headers. Both of these options lock your headers and row headers so that they remain visible as you scroll through the values in the table rows and columns.
- The AUTOFILTER= option enables you to add filters to tables headers so that you can filter based on the value of a particular column.
- The SHEET_NAME= option enables you to add more meaningful text to the worksheet tab.
- The ROW_REPEAT= option makes your report more readable by repeating the rows that you specify in the option. If this report is ever printed, specifying the rows to repeat, in this case the column headers would allow for easy filtering of the data.
- The EMBEDDED_TITLE= option specifies that the title that is specified in the TITLE statement should be displayed.
Output
Using the Excel Destination to Add and Update Images
Microsoft Excel is widely known and used for its ability to manipulate numbers. But if you want to go beyond just numbers, you can make your worksheets stand out by adding visual elements such as images and logos.
Graphic images that you generate with ODS Graphics and SAS/GRAPH® software (in SAS 9.4 TS1M3) are easy to add to a worksheet by using the Excel destination. However, the addition and placement of some images (for example, a logo) can take a bit more work. The only fully supported method for adding images other than graphics is to add an image as a background image.
The next sections discuss how you can add various types of images to your worksheet.
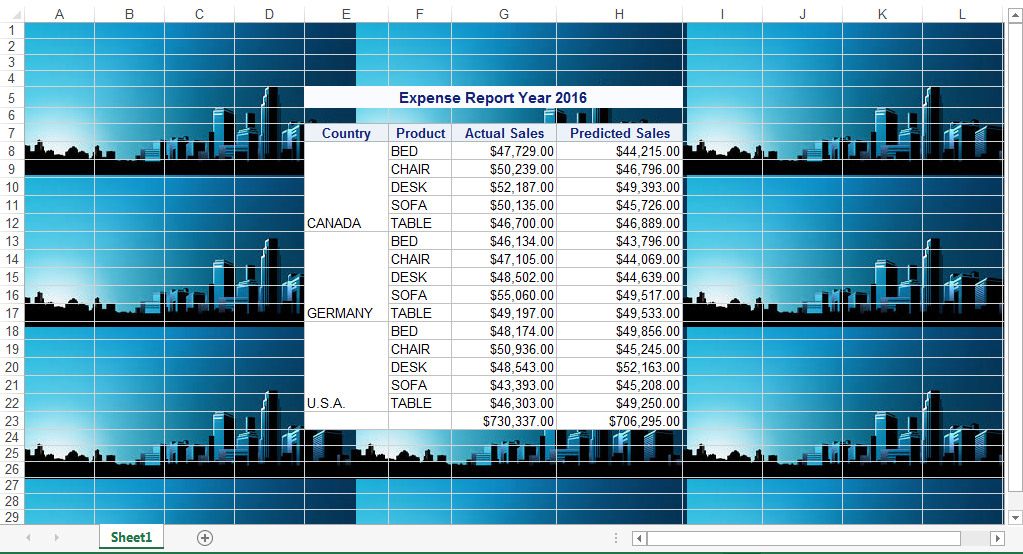
Adding Background Images
You can add images to the background of a worksheet by using either the TEMPLATE procedure or cascading style sheets. With PROC TEMPLATE, you add background images by using the BACKGROUNDIMAGE= attribute within the BODY style element. You also must specify the BACKGROUND=_UNDEF attribute to remove the background color. With a cascading style sheet, you use the BACKGROUND-IMAGE style property.
The following example illustrates how to add a background image using PROC TEMPLATE:
proc template; define style styles.background; parent=styles.excel; class body / background=_undef_ backgroundimage="c:\background.jpg."; end; run; ods excel file="c:\temp.xlsx" options(embedded_titles="yes" start_at="5,5" sheet_name= "Sheet1") style=styles.background; proc report data=sashelp.prdsale spanrows; title "Expense Report Year 2016"; column country product actual predict; define country / group; define product / group; rbreak after / summarize; run; ods excel close; |
In This Example
- PROC TEMPLATE uses the BACKGROUNDIMAGE= attribute within the BODY style element of the CLASS statement to include the image.
- The BACKGROUND=_UNDEF attribute removes the background color.
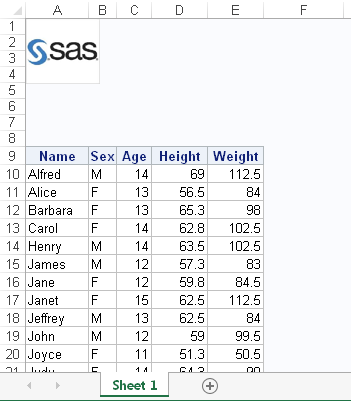
As you can see in the following output, Excel repeats (or, tiles) images that are used as a background. Excel repeats the image across the width of the worksheet.
Output
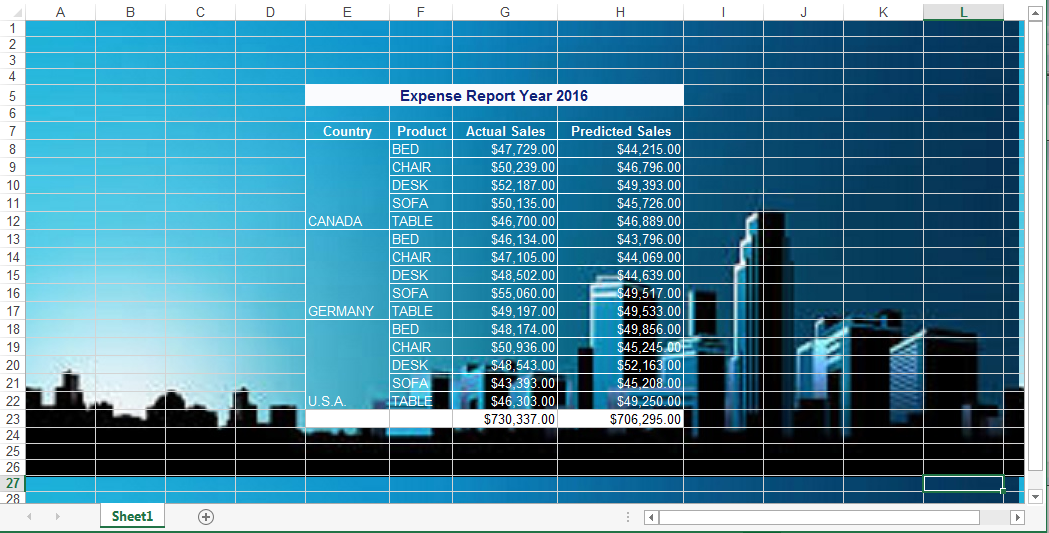
But this method of tiling might not be what you want. For example, you might want your image to cover the entire worksheet. To prevent the background image from being tiled, you can insert the image into an image editor (for example, Microsoft Paint) and enlarge the background image so that it covers the full page. You can also create a canvas (that is, a page) in the image editor and then add your background image to the canvas and save it. The Excel destination does not support transparency, a property in where the background image is visible through an image. However, you can use PROC TEMPLATE to simulate transparency by removing the background colors of the various cells. When you use any of the methods described above, your output includes an image that covers the full page.
The following example uses the PROC TEMPLATE method to create the background image and remove the background colors of the cells:
proc template; define style styles.background; parent=styles.excel; class body / background=_undef_ backgroundimage="C:\background_large.jpg"; class header, rowheader, data / color=white borderwidth=5pt bordercolor=white borderstyle=solid background=_undef_; end; run; ods excel file="c:\temp.xlsx" options(embedded_titles="yes" start_at="5,5" sheet_name="Sheet1") style=styles.background; proc report data=sashelp.prdsale spanrows; title "Expense Report Year 2016"; column country product actual predict; define country / group; define product / group; rbreak after / summarize; run; ods excel close; |
In This Example
- First, the image was included in Microsoft Paint to enlarge it.
- Then, PROC TEMPLATE uses the BACKGROUNDIMAGE= attribute within the BODY style element of the CLASS statement to include the enlarged image.
Output
Adding External Images to the Worksheet
Currently, the Excel destination does not support adding external images on a per-cell basis.
However, you can add external images (for example, a company logo) using either of the following methods:
You can accomplish this task in the following ways:
- manually add an image using an image editor
- use the GSLIDE procedure with the GOPTIONS statement
- use the %ENHANCE macro.
Adding an Image with an Image Editor
Using an image editor such as Microsoft Paint, you can place an image (for example, a logo) wherever you want it on the worksheet. In the following display, the image is brought into the Paint application and moved to the top left of a canvas.
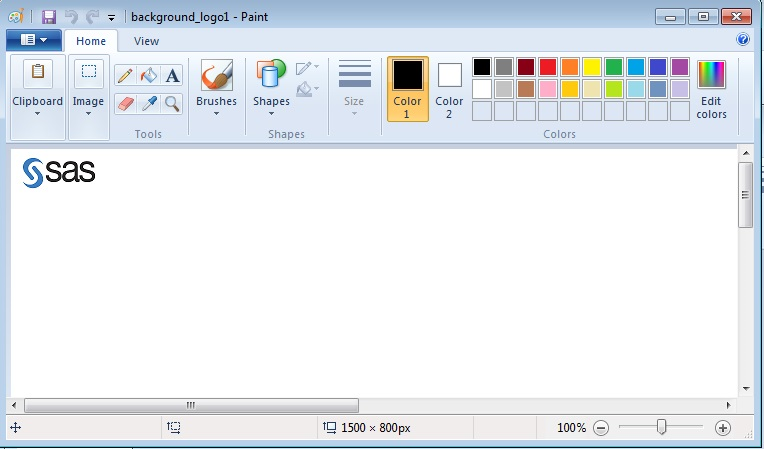
After you save this image, you can include it in an Excel worksheet as a background image using the BACKGROUNDIMAGE= attribute, which displays the logo without repeating it.
proc template; define style styles.background_kogo; parent=styles.excel; class body / background=_undef_ backgroundimage="c:\temp\background_logo"; end; run; ods excel file="c:\temp.xlsx" style=styles.background_logo; proc print data=sashelp.class; run; ods excel close; |
Output
Adding an Image Using the GOPTIONS Statement with the GSLIDE Procedure
You can also use the GOPTIONS statement and PROC GSLIDE procedure with the Excel destination to add a logo on the worksheet. This method requires SAS/GRAPH software to be licensed and installed.
To add a background image to the graph display area of PROC GSLIDE output, specify the IBACK= option in the GOPTIONS statement, as shown in the following example:
ods excel file="c:\temp.xlsx" options(sheet_interval="none"); goptions iback="c:\sas.png" imagestyle=fit vsize=1in hsize=2in; proc gslide; run; proc report data=sashelp.class; run; ods excel close; |
In This Example
- The GOPTIONS statement with the IBACK= option adds a background image to the graph display area.
- The IMAGESTYLE=FIT option keeps the image from repeating (tiling).
- The VSIZE= and HSIZE= options modify the size of the image.
- The Excel destination suboption SHEET_INTERVAL="NONE" specifies that the image and report output are to be added to the same worksheet.
Output
Adding an Image Using the %EXCEL_ENHANCE Macro
The %EXCEL_ENHANCE is a downloadable macro that enables you to place images on a worksheet in an exact location by using a macro parameter. The macro creates VBScript code that inserts your image in a specified location on the worksheet during post-processing.
The following example uses the %EXCEL_ENHANCE macro to add an image to a workbook.
Note: This method is limited to Microsoft Windows operating environments.
%include "C:\excel_macro.sas"; %excel_enhance(open_workbook=c:\temp.xlsx, insert_image=%str(c:\SAS.png#sheet1!a1, c:\canada.jpg#sheet1!b5, c:\germany.jpg#sheet1!b10, c:\usa.jpg#sheet1!b15), create_workbook=c:\temp_update.xlsx, file_format=xlsx); |
In This Example
- The %INCLUDE statement includes the %EXCEL_ENHANCE macro into your program.
- The %EXCEL_ENHANCE macro uses the INSERT_IMAGE= parameter to insert an image into the worksheet at a specified location. You can also specify multiple images, but they must be separated by commas.
The INSERT_IMAGE= option uses the following syntax in the %STR macro function to pass the image.
image-location #sheet-name ! sheet-position |
- The OPEN_WORKBOOK= parameter specifies the location of the workbook in which you want to add an image.
- The CREATE_WORKBOOK= parameter creates a new workbook that includes your changes.
- The FILE_FORMAT= parameter enables you to specify the extension or format for the files that are created.
Output

Navigating a Microsoft Excel Workbook
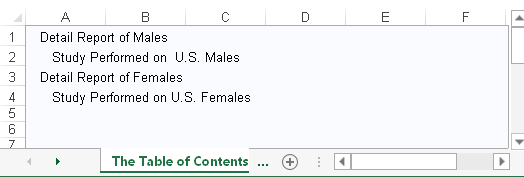
When you generate an Excel workbook with the Excel destination, the best way to navigate the workbook is by creating a table of contents. You can create a table of contents by using the Excel destination's CONTENTS= option. You can also use the PROC ODSLABEL statement to modify the table-of-contents text that is generated by the procedure. In the following example, that text (The Print Procedure) is generated by the PRINT procedure.
ods excel file="c:\temp.xls" options(embedded_titles="yes" contents="yes"); ods proclabel= "Detail Report of Males"; proc print data=sashelp.class(where=(sex="M")); title link="#'The Table of Contents'!a1" "Return to TOC"; run; ods proclabel= "Detail Report of Females"; proc print data=sashelp.class(where=(sex="F")); title link="#'The Table of Contents!a1'" "Return to TOC"; run; ods excel close; |
In This Example
- The CONTENTS= option is included in the ODS EXCEL statement to create a table of contents. You can also use the INDEX= suboption (not shown in the example code) to generate an abbreviated output. These options create the first worksheet within a workbook and include an entry to each element that is generated in the workbook.
- The ODS PROCLABEL statement is used to modify the table-of-contents text that is generated by the procedure name. In this example, the text The Print Procedure (generated by the two PROC PRINT steps) is modified to Detail Report of Males and Detail Report of Females, respectively.
- You can also modify the secondary link by using the CONTENTS= option in the procedure statements for the PRINT, REPORT, and TABULATE procedures.
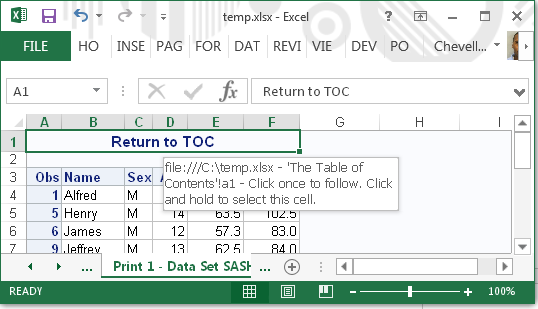
- The LINK= option in the TITLE statement adds a link that returns you to Table of Contents navigation page. You can also use this option in a FOOTNOTE statement. The argument that you specify for the LINK= option is the sheet name for the Table of Contents page. You can also add a link by using the Microsoft Excel hyperlink function in the ODS TEXT= statement using the Excel Hyperlink function.
Output
The output below shows the Table of Contents navigation page.
The next output shows a page in the report that contains the Return to TOC link.
Using the ODS Excel Destination instead of Older Destinations
Currently, you might be using older destinations (for example, the MSOffice2K or the ExcelXP tagsets). If you decide to move to the ODS Excel destination, you'll notice differences related to style, options, and wrapping between it and other destinations.
- One difference is that the Excel destination uses the Excel style, which looks similar to the HTMLBlue style. Other destinations use different styles (for example, the ExcelXP tagset uses styles.default.
- Certain options that are valid with the ExcelXP tagset are not valid in the Excel destination.
- Another difference that you'll notice right away is how the text is wrapped by the Excel destination. By default, the Excel destination uses an algorithm to try to wrap columns in order to prevent overly wide columns. When text wraps, a hard return is added automatically to the cell (similar to when you either press Alt+ Enter from the keyboard under Windows or you submit a carriage-return line feed [CRLF] character). You can prevent the Excel destination from adding this hard return in wrapping by specifying a width value that is large enough so that text does not wrap. You can also use the Excel destination's new FLOW= suboption, which is available in the fourth maintenance release for SAS 9.4 (TS1M4). This option contains the parameters TABLES, ROWHEADERS, DATA, TEXT, and a range (for example, A1:E20). When you specify the parameter TABLES, that automatically includes the HEADERS, ROWHEADERS, and DATA parameters.
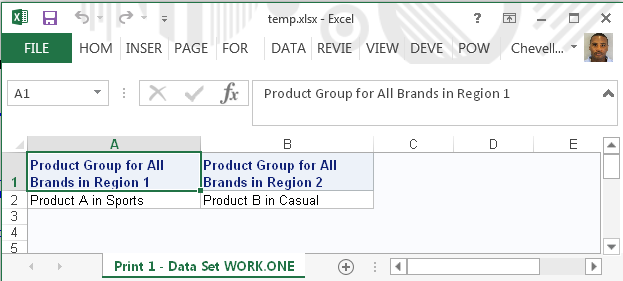
The following example demonstrates how to prevent the Excel destination from automatically generating a hard return for wrapped text in SAS 9.4 TS1M4.
data one; var1="Product A in Sports"; var2="Product B in Casual"; label var1="Product Group for All Brands in Region 1"; label var2="Product Group for All Brands in Region 2"; run; ods excel file="c:\temp.xlsx" options(flow="tables"); proc print data=one label; run; ods excel close; |
In This Example
- The first table shown in the output below is created by default. As a result, the header wraps in the formula bar where the CRLF character is added.
- The second table in the output is generated with the FLOW="TABLES" suboption (in the ODS EXCEL statement) to prevent the destination from adding the CRLF character to table headers, row headers, and data cells. When you add this option, Microsoft Excel text wrapping is turned on, by default.
Output
Table that is created by default:

Table that is created by including the FLOW="TABLES" suboption in the ODS EXCEL statement:
Hot Fixes for the Excel Destination
If you run SAS 9.4 TS1M3 and you use the ODS Excel destination, see the following SAS Notes for pertinent hot fixes that you should apply:
- SAS 56878, "The ODS destination for Excel generates grouped worksheets when multiple sheets are produced"
- SAS Note 57088, "The error 'applied buffer too small for requested data' might be generated when you use the ODS destination for Excel"
Resources
Bessler, LeRoy. 2015. "The New SAS ODS Excel Destination: A User Review and Demonstration."
Proceedings of the Wisconsin, Illinois SAS Users Group. Milwaukee, WI.
Huff, Gina. 2016. "An 'Excel'lent Journey: Exploring the New ODS EXCEL Statement."
Proceedings of the SAS Global Forum 2016 Conference. Cary, NC: SAS Institute Inc.
Parker, Chevell. 2016. "A Ringside Seat: The ODS Excel Destination versus the ODS ExcelXP Tagset."
Proceedings of the SAS Global Forum 2016 Conference. Cary, NC: SAS Institute Inc.

36 Comments
Hi Chevell,
How does SAS allocate memory when using ODS EXCEL and PROC REPORT? I have a job with ~20K observations. I can run the job on two different SAS installations with the same MEMSIZE setting and other memory group options. On one server, the job will run out of memory and on the other server, the job will complete.
Additionally, what PROC REPORT options or statements impact memory usage? I am looking to refine the PROC REPORT step to minimize the memory use.
Thanks,
Scott
Hi, thanks for the information
quick question I am using SAS 9.4 and and want to blank out some rows that have data I don't want to show.
I have tried foreground = White.
But that doesn't seem to work. any ideas
Hello Louise,
Which technique are you using to modify the foreground colors? I have used the CALL DEFIINE statement in the example with PROC REPORT to modify the foreground color. In the below example, all ages less than 16 should now be blanks since the foreground and background are the same color. Please let me know how this works for you.
ods excel;
proc report data=sashelp.class;
column name age sex height weight;
compute age;
if age.sum < 16 then call define(_col_,"style","style={color=white}");
endcomp;
run;
ods excel close;
Sincerely,
Chevell
Hi Chevell!!!
You are just the person I need!!! 🙂 I would like to place several graphs in one worksheet. But, instead of having them placed 1 on top of the other (vertically), I would like to have them placed next to each other (horizontally). Is there an easy way to do this without having to use PROC GREPLAY?
Thanks so much!!! 🙂
Cathy
Hey Cathy,
Its good to hear from you!!! Unfortunately, we can only add the graphs horizontally with ODS Excel, therefore you will need to use PROC GREPLAY here.
Sincerely,
Chevell
Hi,
While opening the ODS excel file, i'm getting Excel file is repair or corrupted message.. is there any way to overcome this issue
Hello,
There can be various reasons for this error such as issues with formulas, styles and things of this nature. The best way to debug a problem such as this is to comment out or remove the style overrides where you are adding things like formulas and styles tod see if you sill get the error when attempting to open the file. If you need further help with this, please either email me or open a tracking entry with Technical Support and we will help determine how to correct the issue.
Sincerely,
Chevell
Found it! https://support.sas.com/content/dam/SAS/support/en/sas-global-forum-proceedings/2018/2174-2018.pdf
Hey Pete,
I am glad that you found it. Let me know if you have any further questions. Have a great day.
Thanks,
Chevell
Chevell,
If my memory is correct, I thought last year in St Petersburg you showed us a way to get the column headers to show vertically in Excel ODs. I haven't been able to make that happen. Can you refresh my memory, or tell me I was dreaming?
Hi Chevell, I'm having a strange problem when I used ODS EXCEL on our GRID (Unix) server. If I do not specify a STYLE template like STYLE=HTMLBLUE, then all the "white space" (unused cells) in my excel workbook get turned red. Have you ever encountered this?
Hello Kent,
By default, even if you do not specify a style using the STYLE= option, the Excel style should be used by default. Typically Excel uses red when it cannot resolve a background color. It almost appears that a default color is being applied to the background of the worksheet cannot be resolved. This is similar to what you would see below when I added an invalid background color for the body of the worksheet below. Make sure that there is not an "Excel" style in SASUSER causing problems by using the ODS PATH statement pointing to the SASHELP.TMPLMST(READ) item store with the access method of read only and see if the problem still persist.
ods path(prepend) work.templat(update);
proc template;
define style styles.test;
parent=styles.excel;
class body /
background=xxxxx;
end;
run;
ods excel file="temp.xlsx" style=styles.test;
proc print data=sashelp.class;
run;
ods excel close;
Sincerely,
Chevell
Hi , when I run the code “ods excel file="c:\temp.xlsx" options(flow="tables");”
the log is “ERROR: Option "flow" not recognized.”
My sas is 9.4
Thanks
Hello Lee,
You will have to have at least SAS 9.4 Maintenance 4 to use this option. To verify, you can run the below statement.
%put &sysvlong;
Sincerely,
Chevell
is it possible to apply two proc reports with the same excel sheep name using ODS Excel.
Hello Venkat,
You can apply two procedures on the same worksheet using the SHEET_INTERVAL="NONE" ODS Excel sub-option. If you want to place multiple procedures on the same page and continue to a new worksheet and add more procedures, take a look at the SAS Note below which uses the SHEET_INTERVAL="NOW" option. Let me know if you have questions.
http://support.sas.com/kb/57766
Sincerely,
Chevell
Hi, I have a Excel template format with all variable names in row 1. Can I use ODS to copy all the observations that I have as a SAS dataset into this Excel template?
Thanks,
Sudha
Hello Sudha,
Unfortunately, ODS Excel does not have update access, therefore this is not currently possible. The ODS Excel destination creates a new workbook each time it executed. Please let me know if you have further questions.
Sincerely,
Chevell
Hi Chevell,
I am trying generate multi-sheet excel output using ODS EXCEL. However I am getting error when records count is around 10000. SAS is stopping process. I have almost 25 to 50 sheets to print in excel
I am using ODS EXCEL with proc print option. Kindly suggest me how to overcome this issue
Hello Srinivas,
You menitoned that you are getting an error when the record count is greater than 10,000. Are you getting an out of memory error in the SAS log? If so, then you will want to increase the memory allocaiton using the -MEMSIZE system option. You can use the below PROC OPTIONS to determine the current setting and increase this. I would not expect an out of memory error with the 10,000 records unless the table is also wide such as many variables as well. You can also run your code this using the FULLSTIMER system option to see how much memory is being used. Please let me know if this does not help or a different issue.
proc options option=memsize;
run;
Sincerely,
Chevell
if excecute via SAS-portal a Stored process with the ods excel is it possible to print previous a waiting message on html page?
Hello Niko,
Thanks for the great question! This task is easier done with HTML output and have not quite figured a way to do this with Excel. I will research this further and would like for you to open a tracking entry with this information using the below.
https://support.sas.com/ctx/supportform/createForm
Thanks,
Chevell
Hi Chevell:
I am fairly new to programming and SAS as well.
However, I need to migrate the legacy macro codes from Classic to SAS Studio and need to replace the DDE with ODS EXCEL.
I have tackled most issues but one thing I could not figure out is how to assign a password for the Excel file within the SAS program.
We deal with so many routine reports and it becomes inefficient to do that outside of the macro.
Do you have any advise on that?
Thanks.
Sylvia
Hello Sylvia,
The ODS Excel destination has the ability to add protection to the worksheet using the PROTECT_SHEETS= suboption. However, the ability to password protect the worksheet doesn't exist with ODS Excel. To add password protection would have to be done as a post processing step. For instance, if this is running on a windows server then we could use Powershell or VBScript to post process the file.
Sincerely,
Chevell
Thanks Chevell!
Sylvia
Hello Chevell,
It seem's that protect_sheets first is supported i 9.4 m5. Using proctect_sheets is it possible to unlock certain cells i Excel? I've tried to find information about unlock cells. I'm looking for a way to combine tagattr for unlock cells and options protect_sheets. Maybe tagattr index?
Is it possible?
kim
Hello Kim,
No, the PROTECT_SHEETS= option works on the worksheet only and not on the cell level. Currently, there is no support for that with ODS EXCEL, however, I will enter a suggestion to add this functionality on the cell level.
Sincerely,
Chevell
Great tips, Chevell!
Thanks Kirk!
How can I prevent the file created with ODS EXCEL from opening automatically?
Hello Tammy,
To prevent ODS Excel from opening automatically, follow the below menu items and deselect the "View Results as they are generated" checkbox.
Tools ► Options ► Preferences ► Results
Under Results Options, clear the "View Results as they are generated" option.
You can also toggle the statement, however, this will prevent the output any of the DATA steps or procedures from being added to the output
window.
ODS NORESULTS;
Sincerely,
Chevell
Hi Chevell,
the gslide technique for putting images in an excel document seems the best option for me, but is there a way to stop the size of the gslide object changing? I'm placing a wide logo across the top of each sheet followed by a proc report, but the width of the proc reports varies and this seems to affect the gslide image. I've experimented with aspect=1 and autosize=off but these seem to make no difference.
Cheers,
Dan
Hello Dan,
I see the problem but have not been able to come up with a good workaround for this. I added a defect for this so we can get this fixed in a future release.
Sincerely,
Chevell
Hi Chevell,
I tried GRIDLINES option in the ODS EXCEL destination. But it does seem to work . Do you know why? Thanks
Sorry. I meant to say the GRIDLINES Option does not seem to work in ODS EXCEL. I am using SAS 9.4M3.
Hello Prashant,
The GRIDLINES= suboption only applies to the printed output. If you go to Page Setup for this workbook select the Sheet tab, it should have the Gridlines for this worksheet if the options has been specified within the options list.
Sincerely,
Chevell