In my previous post, Jedi SAS Tricks - Make This a Button in Base SAS I demonstrated running a SAS program from a tool bar button in the SAS Windowing environment. The program we execute is the macro from a previous post, Jedi SAS Tricks: The DATA to DATA Step Macro. The wily Chris Hemedinger commented that he had written a blog about a custom task for this function in Enterprise Guide, which is an excellent solution for our Enterprise Guide users. Just so our SAS Studio users don't feel left out, I'm going to show you on how to make a custom SAS Studio task that runs the Data2DataStep macro for you. Because this post is a bit longer and more complex than usual, I'm going to include a link to a ZIP file containing a PDF of the instructions and a copy of the XML code for the Data2DataStep task.
SAS Studio tasks are written in XML, so are very easy to create, copy and modify. In fact, SAS Studio allows you to edit your tasks right in the browser! It's a very useful exercise to copy a few tasks and experiment with the XML to get a feel for what each section does. After poking around, I chose to start my new task by right-clicking in the Task window and choosing New Task from the pop-up menu. This creates a blank template we can use to create our task. Let’s got through the template section by section and create a task that will collect input, then execute the Data2DataStep macro for us.
The first section is the Registration section. First, note the GUID (Globally Unique Identifier). This 128-bit integer uniquely identifies each task. SAS Studio provides you a new GUID every time you copy or create a new task. OK - first we’ll edit the Name and Description tags for our task and add a Category tag to help keep out tasks organized. You can also add links to SAS documentation which might be of interest to the user, if desired. The information we enter here will appear on the INFORMATION tab of our task:
<Registration> <Name>Data2DataStep</Name> <Description>Generates a DATA step to recreate a few observations of a data set.</Description> <Category>Data</Category> <GUID>209039f4-f7e6-4916-97d1-6637f0ba2127</GUID> <Procedures>DATA step</Procedures> <Version>3.4</Version> <Links> <Link href="http://support.sas.com/documentation/onlinedoc/sasstudio/index.html">SAS Studio User's Guide</Link> <Link href="https://support.sas.com/documentation/cdl/en/lestmtsref/68024/HTML/default/viewer.htm#titlepage.htm">Base SAS Statements</Link> <Link href="http://support.sas.com/training/studio">SAS Tutorials</Link> </Links> </Registration> |
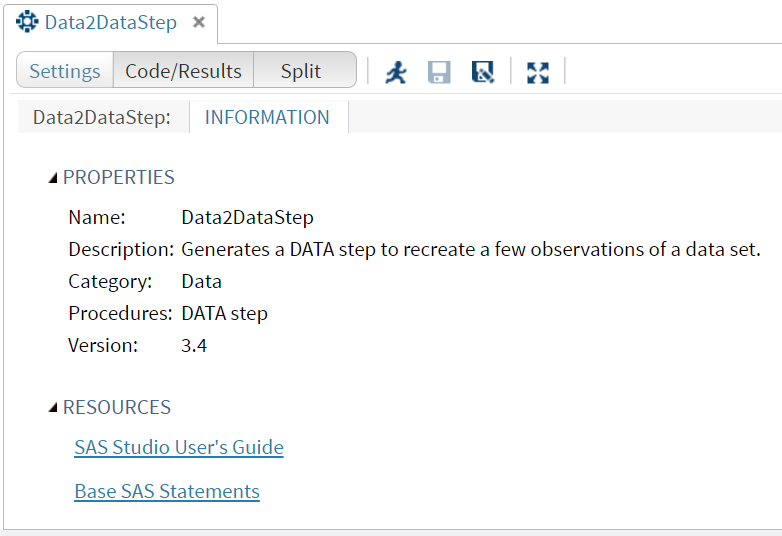
Here's what the INFORMATION tab looks like for our task:
Next, we’ll use the Metadata section to define the objects we will later display in the User Interface section. We’ll need the following object:
   <Metadata>
      <DataSources>
         <DataSource name="dataset">
         </DataSource>
      </DataSources>
      <Options>
         <Option inputType="string" name="dta">Input Data</Option>
         <Option inputType="string" name="opts">Options</Option>
         <Option inputType="string" name="TaskTitle">Data2DataStep:</Option>
         <Option inputType="inputtext" name="ProgramFile" indent="1" required="False" promptMessage="Enter the fully-qualifed name of the program file (Optional)">Program File:</Option>
         <Option inputType="numstepper" name="Nobs" indent="1" required="False" decimalPlaces="0" defaultValue="10" increment="1" invalidMessage="Number of observations (default is 10)" minValue="1" promptMessage="Enter an integer greater than 0 for the number of observations to be output" rangeMessage="Must be an integer greater than 0" rangeMessageKey="subsetNobsRangeKey" >Number of observations to output:</Option>
      </Options>
   </Metadata>
Next, we will deploy the objects we’ve defined to create a User Interface (UI) for our task:
   <UI>
      <Container option="TaskTitle">
         <Group open="true" option="dta">
            <DataItem data="dataset"/>
         </Group>
         <Group open="true" option="opts">
            <OptionItem option="ProgramFile"/>
            <OptionItem option="Nobs"/>
         </Group>
      </Container>
   </UI>
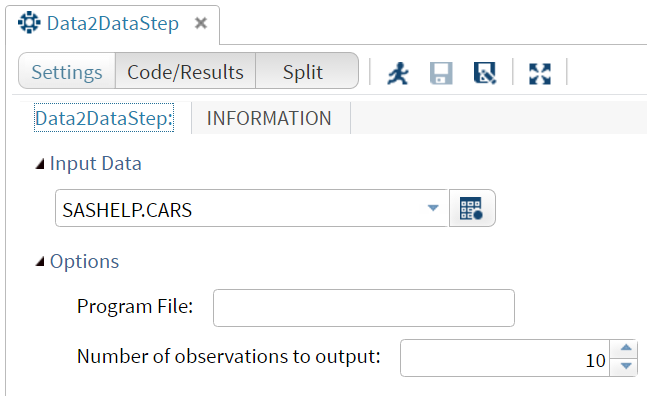
Here's what the main tab will look like when using this Task:
Lastly, we’ll need to populate the Code Template of our task so it can generate SAS code from our inputs. Values stored in objects are referenced with a $ and the object name. For example, to surface the dataset object value in our code, we will use '$dataset':
   <CodeTemplate>
   <![CDATA[
/* Write a DATA set to re-create a few observations of a data set */
%DATA2DATASTEP($dataset,,$ProgramFile,$Nobs)
]]>
   </CodeTemplate>
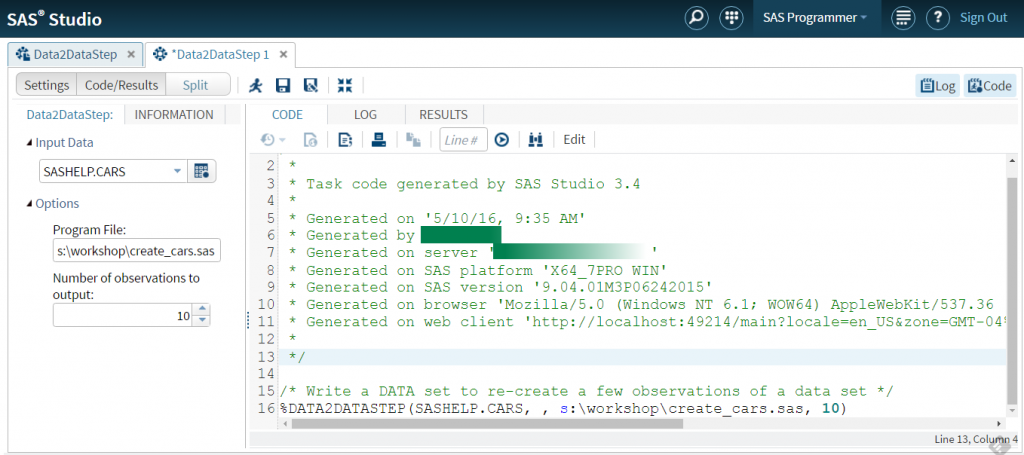
Save the task, and that’s it! Now we are ready to test our task. In the SAS Studio Tasks riser bar, choose the new task (My Tasks -> Data ->Data2Datastep). Fill in the form, and watch the code dynamically build in the Code/Results tab!
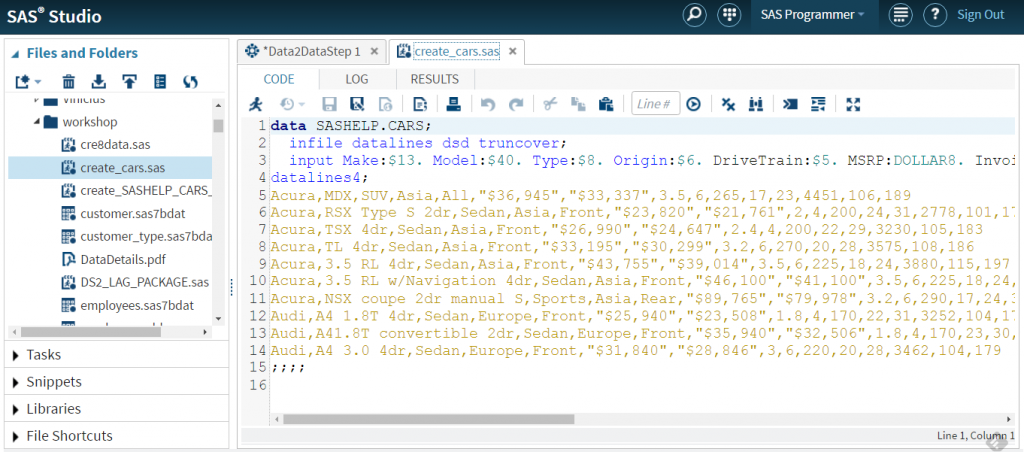
Submit the generated code and verify the program file you desired was indeed created.
You can download a PDF of these instructions and an XML file for this sask from this link.
That's all for this episode. Until the next time, may the SAS be with you!
Mark


5 Comments
Apologies, I guess I can just save it after I've selected the dataset and it will stay there as default!
Woot! That's the secret - save the task after selecting. Glad you found the answer, and glad you shared it here :-)
May the SAS be with you!
Mark
I've just started learning how to use custom tasks to try and make a user interface for non-SAS programmers. So far I really like it.
I'm just wondering if there's any way to specify a default dataset for the DataSource. I notice you have sashelp.cars as your input data set. Presumably this is after you have selected it, rather than it be a default.
I essentially want a role underneath so that the user can select columns from a dataset of my choosing but I can't figure out a way to do this without having them first select a dataset themselves. Is this possible?
Hope that was clear!
Thanks!
Pingback: Let SAS® Studio do your clinical research ‘tasks’ - SAS Voices
Pingback: Let SAS® Studio do your clinical research ‘tasks’ - A Shot in the Arm