When I purchased my Instant Pot a few years ago I didn’t think twice about having the Yogurt function included because I knew I would never make homemade yogurt. Bacteria, fermentation, boil, cool, incubate…so much potential room for error…no thanks. However, I finally got up the nerve to give it a try and I’m so glad I did!
Why Make Your Own Yogurt?
Making yogurt can be intimidating, I get it. But once you try it, you’ll never go back to store-bought. Homemade Greek yogurt has a much cleaner, fresher taste and costs a fraction of the price. You’re also able to control the quality of ingredients and know exactly what is in your yogurt.
Yes, it takes a full day to make but the work is being done for you while you sleep, work and play. You only need 5-10 minutes of hands-on time while your Instant Pot and fridge do the rest.
How to Do It
There are 2 ways to make yogurt in the Instant Pot: the super simple cold start method described in this blog and the boil and cool method. The primary differences between these methods are the type of milk used and the time it takes the make them.
The cold start method skips the boiling and cooling step and is the epitome of a “set it and forget it” process. This is my preferred way to make yogurt as the Instant Pot takes all the guesswork out of the process.
All you need is 2 ingredients, an Instant Pot*, the push of a button and a little patience. I’ve included lots of details below, but it all boils down to this:
- Mix milk with a little yogurt.
- Set the Yogurt function on the Instant Pot.
- Walk away and forget about it!
- Strain in the fridge.
- Enjoy!
*All Instant Pot models, except the Lux model, should have a Yogurt function. If your Instant Pot does not have this capability, you can still make yogurt in it, but you’ll need follow the boil and cool method.
Type of Milk
With the cold start method, you can use any unflavored/unsweetened ultra-pasteurized, UHT (ultra high temp), shelf-stable or powdered milk. Ultra-pasteurized is key as this type of milk has already been sterilized so the extra boiling step is not necessary. If using regular pasteurized or raw milk, you will need to use the traditional boil and cool method. If using non-dairy milk, some brands work better than others so you will need to experiment with different options to see what works best.
The most popular milk used with the cold start method is an ultra-pasteurized, ultra-filtered milk like this. Ultra-filtration removes lactose and much of the sugar resulting in a higher concentration of protein. A cup of regular cow’s milk contains 8 grams of protein while ultra-filtered cow’s milk has about 13 grams of protein per cup. Since the milk has a higher protein, lower sugar content, the yogurt will be much thicker prior to straining and won’t need to strain as long in the fridge.
Ultra-filtered milk is a great option and speeds up the process a bit, but it isn’t necessary to successfully make yogurt. Remember, ultra-pasteurized is the essential component — the rest is based on personal preferences.
If you prefer organic/grass-fed milk like I do, you may need to skip the ultra-filtered varieties. They exist but are harder to get your hands on (at least where I live). Instead, you can use any brand of unsweetened ultra-pasteurized organic, grass-fed milk (like this).
The fat content of the milk will determine how thick and creamy the resulting yogurt is. The less fat there is in the milk, the thinner the yogurt will be. Therefore, I’d recommend using whole or 2% milk.
Regardless of the milk you choose, you will get the best results using fresh milk that isn’t close to its expiration or sell by date.
2 ingredients, an Instant Pot, the push of a button and a little patience is all you need for out of this world homemade Greek yogurt #saslife Click To TweetYogurt Starter
In order to make yogurt, you need a little yogurt. Known as the starter, the blend of bacterial cultures will chow down on the lactose in the milk and convert it to lactic acid which changes the protein structure of the milk creating the thick texture and tangy taste of plain yogurt. Without it, you’ll end up with a pot of warm milk.
In general, you need 1 Tablespoon of starter per ½ gallon of milk. Too much starter can overcrowd the bacterial balance, leading to thin or lumpy yogurt. If you choose to include any add-ins like condensed milk or creamer, you will need 2 Tablespoons of starter per ½ gallon of milk.
Any brand of plain, unsweetened store-bought yogurt will work as long as it contains live or active cultures. (Check the label and ingredients list to ensure active cultures are present; ‘made with live or active cultures’ will not work). The taste and texture of your homemade yogurt will be determined by the starter, so use your favorite brand of plain yogurt. You can also use powdered yogurt starter following the package directions.
Be sure to use freshly opened yogurt. Once opened, the cultures start to wane so if you use older starter you may end up with thin, runny and/or lumpy yogurt. Do not use yogurt that has been opened for 7 days or longer.
Once you’ve made your first batch of homemade yogurt, freeze 1-2 Tablespoons from each batch to use as starters for future batches. This way you won’t have to buy yogurt every time you want to make yogurt! If you find after a while that your yogurt is coming out thinner than usual, it may be time to start over with fresh store-bought yogurt as the starter. Frozen yogurt is good to use as a starter for up to 6 months. Freezing does not kill the bacteria is just slows it down so after 6 months it can become weaker.
Pro Tips:
- Freeze yogurt in an ice cube tray (1 cube is approximately 1 Tablespoon).
- When ready to use, thaw out at room temperature for about 30 minutes before whisking into the milk.
Optional Add-Ins
If you haven’t quite grown accustomed to the taste of plain Greek yogurt, you can sweeten the yogurt by adding condensed milk or ultra-pasteurized liquid coffee creamer to the milk before incubating. If you want to add vanilla, pureed fruit, jam or other sweeteners like maple syrup or honey, it’s best to do so after the yogurt has fully chilled and set as they can slow down the culturing process.
Nutritionally speaking, the less added sugar there is the better. By making your own yogurt you can control the type and amount of sweetener used. If you need sweetened yogurt to start, gradually reduce the amount used overtime until you enjoy the taste of plain yogurt.
Set it and Forget It
Once you’ve selected your milk and starter, the fun begins!
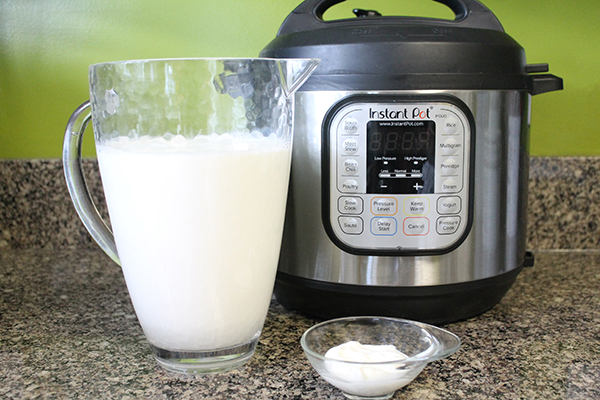
- In your Instant Pot, whisk together about a cup of milk and the starter until smooth.
- Pour remaining milk into the pot and whisk well to combine.
- Cover with a lid. You can use any lid that fits well (Instant Pot lid- sealed or vented, a glass lid, a large dinner plate, a silicone suction lid, etc.).
- Press the Yogurt button and set for 8-12 hours. The time will start to count up on the Instant Pot. The longer the incubation time, the tangier the yogurt will be. If using ultra-pasteurized, ultra-filtered milk (like this), incubate for 8-10 hours. If using organic milk (like this), it takes a bit longer to set so incubate for 10-12 hours.
Then walk away and go about your normal day. It’s truly that easy!
Pro Tip: Start your yogurt first thing in the morning or at bedtime. I prefer to start mine in the evening, wake up, transfer it to a strainer and place in the fridge to strain during the day.

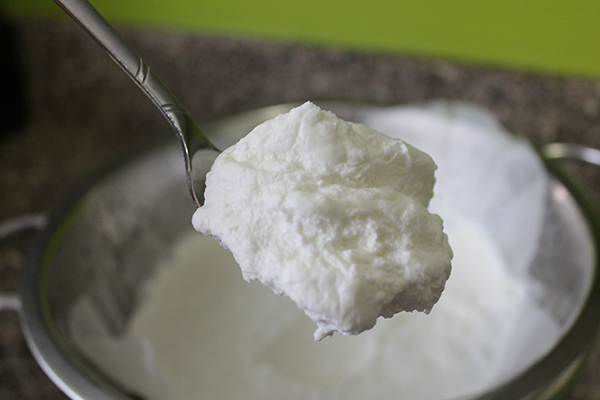
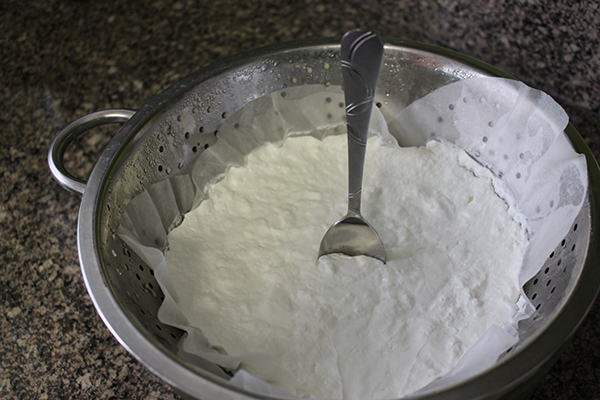
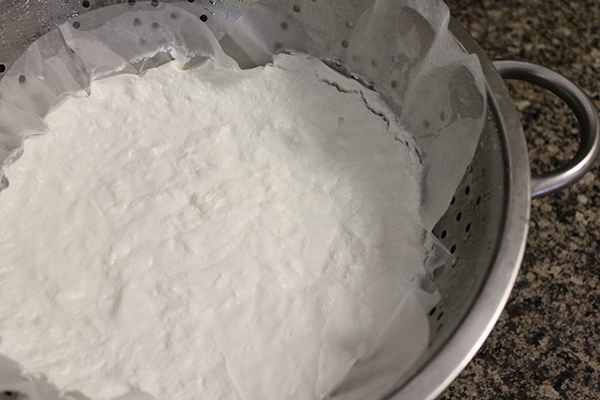
The Straining Process
While straining your yogurt is optional, it is required to make Greek yogurt. The straining process removes much of the lactose (natural milk sugar), resulting in a higher protein, lower carb Greek style yogurt. The clear, yellowish liquid that separates from the yogurt is called whey. It is a great source of nutrients so don’t pour it down the drain! Check out Yes, Whey! for creative uses for leftover whey.
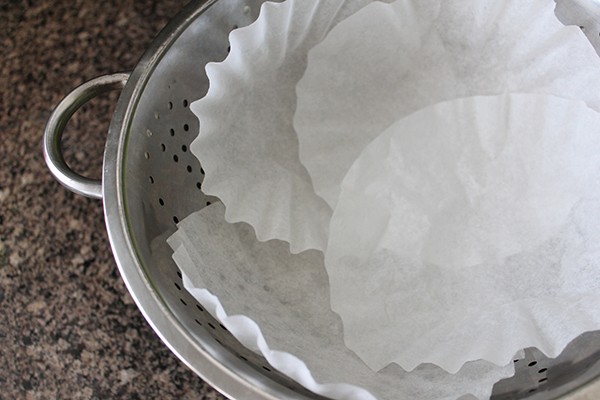
While there are strainers designed specifically for yogurt (like this), you likely have all the materials you need already in your kitchen. To save time and free up your Instant Pot, you can strain and chill your yogurt at the same time, immediately transferring it to a strainer when it’s done incubating. However, if you find that yogurt solids are getting into your whey, you may want to let it chill in the pot in the fridge for a few hours before transferring it to a strainer.
- Line a colander with coffee filters or cheesecloth and place over a large bowl. You could also use a nut milk bag, white cotton pillowcase, linen towel, etc.
- Slowly pour yogurt into the strainer. Do not stir until fully chilled and strained! Stirring will disturb the cultures and can mess up the setting process.
- Cover with plastic wrap and put in the fridge for 4-12+ hours. The longer it strains, the thicker and tangier the yogurt will be.
Time to Eat!
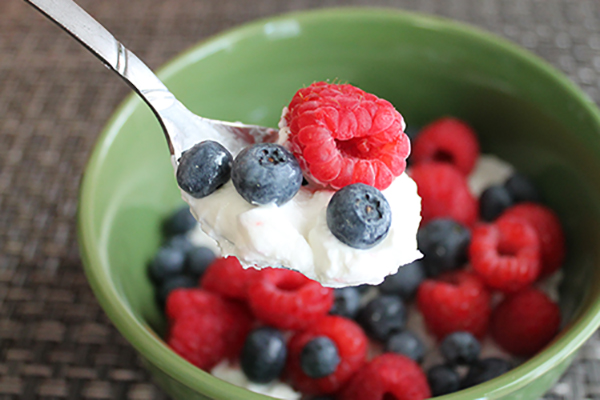
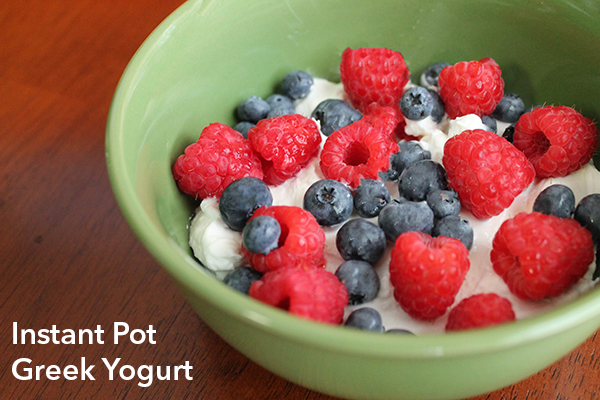
Now that your yogurt has set, chilled and strained, it’s time to enjoy the fruits of your labor! Store in air-tight containers in the fridge for up to 2 weeks.
Top with fresh or frozen fruit, granola, flax seeds and/or nuts; stir into chicken salad in place of mayo; mix with a few herbs for a fantastic vegetable dip; or throw into a smoothie for a creamy boost of protein.
For more information, check out what the creator of the cold start method has to say.
Instant Pot Greek Yogurt
Makes 4 cups
PRINT RECIPE
Ingredients
½ gallon unsweetened ultra-pasteurized milk
1 Tbsp plain, unsweetened yogurt with live cultures
Directions
1. In your Instant Pot, whisk together about a cup of milk and the starter until smooth.
2. Pour remaining milk into the pot and whisk well to combine.
3. Cover with a lid. You can use any lid that fits well (Instant Pot lid- sealed or vented, a glass lid, a large dinner plate, a silicone suction lid, etc.).
4. Press the Yogurt button and set for 8-12 hours. The time will start to count up on the Instant Pot. The longer the incubation time, the tangier the yogurt will be. If using ultra-pasteurized, ultra-filtered milk (like this), incubate for 8-10 hours. If using organic milk (like this), it takes a bit longer to set so incubate for 10-12 hours.
5. Remove lid when time is up (YOGT will show on the Instant Pot display).
6. Line a colander with coffee filters or cheesecloth and place over a large bowl. You can also use a yogurt strainer (like this).
7. Slowly pour yogurt into the strainer. Do not stir until fully chilled and strained. Cover with plastic wrap and put in the fridge to strain for 4-12+ hours. The longer it strains, the thicker the yogurt will be.
8. Transfer yogurt to air-tight containers and store in the fridge up to 2 weeks.
9. Pour the whey (the liquid that separates from the yogurt and collects in the bowl) into a glass jar or other air-tight container and store in the fridge to use later in smoothies, breads, pancakes, muffins and more.
Notes
- Be sure to use ultra-pasteurized milk! Check the milk carton carefully to ensure you have the right type. Regular pasteurized milk will not work for this preparation method as the milk is not heated enough to kill off unwanted bacteria.
- Whole or 2% milk works best and will produce thick and creamy yogurt. The less fat there is in the milk, the thinner the yogurt will be.
- The yogurt used as the starter should list live or active cultures on the label.
- If you don’t want to buy yogurt to use as a starter each time, freeze 1-2 Tbsp of each batch of homemade yogurt to use for future batches.
- Place yogurt in an ice cube tray (1 cube is approximately 1 Tbsp).
- As soon as the yogurt is frozen, transfer to a freezer bag or container.
- When ready to use, thaw out at room temperature for about 30 minutes.
- Frozen yogurt is good to use as a starter for up to 6 months.